
What a star-projector toy taught me about viewing angles, datasheets, optical safety, lead stress, and a strange ability LEDs have to detect light
By Leon | TOY R&D
At TOY R&D, I want to document more than the “big” technologies behind toys.
Some of the most expensive lessons in product development come from components that look too small and too cheap to deserve much attention.
LEDs are a perfect example.
A conventional through-hole LED may cost only a few cents. Because of that, the engineering discussion around it is often surprisingly short:
“Put a white LED here.”
“Make it brighter.”
“Can we change this one to blue?”
And then the project moves on.
After working on a star-projection toy years ago, I stopped thinking about LEDs that way.
Because I learned that a component worth only a few cents can easily cost a development team several weeks.
We Thought the Solution Was Simple: Use a Brighter LED
The product was a typical children’s star projector.
There was an LED at the bottom of the product and a dome above it.
The dome contained many cut-out shapes — stars, moons and other patterns.
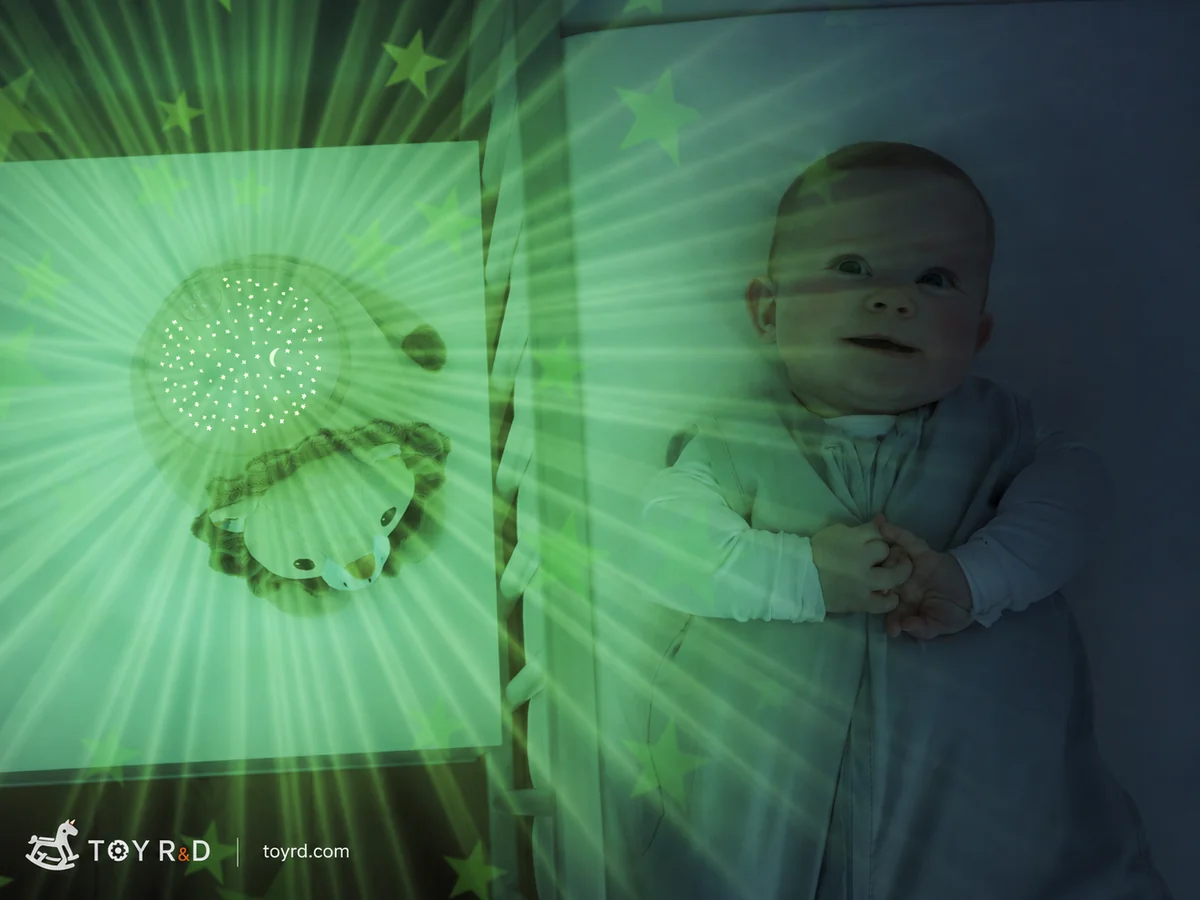
When the LED turned on, light passed through the openings and projected those shapes onto the walls and ceiling.
The concept looked almost too simple to get wrong.
So when the projection was weak, our first assumption was obvious:
The LED wasn’t bright enough.
We tried brighter LEDs.
It didn’t solve the problem.
Some LEDs looked extremely bright when viewed directly, yet performed badly once installed inside the product.
Some created a bright center with almost no useful light around the edges.
Some produced fuzzy stars.
Others were almost uncomfortable to look at directly, yet the projected pattern on the ceiling remained disappointingly dim.
We changed LEDs.
We adjusted distances.
We changed suppliers.
We changed mounting heights and power levels.
After spending far too much time on the problem, I finally started paying serious attention to one parameter that had originally looked almost secondary:
Viewing angle.
The Tiny Reflector Inside a Through-Hole LED
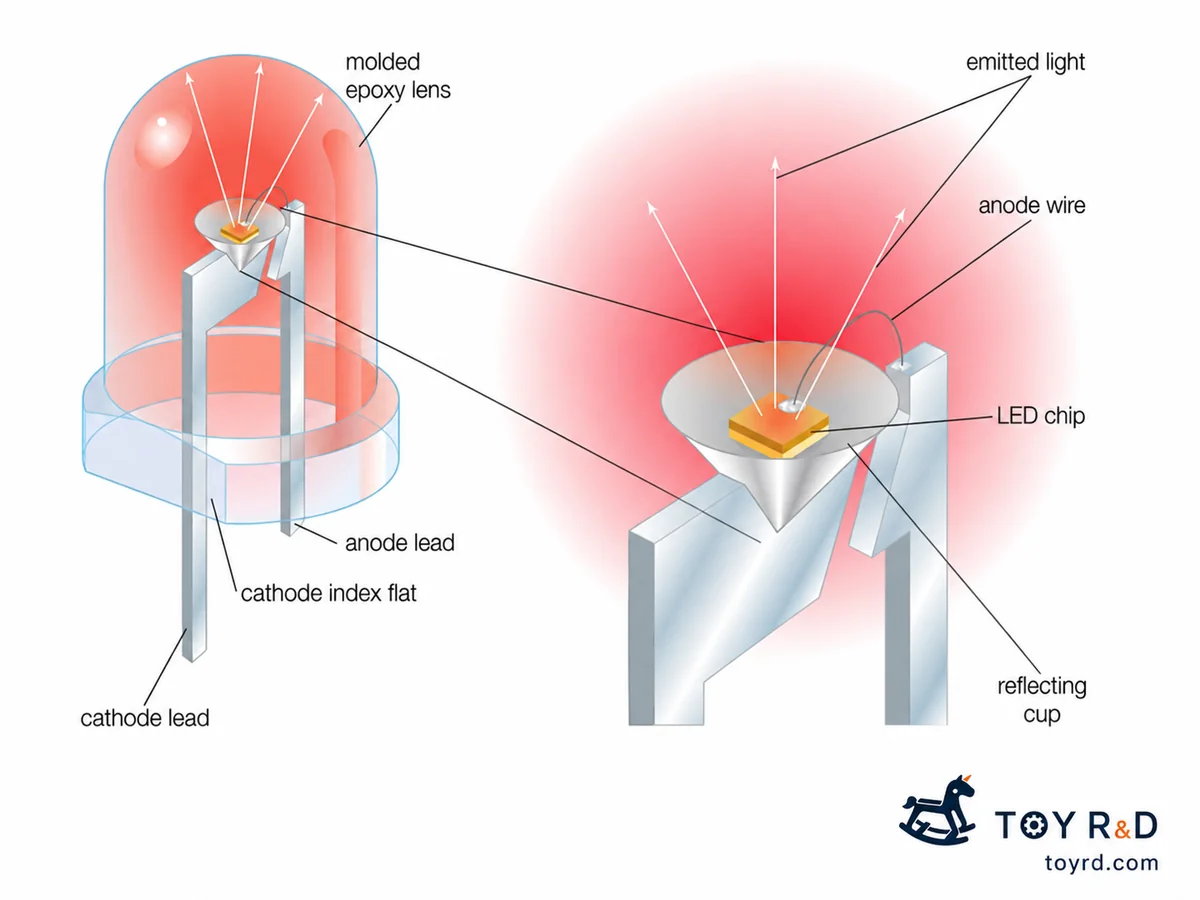
A traditional through-hole LED is more than an LED die buried inside transparent epoxy.
The die is mounted on a metal lead-frame structure, part of which can help control and reflect the emitted light.
In parts of the Chinese LED supply chain, people sometimes informally call this structure the “lamp cup.”
In English, reflector cup or cup reflector is a better description.
The geometry can vary significantly.
Some packages have a relatively narrow cup-like structure.
Others are much more open.
Together with the position of the die and the shape of the external epoxy lens, this contributes to the final spatial light distribution.
That turned out to be the key to our projector.
The Best LED Wasn’t the Brightest. It Was the Widest.
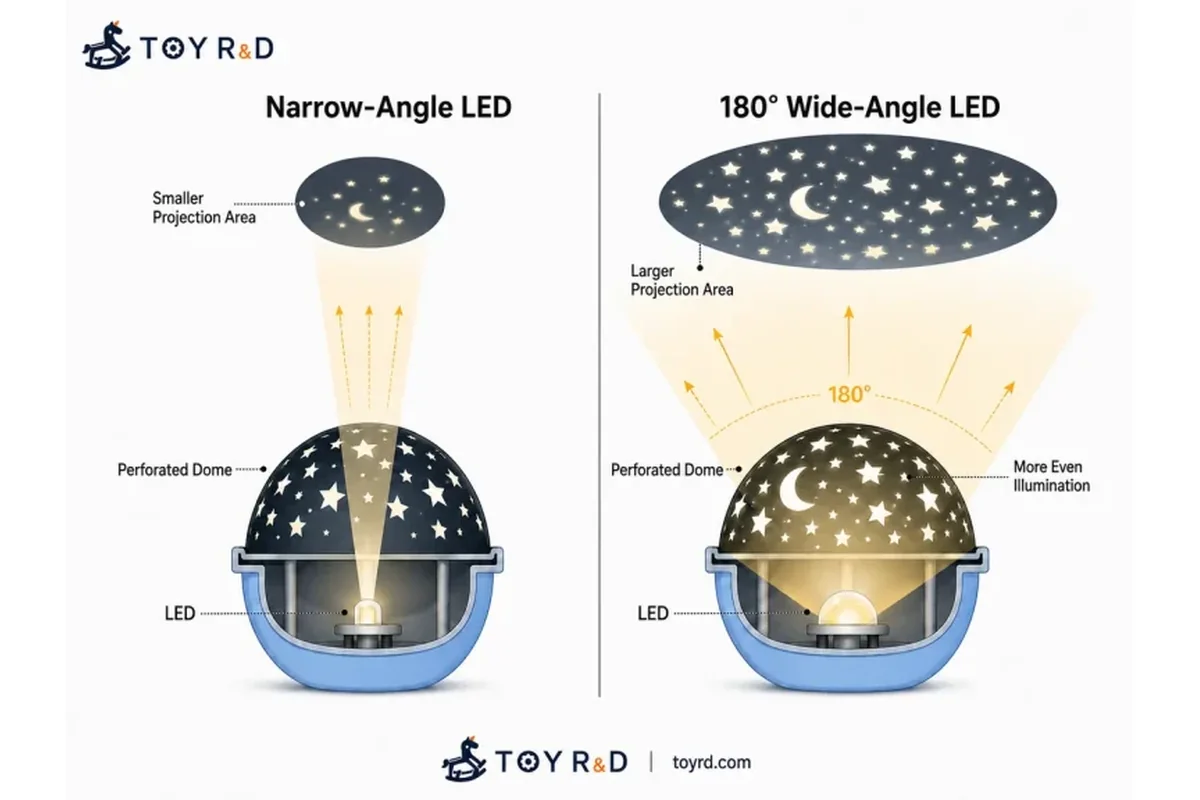
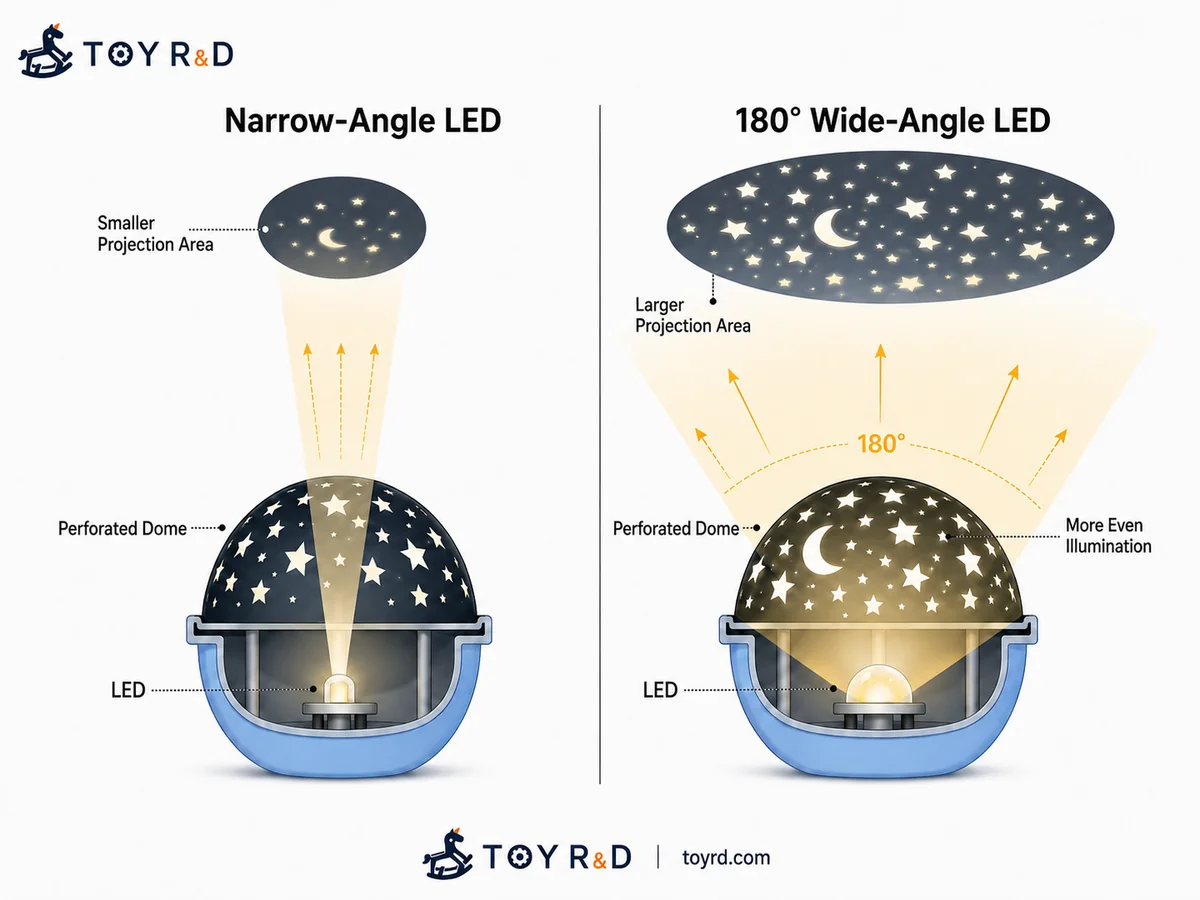
After testing many LEDs, the best performer in that particular mechanical design was a very wide-angle LED, with a viewing angle close to 180°.
Its internal reflector geometry also appeared much more open than the conventional narrow-angle LEDs we had tested.
The difference was easy to see.
A narrow-angle LED concentrated too much light around the center.
But our projector did not need a bright spot in the middle.
It needed to illuminate as much of the perforated dome as possible.
With the wider light distribution, more of the outer stars and moons received useful illumination, and the overall projection on the walls and ceiling improved dramatically.
There is an important qualification here.
I am not saying:
Every star projector should use a 180° LED.
Optical performance also depends on:
- distance between the LED and the projection mask
- emitter size
- viewing angle
- external lens geometry
- reflector-cup geometry
- curvature of the dome
- size of the openings
- internal reflections
- LED mounting height
- ambient-light conditions
In our design, a viewing angle close to 180° was the best result after substantial real-world testing.
It was an empirical solution, not a universal optical law.
But the project permanently changed the way I specify LEDs.
For an optical-effect toy, asking only how bright an LED is tells you very little.
Why Some Star Projectors Produce Little More Than a Blob of Light
After that project, I began noticing similar products differently.
Some have everything they appear to need:
a dome,
star-shaped openings,
a reasonably bright LED,
and a dark room.
Yet when switched on, the “stars” are little more than vague blobs of light.
The mechanical design may not always be the real problem.
Sometimes nobody seriously specified the light source.
The supplier asks:
“White LED OK?”
The engineer says:
“OK.”
Purchasing finds a white LED with approximately the right brightness and an attractive price.
The project continues.
Only after the PCB, tooling and plastic structure are almost complete does someone finally notice that the optical effect is poor.
At that point, replacing a few-cent LED may no longer be a few-cent change.
It can affect:
- mounting height
- PCB layout
- current-limiting resistor
- operating current
- plastic geometry
- distance between the source and projection dome
The cheapest component in the product suddenly starts pulling the entire project behind it.
That is one of the strange things about product development:
The cheaper a component looks, the easier it is to underestimate it.
TOY R&D Supplier Tip: Ask for the Datasheet Before You Compare Prices
Over time, I developed a simple habit when evaluating LED suppliers.
Before taking a supplier seriously, I ask:
“Can you send me the official datasheet for this exact part number?”
The answer can reveal much more than a quotation sheet.
Some suppliers provide little more than a basic table.
The document may not clearly define:
- viewing angle
- forward voltage
- luminous intensity or luminous flux
- dominant wavelength
- CCT
- test current
- mechanical dimensions
Ask about binning, optical distribution, test conditions or batch consistency, and the answers may become vague.
That does not necessarily mean the factory cannot manufacture an LED that lights up.
But there is a difference between producing something that emits light and manufacturing a controlled optoelectronic component.
Sometimes You Can See Engineering Discipline Before You Power Up the Sample
With more professional LED suppliers, the difference often begins with the packaging.
Look at the bag.
Look at the label.
Look at the exact part number.
Look for lot information.
Look for binning.
Look at traceability between batches.
Then open the datasheet.
A useful LED datasheet should normally allow an engineer to understand information such as:
- viewing angle
- forward voltage
- luminous intensity or luminous flux
- dominant or peak wavelength, or CCT
- test current
- absolute maximum ratings
- mechanical dimensions
- operating conditions
- binning information
- soldering and handling precautions
A polished datasheet does not automatically guarantee a good LED.
But if a supplier cannot clearly define the basic characteristics of its own component, I become much more cautious about putting that part into mass production.
Return to the projection example:
If the datasheet does not even specify the viewing angle, you may not really know what optical component you are buying.
The More Expensive LED Can Easily Be the Cheaper Choice
Toy development is extremely cost-sensitive.
That is normal.
But I have become increasingly uncomfortable with comparisons like:
Supplier A: ¥0.08 Supplier B: ¥0.12
Therefore Supplier A is “cheaper.”
If Supplier B provides:
consistent binning,
a proper datasheet,
lot traceability,
well-defined mechanical dimensions,
and stable optical performance,
is that extra ¥0.04 really a cost?
Maybe not.
If the cheaper LED eventually causes:
another prototype,
a PCB revision,
mechanical changes,
color variation between batches,
brightness inconsistency,
or repeated compliance testing,
those few cents disappear very quickly.
One sentence summarizes the lesson well:
A datasheet is not only a place to look up specifications. Sometimes it is also a health check for the supplier.
A Datasheet Is Becoming Relevant to Compliance, Not Just Engineering
For electrically operated toys, optical radiation is also a safety issue that needs to be treated seriously.
IEC 62115 Amendment 1:2025 revised Annex E for toys incorporating optical radiation sources. Among the updates is a pathway that makes use of technical LED datasheet information when assessing compliance with specified Accessible Emission Limits (AEL), together with updated optical-radiation measurement details.
I find that particularly interesting.
Something I originally learned as a supplier-selection habit — ask for a proper LED datasheet — increasingly connects with the compliance process as well.
For European projects, however, it is still important to distinguish between the latest international IEC publication and the exact standard version currently applicable to the product and accepted by the final laboratory.
The safest engineering habit is not to rely on memory.
It is to confirm:
which standard edition actually applies to the project, and which basis the final test laboratory will use.
TOY R&D Compliance Note: Why Can Two Laboratories Give You Very Different Answers?
I once lost a lot of time on an LED toy because of optical-radiation testing.
One part was particularly confusing.
Different laboratories gave us very different practical feedback.
At one point, a small local laboratory appeared to apply a more conservative judgment than a large international test house in Hong Kong.
It is tempting to conclude:
“Different laboratories have different standards.”
That is not the best way to describe it.
A laboratory is not supposed to invent its own safety limits.
But real test outcomes and engineering advice can be influenced by details such as:
- how the worst-case operating mode is established
- measurement distance
- measurement direction
- accessible viewing angles
- test setup
- measurement method
- interpretation of the applicable clause
- quality of the LED technical information
- which edition or regional adoption of the standard applies
In other words:
The difference is often not the standard itself, but how the product is tested and how the result is interpreted.
Sometimes the Most Expensive Laboratory Is the Cheapest Development Path
That project gave me another practical lesson.
During the concept stage, asking several laboratories for opinions can make sense.
But once:
tooling is already underway,
the PCB is close to final,
the customer already knows which laboratory it will ultimately accept,
and one safety question is consuming days of engineering discussion,
asking five more laboratories:
“Do you think it will pass?”
may no longer be the cheapest option.
Sometimes it is better to send the real sample directly to the laboratory that ultimately matters and pay for an early pre-test.
The test may be expensive.
But so are:
two weeks of engineering time,
another PCB revision,
another prototype round,
international sample shipping,
mechanical changes,
and a delayed launch.
That project left me with a rule I still remember:
Sometimes the most expensive test is actually the cheapest development path.
Another Small Through-Hole LED Trap: Do Not Assume It Should Be Pushed Flush Against the PCB
There is another easily overlooked detail with conventional through-hole LEDs.
A common production instinct is:
insert the LED,
push it all the way down to the PCB,
solder it,
then trim the remaining leads.
It looks perfectly reasonable.
But different LED packages have specific mechanical requirements for their leads.
Some through-hole LEDs also have small shoulders, standoffs or locating features on the lead frame.
These features are not identical across all packages, so the correct lesson is not:
“Every LED must sit a fixed distance above the PCB.”
The correct lesson is:
Read the datasheet and handling precautions for the exact package.
Many LED manufacturers specifically warn against transferring mechanical stress from lead bending, forming or trimming into the base of the resin package.
Some through-hole LED datasheets also specify a minimum distance between the package body and the point where the lead may be bent.
That is very different from assuming that an LED is safe simply because:
“we pushed it down, soldered it, cut the leads, and it still lights.”
Immediate function is not the same as long-term reliability.
Mechanical stress can affect the resin package, lead frame or internal connection without creating an instant failure.
The Strangest LED Trick: It Can Actually “See” Light
One of my favorite LED facts is something many people never use:
An LED can detect light.
An LED is a semiconductor junction.
Under suitable illumination, it can exhibit a photovoltaic effect and generate a small electrical response.
In the right circuit, an ordinary LED can even be used as a very simple light-sensitive device.
Possible uses include:
- basic ambient-light sensing
- optical communication
- light-triggered interaction
- very low-cost light-detection tricks
There are important limitations.
An LED is not automatically a replacement for a proper ambient-light sensor.
Its spectral response is selective, and sensitivity, consistency, circuit design and ambient interference all need to be tested.
But from a toy-design perspective, the idea is fascinating.
A component already sitting in the BOM to emit light may, under the right hardware and software conditions, also participate in detecting light.
A Few-Cent LED Is Really a Small Engineering System
Today, when I specify an LED for a toy, I rarely stop at:
“Is it bright enough?”
I also want to know:
What is the viewing angle?
What does the light distribution look like?
What current will we actually use?
What are the mechanical mounting requirements?
How far should the package sit from the PCB?
Does the supplier have a real datasheet?
Is there bin control?
Can we trace production lots?
Can a child directly view the source?
Do we need an optical-radiation assessment?
Could the LED perform some other useful function in the design?
Each question looks small on its own.
But toy development is built from hundreds of small questions like these.
The difference between:
“it lights up”
and
“the effect looks right,”
between:
“the prototype works”
and
“we can mass-produce it reliably,”
and between:
“we think it is safe”
and
“the final test laboratory agrees”
is rarely one spectacular engineering breakthrough.
More often, it is a collection of details that somebody cared enough to investigate.
That is exactly what I want to keep documenting at TOY R&D:
the development lessons that may occupy one line in a datasheet and cost only a few cents on the BOM — but can take weeks of real project work to truly understand.
After that star-projector project, I never looked at an LED as:
“just a little light”
again.
Have a question or a correction? Send feedback on this article.
Was this article helpful?
Your feedback helps improve these field notes.
No account needed. Your choice is remembered in this browser. Privacy policy