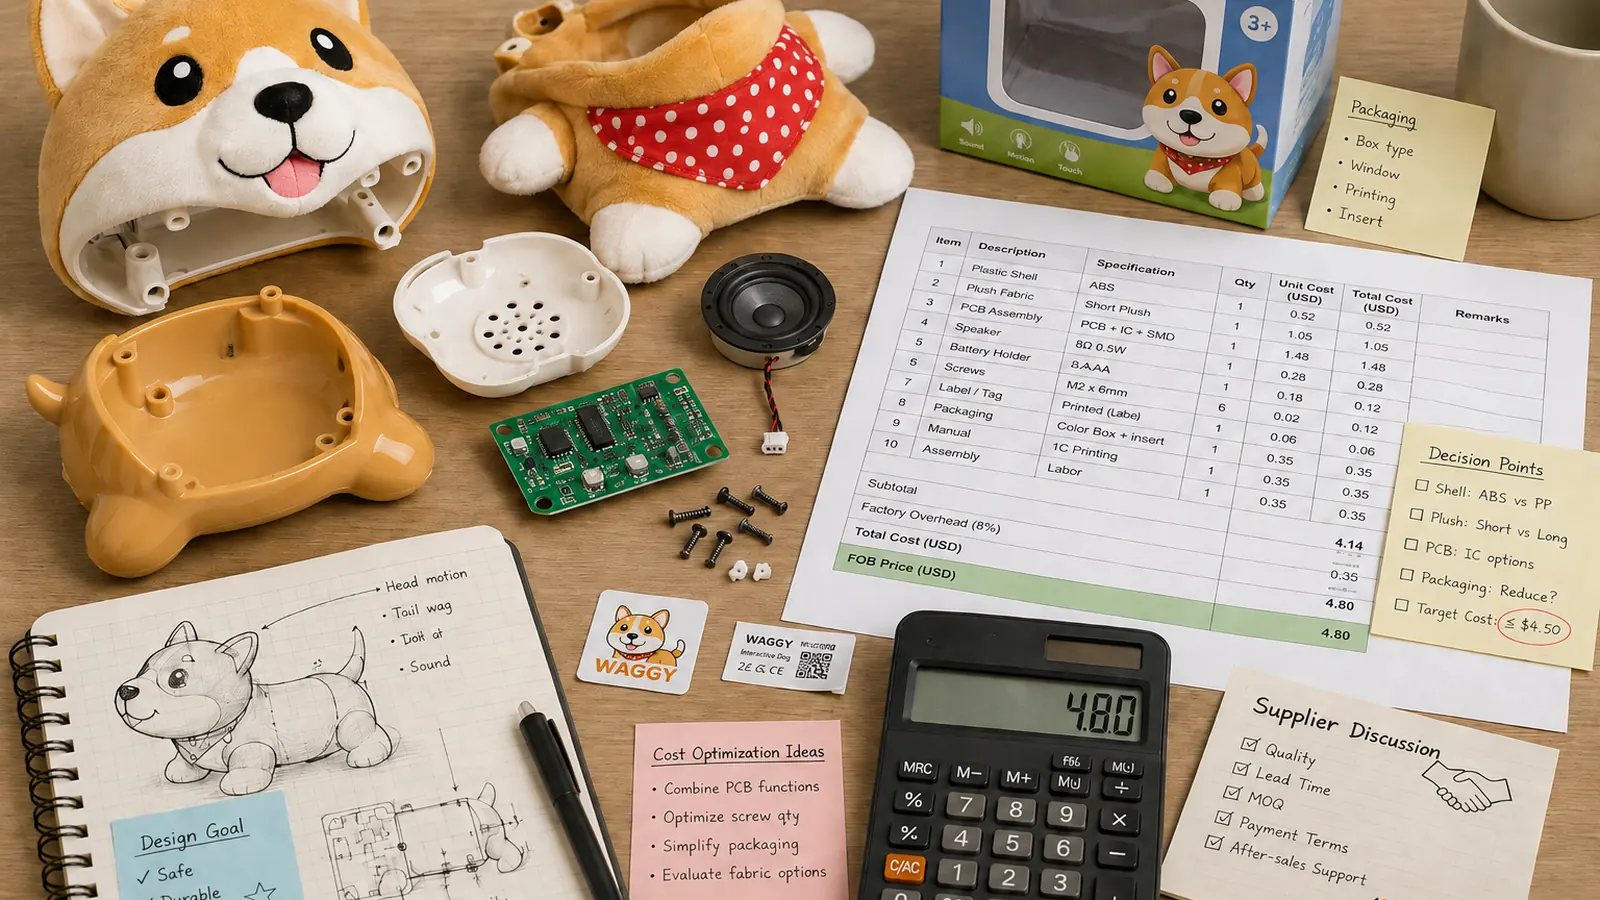
When developing a product, it is easy to fall into a familiar assumption:
If we want a better result, we should use a better material.
If we want a stronger structure, we upgrade the material.
If we want the electronics to be thinner, we choose a more advanced circuit solution.
If we want the product to feel more premium, we add more parts, more processes, and more cost.
But after working on enough real-world products, I have become increasingly convinced that this is not always the right way to think.
Sometimes, a very ordinary — even seemingly “low-end” — material can create an unexpectedly refined result when it is used in exactly the right place.
The important question is not how sophisticated the material is.
The important question is:
What problem do you actually need it to solve?
A Lighting Problem Inside a Flexible Structure
The solution should meet the real bending, lighting, weight, and cost requirements—nothing more.
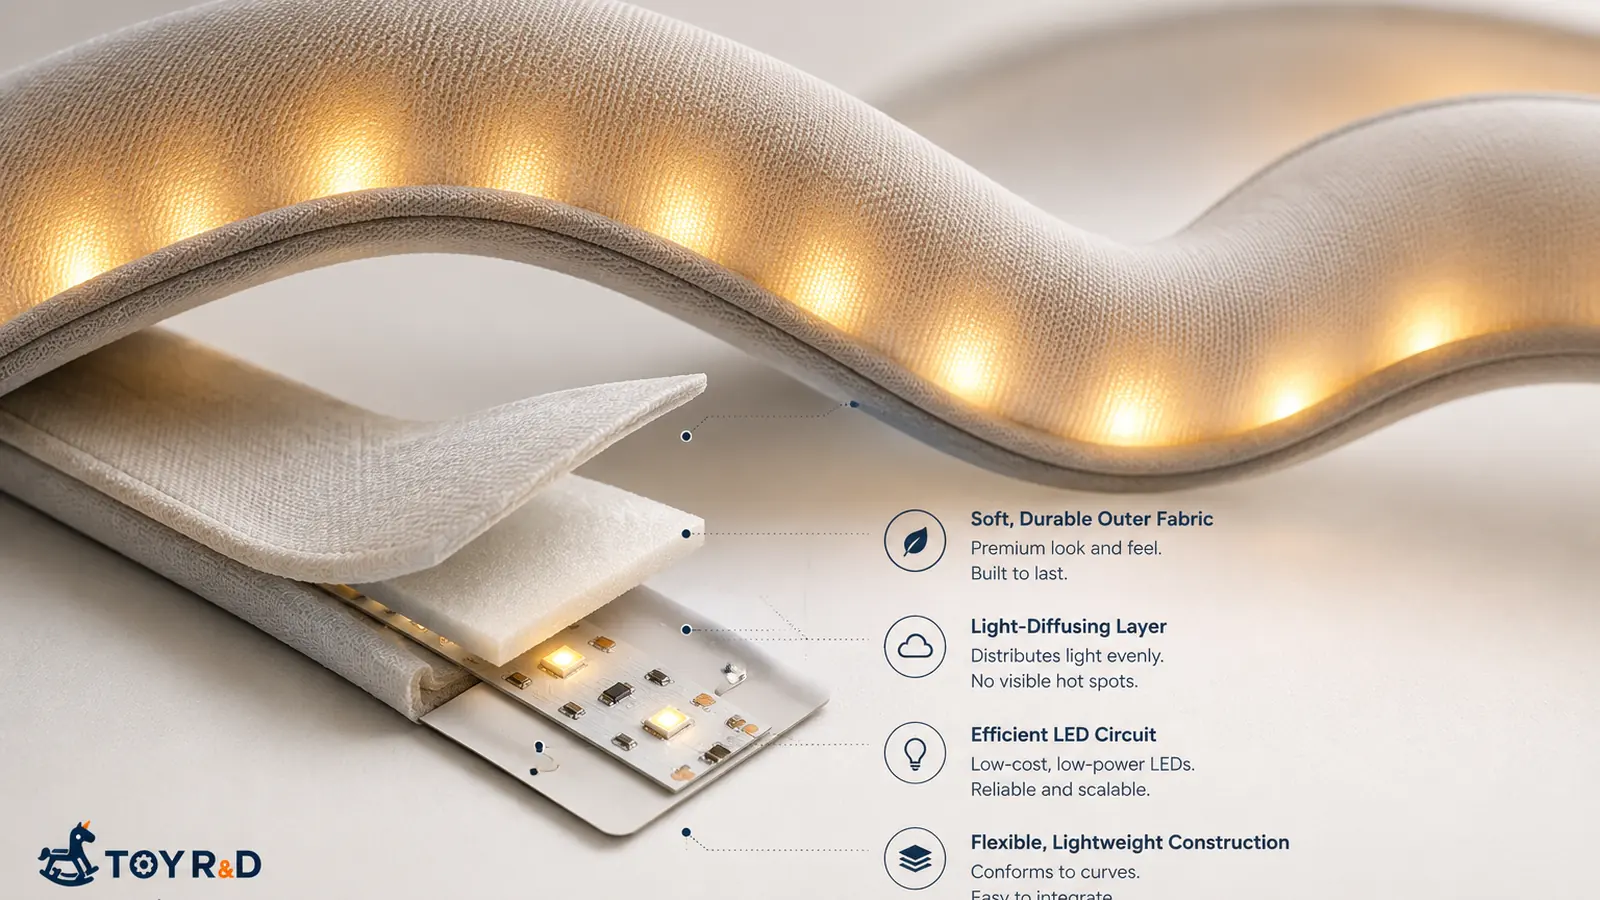
In one project, we needed to add a lighting effect inside a soft, flexible textile structure.
From an electronics perspective, this did not seem particularly complicated.
If a structure needs to bend while carrying multiple LEDs, one of the most obvious solutions is:
Use a flexible printed circuit, or FPC.
That is exactly what FPC is designed for.
It is thin, flexible, suitable for mounting LEDs, and technically easy for an electronics engineer to justify.
On paper, it looks like the standard answer.
But product development is different from pure electronics engineering.
A technically correct solution is not always the best product solution.
So we went back and looked at the actual requirements again.
Did the structure really need a full flexible circuit?
Did it need to survive repeated, extreme folding?
Did it require high-density routing?
High-speed signals?
Very tight dimensional tolerances?
Not really.
The real requirements were much simpler:
It needed to carry LEDs.
It needed to conduct electricity.
It needed to tolerate a certain degree of bending with the textile structure.
It needed to stay lightweight.
It had to remain hidden inside the product.
And it had to be inexpensive.
Once the requirements were broken down this way, the problem changed.
We were no longer asking:
“What is the best flexible circuit solution?”
We were asking:
“What is the lowest-cost structure that can reliably meet these actual requirements?”
Those two questions sound similar.
But they can lead to very different answers.
A Solution That Did Not Look “Premium”
The final solution was not a conventional high-spec flexible circuit.
Instead, we used a very low-cost circuit structure built on a substrate that naturally offered a useful degree of flexibility.
By itself, the material was not impressive.
It was not something a marketing team would put on the front of the package.
The end user would probably never know it existed.
But inside the right product structure, it did exactly what we needed.
The LEDs could be distributed along the flexible section.
The overall assembly could still bend sufficiently.
The electronics could remain hidden inside the textile construction.
And the user could still clearly perceive the intended lighting effect.
What the customer experienced looked more sophisticated than what the internal cost structure might suggest.
That is one of the most interesting things about product development.
The user experiences the result, not the BOM.
“Cheap” Does Not Mean “Bad”
A lower-cost structure is valuable when it reliably delivers the performance the product genuinely needs.
There is an important distinction here.
Cost optimization is not simply about finding a cheaper component.
If you replace a two-dollar part with a one-dollar part but create more failures, more assembly difficulty, more rework, more compliance risk, or more after-sales problems, that is not real cost optimization.
Good cost engineering means:
Finding a lower-cost solution that still satisfies the performance the product genuinely requires.
In some cases, a simpler and cheaper structure may even be more suitable for mass production than a supposedly “better” solution.
That is why I do not find it particularly useful to divide materials into:
premium materials and low-end materials.
A better distinction is:
the right material and the wrong material.
Do Not Choose the Material First and Justify It Later
Engineers naturally tend to begin with the technologies they already know.
An electronics engineer sees a flexible structure and thinks of FPC.
A mechanical engineer sees a connection problem and thinks of screws, snap-fits, or reinforcement ribs.
A supplier sees an appearance issue and may immediately suggest painting, UV printing, IMD, or another added component.
None of these solutions are necessarily wrong.
The problem is that we sometimes move too quickly into how to build something before clearly defining what the product actually needs.
A useful habit in product development is to ask, before choosing the solution:
What conditions does this feature truly need to satisfy?
Then break those conditions down.
For example:
How much does it actually need to bend?
How many bending cycles does it need to survive?
Can the user touch this component?
What is the realistic product life requirement?
Is the feature carrying a functional load, or is it mainly creating a visual effect?
Is this level of performance genuinely required by the product, or was it added by the engineering team simply because it was possible?
A surprising amount of unnecessary cost enters a product before these questions have been properly answered.
Premium Products Do Not Always Come From Expensive Parts
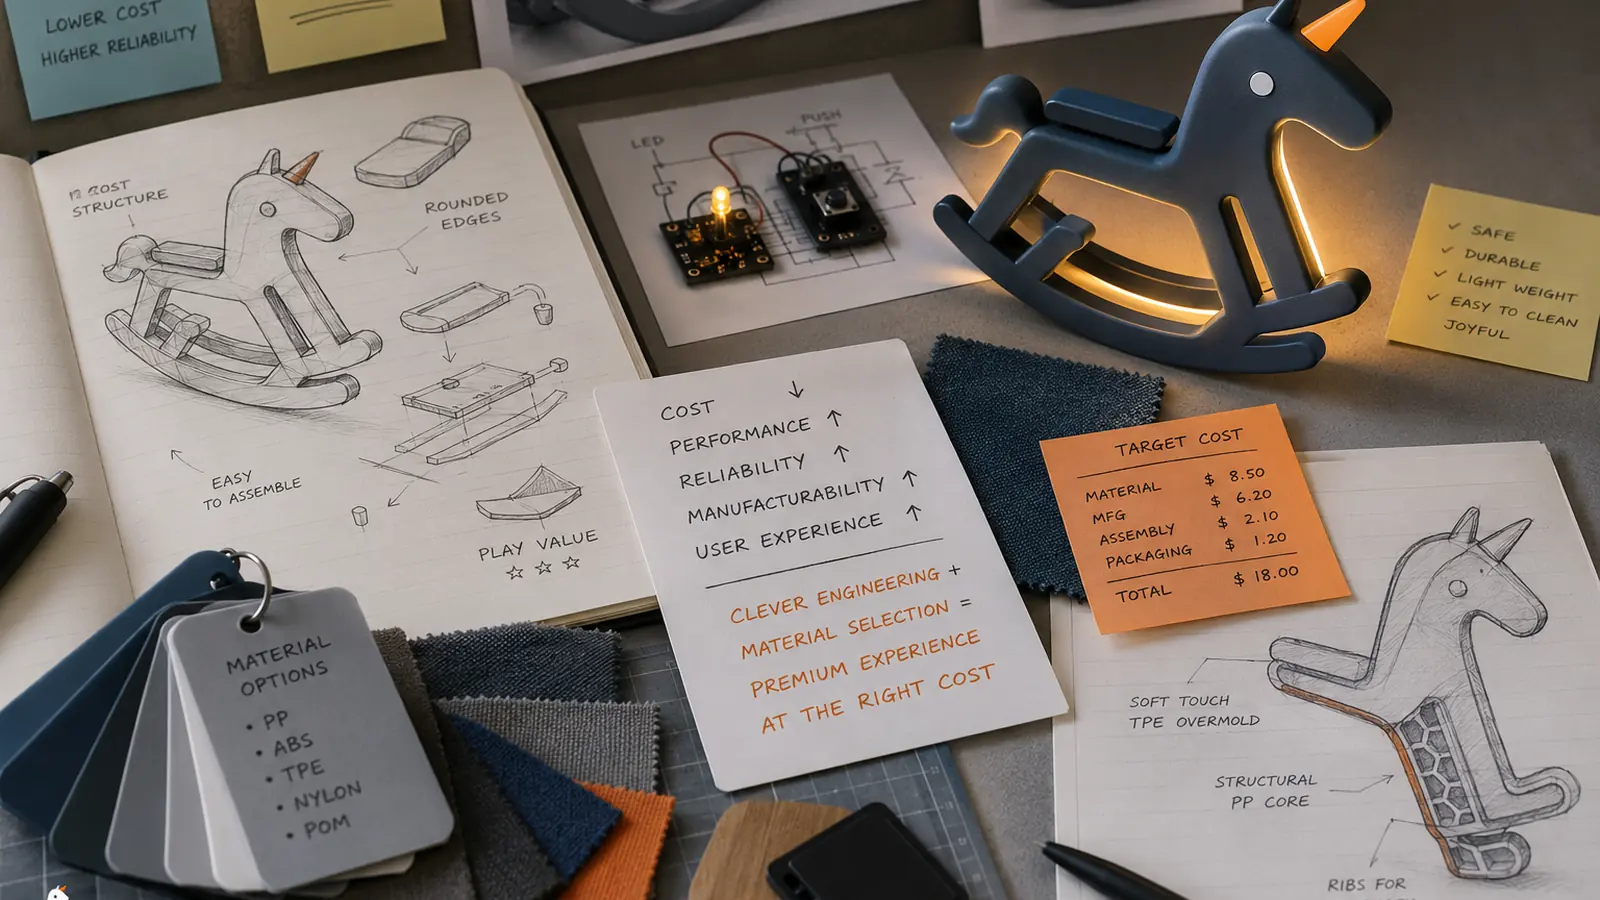
The best material decision is the one that creates the intended experience without spending where the customer gains no value.
I increasingly enjoy studying products that are clever on the outside and surprisingly simple on the inside.
They create strong perceived value without relying on excessive material cost.
In many ways, that is harder than simply using expensive components.
Because good product engineering is not:
“I know an advanced technology, so I should put it into the product.”
It is:
“I know many possible technologies, but I will only use the one this product actually needs.”
That is why opening a well-designed mass-produced product can sometimes create a strange reaction:
“That is all there is to it?”
But this kind of simplicity is rarely accidental.
It is often what remains after many rounds of trade-offs, simplification, testing, and decision-making.
A ToyRD Product Development Principle
At ToyRD, these are exactly the kinds of engineering decisions I want to keep documenting.
Not simply:
Which material is the best?
Which chip is the most advanced?
Which manufacturing process is the most sophisticated?
But rather:
What is the most reasonable choice when cost, performance, reliability, manufacturability, and user experience all have to be balanced at the same time?
Great products are not always great because they use expensive things.
Often, they are great because someone understood precisely:
where the money should be spent — and where it should not.
Sometimes, a very ordinary material, used in exactly the right place, can create a surprisingly extraordinary result.
That may be one of the most interesting parts of product development.
*Some product details in this case have been generalized to protect project confidentiality.*
In toy development, material cost is easy to see.
Engineering cost is not.
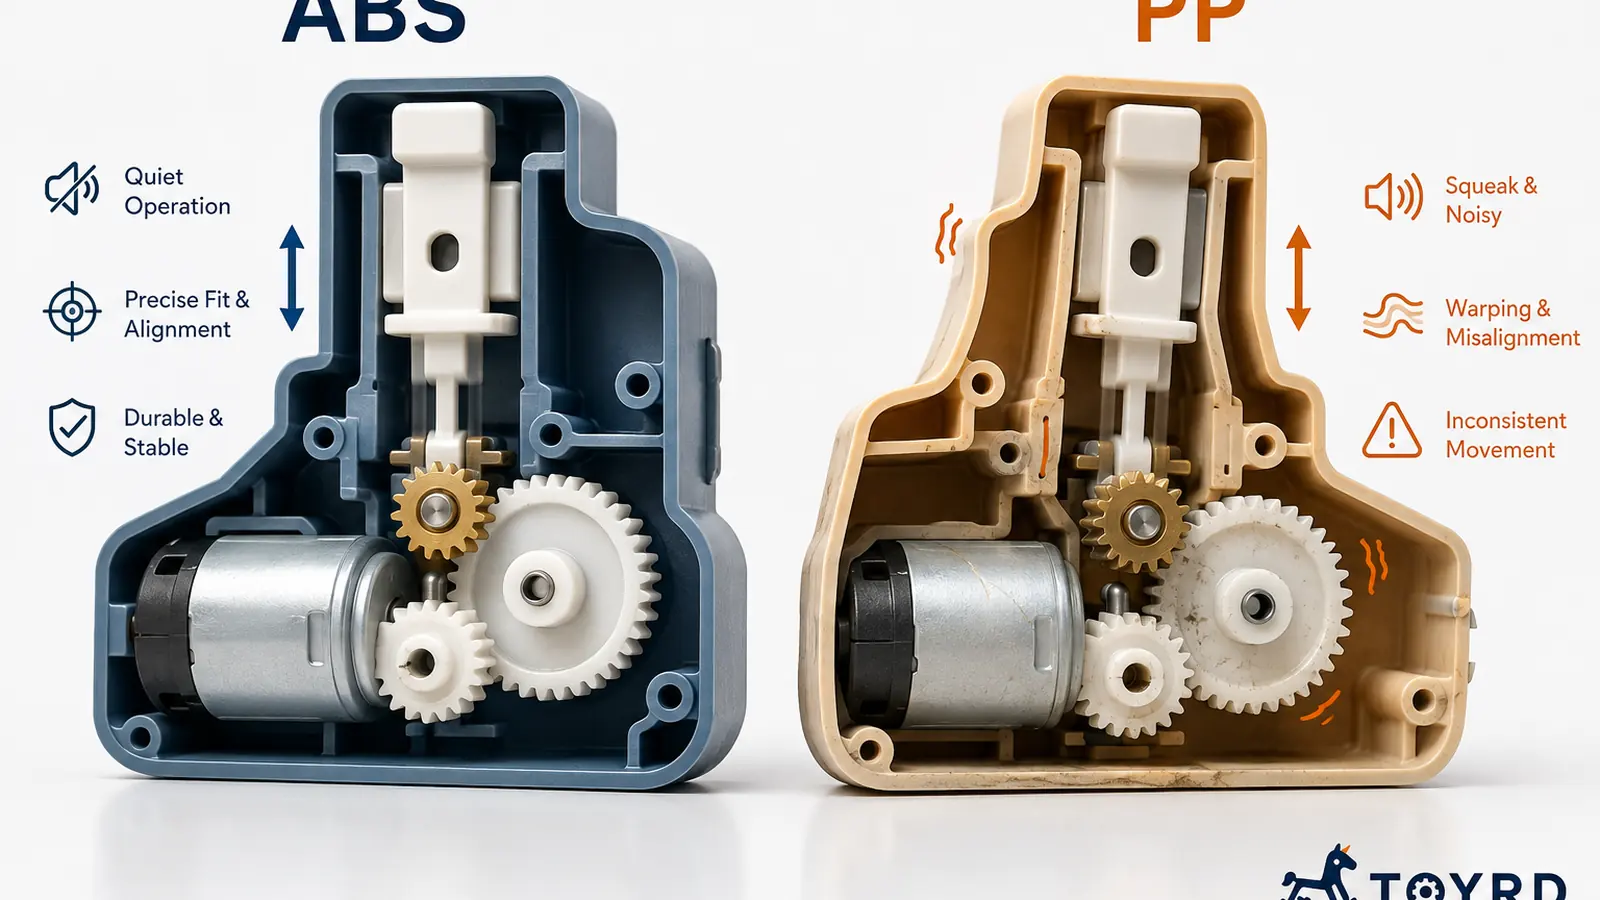
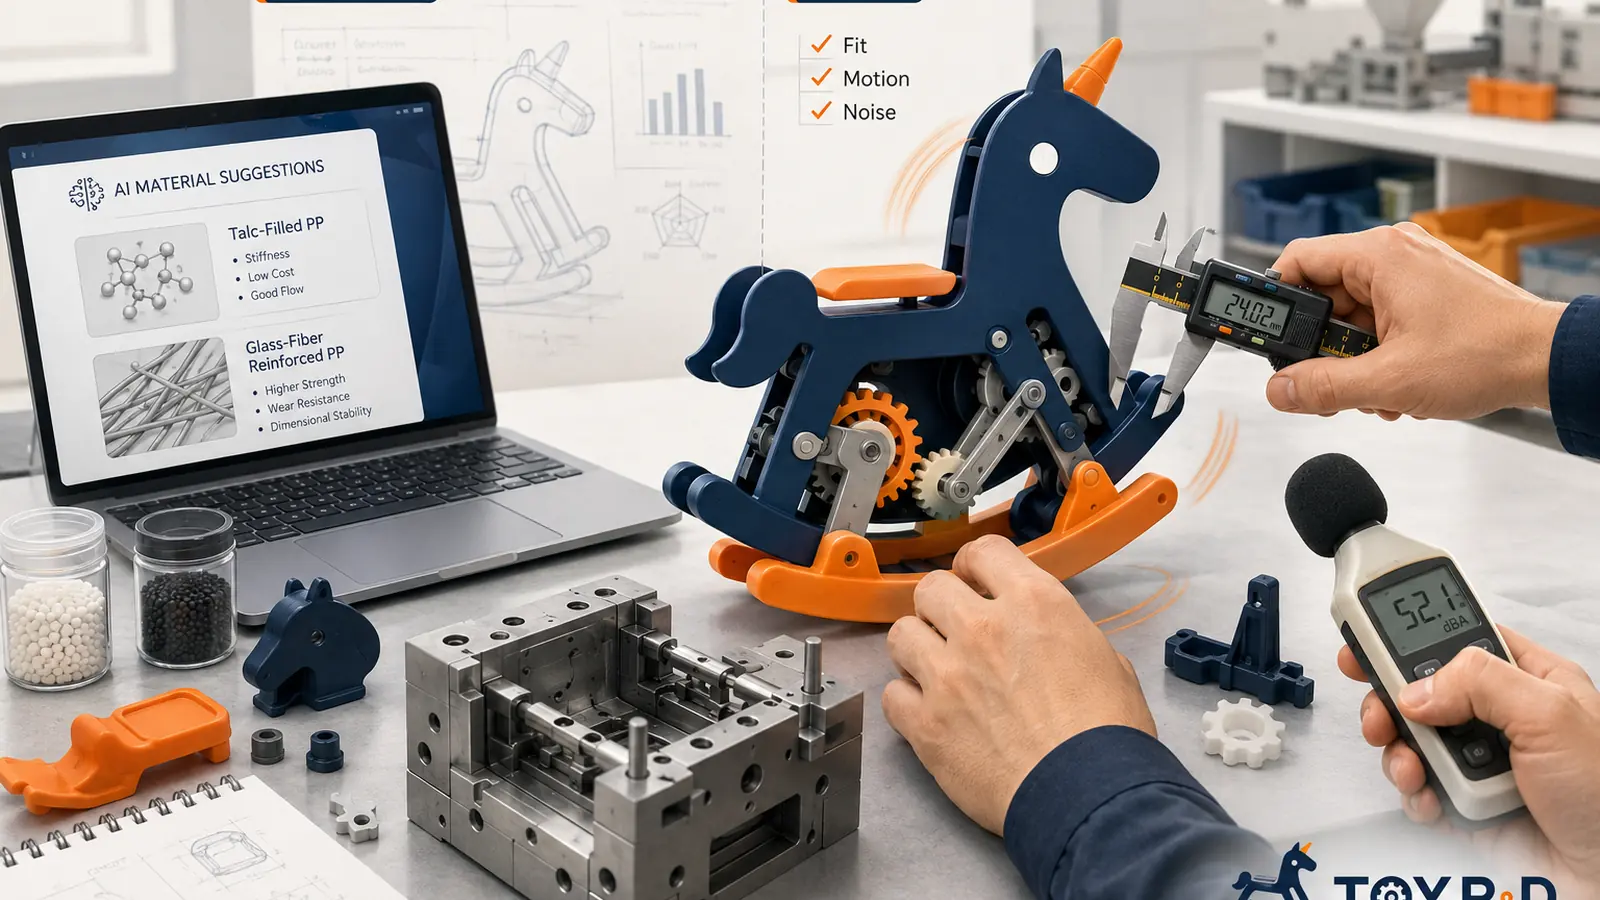
A resin that saves a few cents per part can look like a good decision in a BOM review. But when that material is used inside a mechanism with gears, sliding parts, repeated movement, and tight dimensional relationships, the real cost may appear later—in noise, friction, inconsistent assembly, rework, tooling changes, and delayed production.
Recently, I ran into exactly this kind of problem on a toy project involving a small motorized mechanism.
The mechanism itself was not complicated. A motor drove a gear train, and the gear train moved a plastic component back and forth repeatedly. But the motion depended on several molded parts staying within the right dimensional range.
At an early stage, PP was selected for part of the mechanism as a cost-saving option.
On paper, that choice looked reasonable.
In practice, it became much more complicated.
PP Is Not a Bad Material
PP, or polypropylene, is one of the most widely used plastics in toys and consumer products.
It is lightweight, cost-effective, chemically resistant, and tough. It works very well in many applications such as housings, living hinges, containers, clips, and flexible parts.
The problem is not that PP is "cheap" or "low quality."
The problem is that material selection has to match the job the part is doing.
For a decorative cover, a small dimensional change may not matter much.
For a moving mechanism, it can matter a lot.
The Real Problem Was Dimensional Stability
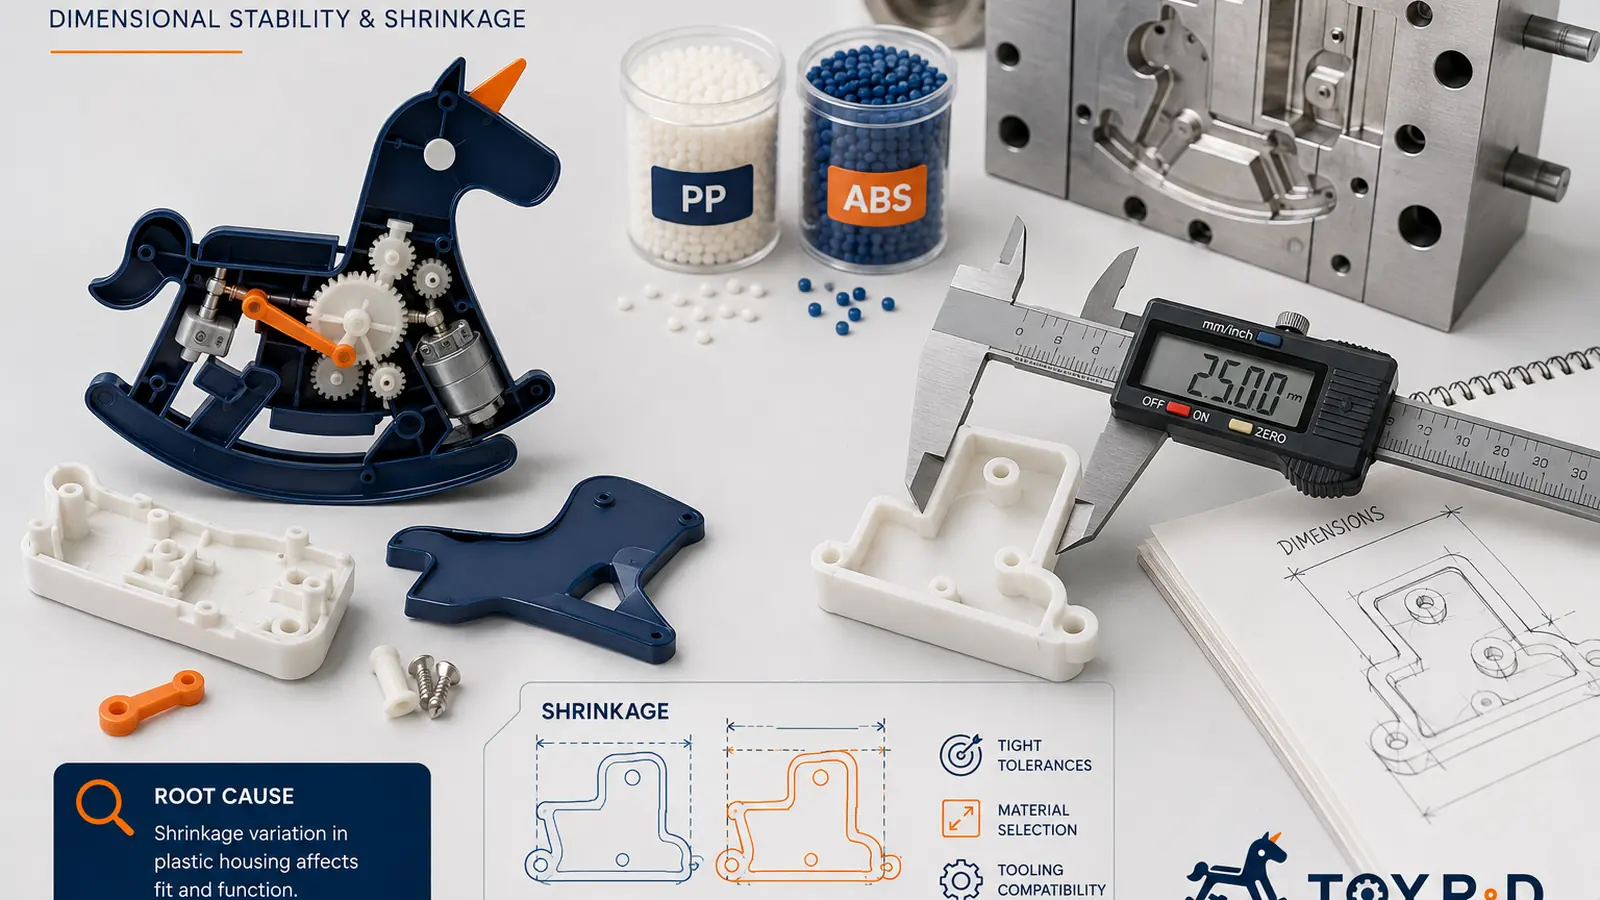
Material shrinkage and dimensional stability must be evaluated as a mechanism-level issue.
One of the most important differences between PP and ABS is molding shrinkage.
The exact value depends on the resin grade, filler content, wall thickness, mold temperature, packing pressure, gate design, and many other processing conditions. So it is never correct to treat shrinkage as one universal number.
But the general engineering trend is clear:
PP typically has significantly higher molding shrinkage than ABS.
That becomes important when molded parts are part of a mechanical system.
A mechanism may rely on:
gear center distances,
shaft positions,
sliding clearances,
guide surfaces,
wall straightness,
bearing locations,
part-to-part gaps,
and cumulative tolerance across several components.
A small deviation in one part may be harmless.
Small deviations across several parts can become a system-level problem.
That is where symptoms such as these begin to appear:
intermittent friction,
unstable movement,
increased mechanical noise,
inconsistent assembly,
higher motor load,
parts rubbing where they should not,
and units that behave differently even though they use the same design.
This is a good reminder that a plastic part does not exist independently.
Inside a mechanism, every dimension interacts with another dimension.
A Cheaper Resin Can Create More Expensive Problems
When engineers or sourcing teams review a BOM, the conversation often focuses on the material price itself.
For example:
Can we save a little by changing this part from ABS to PP?
That is a valid question.
But it is incomplete.
The better question is:
What happens to the total engineering cost if this material changes?
That total can include:
tooling adjustment,
additional sampling,
longer debugging cycles,
extra assembly labor,
sorting and rework,
higher QC burden,
reduced yield,
mechanical noise complaints,
inconsistent function,
and production delays.
If a material saves $0.03 per unit but causes $0.08 per unit in additional manufacturing or quality cost, that is not cost reduction.
It is cost transfer.
And cost transfer is often harder to see because it appears across different departments.
"Why Not Just Switch the Existing Mold to ABS?"
Once a PP part starts creating dimensional problems, the obvious reaction is often:
Then let's just mold the same tool in ABS.
Sometimes that can work.
But it should not be treated as a drop-in material substitution.
Injection molds are designed around the expected behavior of the material, including shrinkage.
The tool cavity dimensions, part dimensions, clearances, draft, ejection strategy, and processing window were all developed under certain assumptions.
If a mold was designed around a higher-shrinkage PP grade and the material is suddenly changed to a lower-shrinkage ABS grade, the final dimensions can shift.
That may affect:
overall part size,
fit with mating parts,
gear alignment,
snap engagement,
interference,
sliding gaps,
and ejection behavior.
The correct conclusion is not:
"A PP mold can never run ABS."
That would be too absolute.
The correct conclusion is:
A material change after tooling must be treated as an engineering change, not a purchasing change.
The mold, part dimensions, tolerances, processing conditions, and mechanical performance all need to be re-evaluated.
Then Another Idea Came Up: Filled PP
During the discussion, another possibility came up:
Could we keep PP, but use a modified grade with talc, mineral filler, or glass fiber to improve stiffness and reduce shrinkage?
From a material-science perspective, this is a perfectly reasonable direction to investigate.
Filled PP compounds are widely used in industry precisely because fillers can improve properties such as:
stiffness,
dimensional stability,
heat resistance,
creep performance,
and molding shrinkage.
So the proposal is technically plausible.
But technically plausible is not the same as production-ready.
The existing mold was not originally developed around an arbitrary filled PP grade.
Changing filler type and percentage can also change:
melt flow,
viscosity,
warpage behavior,
surface appearance,
abrasion on tooling,
ejection behavior,
weld-line behavior,
and actual molded dimensions.
At the same time, the molding team raised practical concerns about whether a different compound could create new molding or release problems in the existing tool.
At that point, the most useful response was not to argue from theory.
It was to test.
This Is Where AI and Factory Experience Should Meet
Use trials and measurements to test material hypotheses against the real tool and mechanism.
This case also illustrates something increasingly common in product development.
AI can very quickly suggest technically reasonable directions:
use a filled PP grade,
reduce shrinkage,
increase stiffness,
change a material system,
adjust clearances,
review processing parameters.
That is useful.
But AI does not physically see the mold.
It does not automatically know:
the actual draft angle,
the tool surface condition,
the gate location,
the wall-thickness transitions,
the ejector layout,
the existing dimensional deviation,
the real machine settings,
or what happened during the previous molding trials.
Factory technicians and tooling engineers, on the other hand, often carry years of experience that is difficult to express in a datasheet.
They may look at a tool and say:
"I don't like this material change on this mold."
That statement may not come with a full polymer-science explanation, but it may still be based on many past failures.
So who should you trust?
The better answer is:
Do not turn it into a competition.
A stronger development process looks like this:
1. AI or engineering analysis expands the possible solution space. 2. Tooling and molding teams identify practical risks. 3. Controlled material trials are run. 4. Critical dimensions are measured. 5. Parts are assembled into the real mechanism. 6. Noise, load, movement, temperature, and durability are evaluated. 7. The decision is made using production evidence.
AI is useful for generating hypotheses.
Factory experience is useful for identifying hidden risks.
Testing decides whether either one is right for the actual product.
PP Can Also Create Surface-Treatment Challenges
There is another PP-related issue that is easy to underestimate: surface treatment.
PP is a low-surface-energy plastic.
That means printing, painting, labeling, and adhesive bonding can be more difficult than on materials such as ABS unless the material, ink, adhesive, or surface preparation is designed for it.
Depending on the product, manufacturers may use:
flame treatment,
corona treatment,
plasma treatment,
primer,
special inks,
special adhesives,
or modified resin grades.
On a previous project, we also explored laser marking on PP.
For that specific application, the result was quite acceptable.
That does not mean every PP grade can be laser-marked well. Laser performance depends heavily on resin formulation, color, additives, wavelength, and process settings.
But it reinforces the same lesson:
A simple material change can affect much more than the injection molding step.
It may also affect decoration, marking, adhesion, assembly, appearance, and long-term production consistency.
So Should Moving Toy Mechanisms Avoid PP?
A lower resin price does not help if movement, fit, and production consistency become harder to control.
No.
That would be too simplistic.
PP is successfully used in many moving products, automotive systems, home appliances, hinges, gears, guides, and mechanical components.
The important lesson is different:
Do not choose PP for a precision-sensitive moving mechanism only because it is cheaper.
If the component has any of the following characteristics, material selection deserves more attention:
gear positioning,
sliding movement,
reciprocating motion,
tight dimensional chains,
noise sensitivity,
alignment-critical features,
multi-part assemblies,
or narrow functional clearances.
In those cases, ABS can often be a more conservative starting point when dimensional stability and predictable molding behavior matter more than squeezing out the lowest possible resin cost.
And if PP is still the preferred material, it is better to decide that at the beginning of the project.
Then you can define:
the exact PP grade,
whether it is filled or unfilled,
expected shrinkage,
tool compensation,
critical tolerances,
sliding clearances,
warpage limits,
and worst-case tolerance stack.
That is material engineering.
Changing resin after tooling and hoping everything else remains the same is not.
One of the Most Expensive Questions in Toy Development
A question I hear often in product development is:
Can we make this part a little cheaper?
Sometimes the answer is absolutely yes.
But for moving structures, I increasingly prefer a different question:
If we save money here, where might we pay for it later?
That small change in mindset can prevent a surprising amount of trouble.
Material cost is visible.
Debugging cost is not.
A BOM may show that PP is cheaper than ABS.
It does not show the extra two weeks spent chasing noise, movement inconsistency, dimensional drift, or molding problems.
That is why I increasingly think about Total Engineering Cost, not just part cost.
ToyRD Note
This is exactly the kind of development lesson I want to document on ToyRD.com.
A material datasheet can tell you the shrinkage range of PP.
An AI system can suggest talc-filled or glass-fiber-reinforced PP.
A tooling engineer may tell you the existing mold is unlikely to like the change.
All three inputs can be useful.
But real product development happens where materials, tooling, mechanism design, supplier experience, and physical testing meet.
The most useful question is often not:
"What is the shrinkage rate of PP?"
It is:
"I already have a molded PP mechanism that is noisy and dimensionally unstable. What is the lowest-risk way to recover the project?"
That is a much harder question.
And that is the kind of question ToyRD is built around.
ToyRD.com — Practical toy development notes from real engineering problems.
If you come from consumer electronics, smart hardware, or a more conventional electronics engineering background, your first encounter with toy electronics in Chenghai can be surprising.
This article explains how Chenghai toy electronics balance cost, function, and manufacturability.
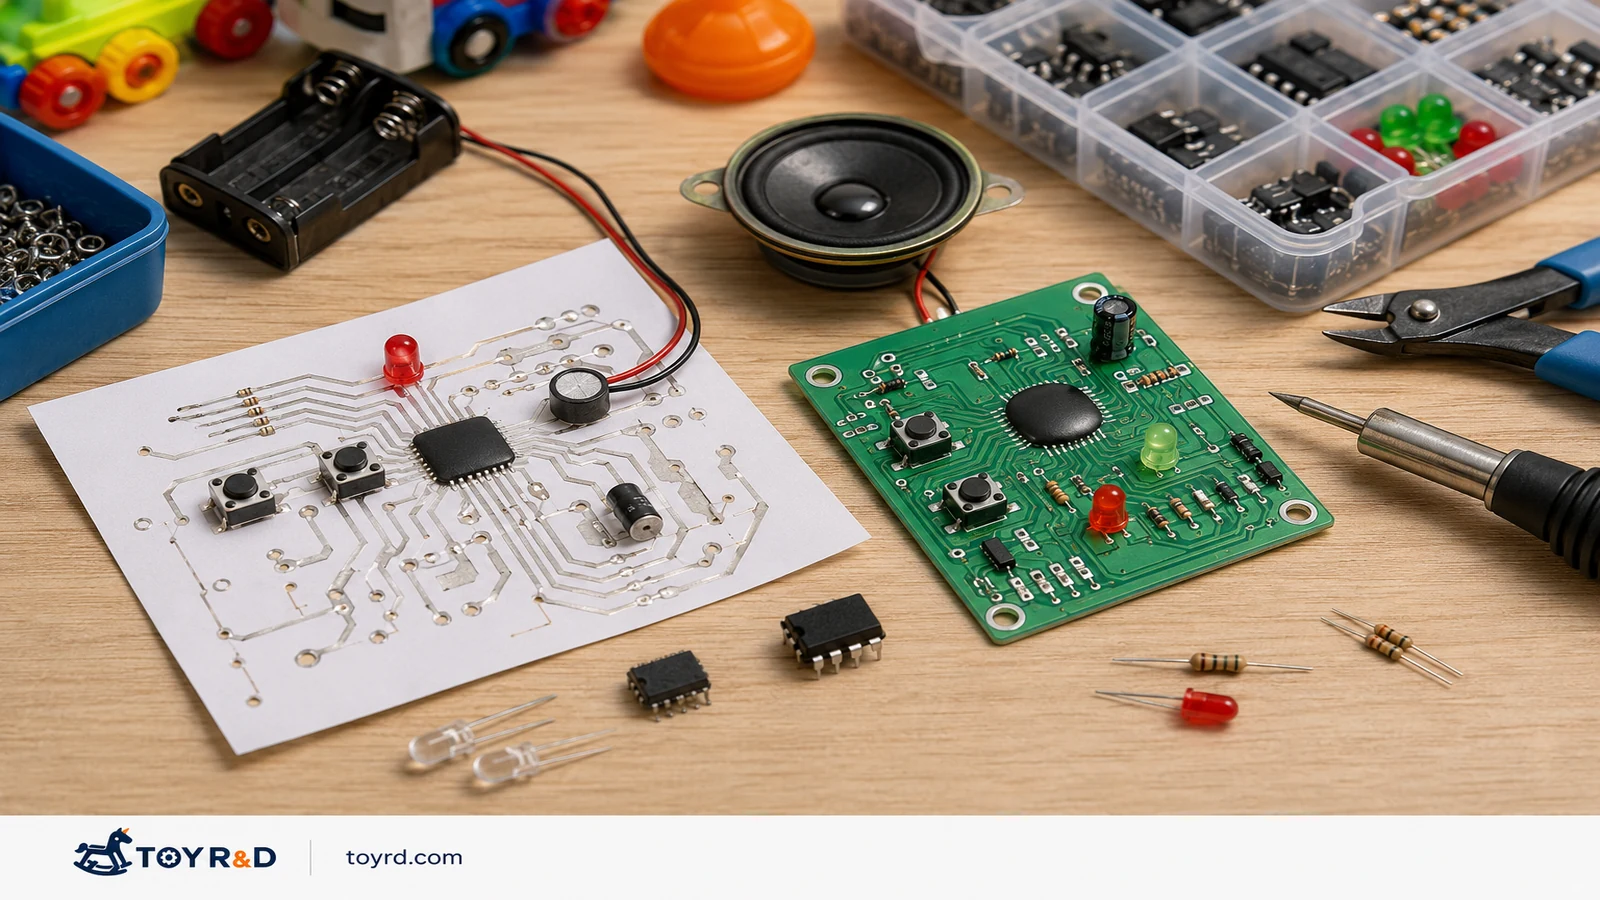
You may see paper-based circuit boards, extremely low-cost voice ICs, through-hole components, and audio capacity quoted simply as “how many seconds at 6K.”
From a purely technical perspective, some of these technologies may look old-fashioned.
But describing Chenghai toy electronics as simply “outdated” misses the more interesting point.
Over many years, the local toy industry has developed a highly mature low-cost electronics ecosystem built around one core question:
What is the lowest-cost way to make this function work reliably?
That is a very different mindset from asking:
What is the most advanced technology we can use?
At ToyRD, we believe the best way to understand toy electronics is not to start with advanced MCUs, Bluetooth SoCs, or AI chips.
It is better to start with the most basic thing inside many electronic toys:
a circuit board.
Before We Start: What Is the Relationship Between Shantou and Chenghai?
For overseas buyers and product developers, this is worth understanding first.
Shantou is a prefecture-level city in Guangdong Province, and Chenghai is a district under Shantou.
In simple terms:
Shantou is the larger set. Chenghai is a subset of Shantou.
So when someone says they are going to “Shantou” to develop toys, they may actually spend much of their time in Chenghai District, because Chenghai is the core toy manufacturing and development cluster within Shantou.
This distinction can be confusing to international buyers because both names are commonly used in the industry.
You may hear:
Shantou toy factories
Shantou toy suppliers
Chenghai toy factories
Chenghai toy market
Chenghai electronics suppliers
In many practical business conversations, these descriptions overlap because Chenghai is part of Shantou and is deeply associated with the city’s toy industry.
For clarity, ToyRD uses the terms this way:
Shantou refers to the broader city and regional supply-chain environment.
Chenghai refers more specifically to the main toy manufacturing, development, component, and supplier cluster.
If you are an overseas buyer coming to develop toys here, understanding this relationship makes supplier searches, factory visits, transportation planning, and communication much easier.
1. Toy Electronics Often Begin with a Very Cheap PCB
The lowest-cost board is not always the right one; select the substrate for the product’s real needs.
Many engineers associate PCBs with standard green FR-4 fiberglass boards.
In low-cost toys, however, that is not always the case.
A large number of simple light-and-sound toys in Chenghai still use paper-based copper-clad boards.
Compared with higher-grade PCB materials, paper-based boards have clear limitations in mechanical strength, heat resistance, dimensional stability, and circuit complexity.
But the real question is:
Does a simple toy with a few LEDs, several buttons, one voice IC, and a speaker actually need a higher-grade PCB?
In many cases, it does not.
If the circuit is simple, power consumption is low, operating temperatures are normal, and there is no special requirement for dense routing or mechanical strength, a paper-based PCB can already be good enough.
And its biggest advantage is simple:
It is cheap.
When the total factory cost of a toy is only a few RMB or a little over ten RMB, saving even a few tenths of a yuan on the PCB matters.
At production volumes of 100,000, 500,000, or even one million units, very small differences become very large numbers.
This creates a clear cost hierarchy in the Chenghai toy electronics supply chain.
At the low end, paper-based boards are still common.
At the next level, suppliers may use thinner or better-performing board materials.
Higher-end products, products with more complicated circuits, or products with stricter reliability requirements are more likely to use resin- and fiberglass-based PCB materials.
The important principle is:
A PCB should not be selected because it is “better.” It should be selected because it is appropriate for the product.
That sounds obvious.
The difficult part is knowing where “good enough” ends.
2. Why Toy IC Suppliers Often Ask: “How Many Seconds Do You Need?”
One of the most distinctive features of traditional toy electronics in Chenghai is the way voice ICs are discussed.
If you are developing a consumer electronics product, a chip discussion may involve Flash size, RAM, CPU architecture, codecs, DAC performance, sampling rate, bit depth, or processing capability.
In many traditional toy electronics businesses, the conversation can be much simpler.
You ask:
How much is this IC?
The supplier may ask:
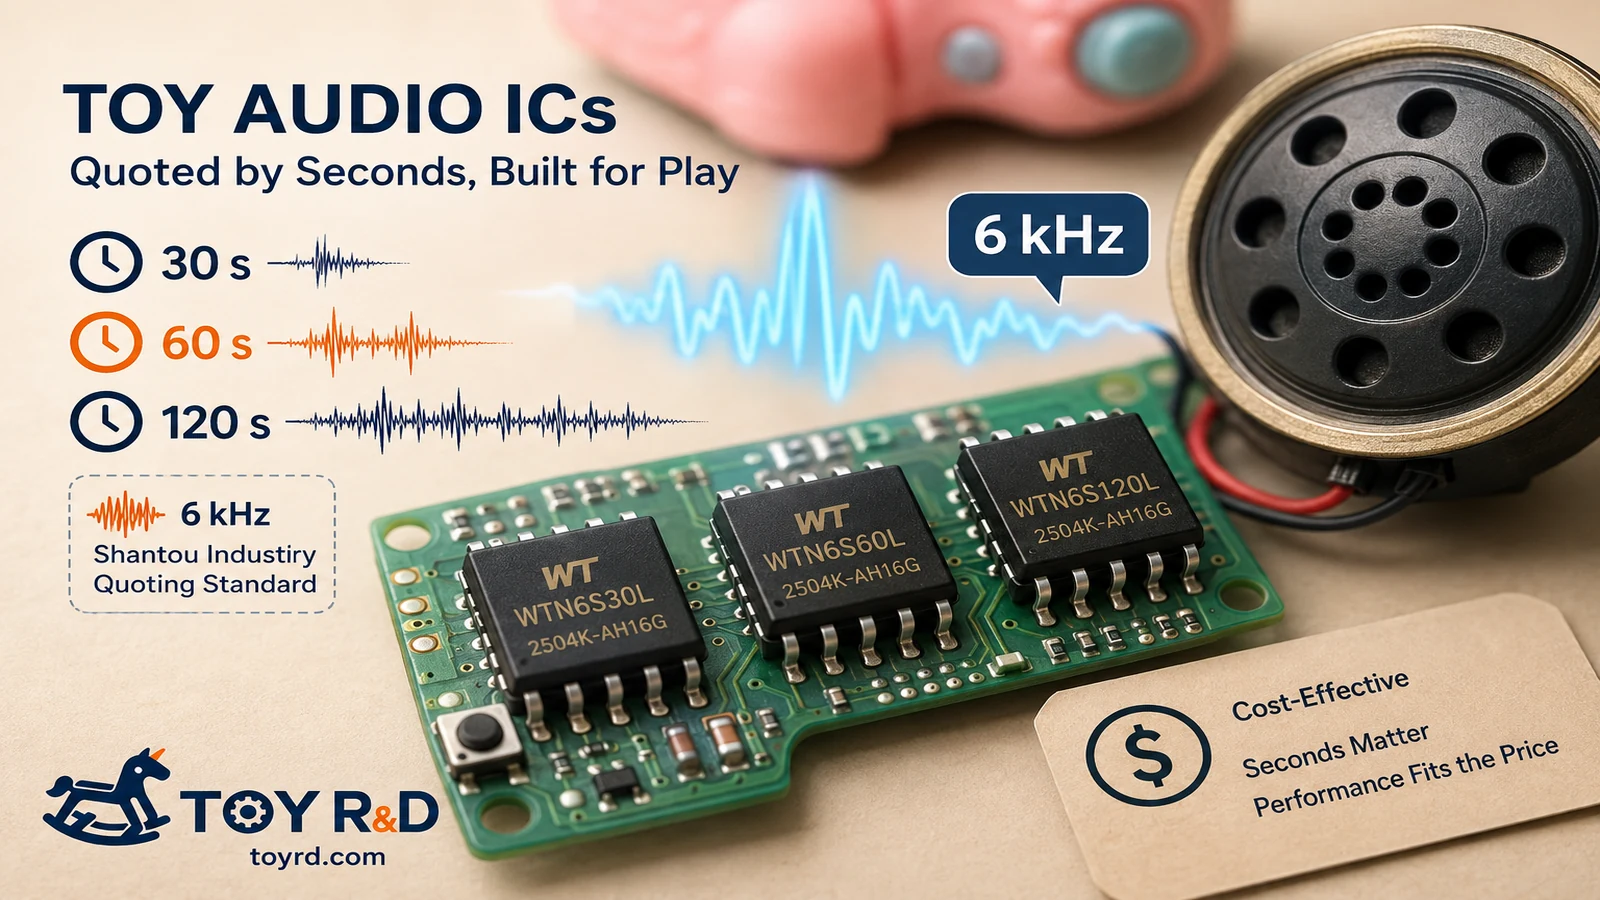
“How many seconds of audio do you need?”
Thirty seconds.
Sixty seconds.
One hundred and twenty seconds.
One hundred and eighty seconds.
For a large number of low-cost sound toys, audio duration itself becomes one of the most practical ways to define an IC option and quote a price.
And in the local toy electronics market, one very classic phrase is:
“Calculate it at 6K.”
Here, “6K” typically refers to using roughly a 6 kHz sampling rate as a practical reference point for estimating how much audio a voice IC can store.
So a supplier may tell you:
This IC can hold this many seconds at 6K.
Another IC can hold more.
Then the designer chooses the IC according to the total audio duration required.
For an electronics engineer, this is obviously not a complete technical description of the chip.
But for the toy industry, it is extremely efficient.
The real commercial questions are often only:
Will the audio fit?
Is the sound quality acceptable?
How much does it cost?
That is why “6K plus audio duration” has become a very recognizable shorthand in traditional toy electronics.
3. “60 Seconds at 6K” Does Not Mean Two ICs Are the Same
There is an important limitation to this way of quoting.
Suppose two IC suppliers both say:
Our chip can store 60 seconds of audio at 6K.
That does not mean the two chips use the same storage capacity, the same encoding method, or produce the same sound quality.
Different IC suppliers may use different audio coding and compression methods.
They may differ in:
compression ratio;
bit depth;
decoding algorithm;
DAC performance;
noise level;
optimization for speech versus music.
One IC may sound acceptable for spoken phrases but poor for music.
Another may sound noticeably cleaner even if both are quoted using the same nominal audio duration.
So “6K, 60 seconds” should be understood as:
a fast quotation language used by the toy supply chain, not a complete technical specification.
This kind of shorthand is common in mature industries.
It compresses a lot of practical background knowledge into a few words.
4. Why Cheap Toys Often Sound Like “Toy Audio”
This also helps explain a familiar phenomenon.
Why can you often recognize the sound of a low-cost toy almost immediately?
Part of the answer is the audio data itself.
A higher sampling rate generally means more audio data.
More data requires more storage.
More storage often means a more expensive IC.
For a low-cost toy, the engineering question therefore becomes:
Is better audio quality worth increasing the IC cost by several tenths of a yuan?
Very often, the answer is no.
The product may only need to achieve four things:
the child can understand the words;
the song is recognizable;
the sound is loud enough;
there is no unacceptable noise or distortion.
It usually does not need:
high-frequency detail;
wide dynamic range;
high-fidelity playback;
audio performance comparable to consumer speakers.
This is one of the clearest differences between toy electronics and consumer audio electronics.
5. Sound Quality Depends on Much More Than the IC
Audio duration and sampling reference are useful quotation shorthand, not a complete IC specification.
It would also be wrong to blame poor toy audio entirely on a low sampling rate.
In a real product, sound quality is the result of an entire signal chain.
It can depend on:
the original audio file;
encoding and compression;
the voice IC;
DAC or output stage;
amplifier;
speaker;
acoustic cavity;
product enclosure;
sound holes;
even plush fabric, silicone skins, or internal structural parts.
This is why simply replacing an IC with a “better” one does not always produce a dramatic improvement.
Sometimes the real bottleneck is a very inexpensive speaker.
Sometimes it is the acoustic cavity.
Sometimes it is the enclosure.
At ToyRD, we therefore prefer to look at toy audio as a complete system rather than focusing on a single specification such as sampling rate.
6. Why a Few Cents of Through-Hole Labor Still Matter
Through-hole insertion points and SMT setup economics must both be considered in total cost.
Another very characteristic part of low-cost toy electronics is through-hole assembly.
Many low-cost toy PCBs still contain through-hole components such as:
electrolytic capacitors;
switches;
connectors;
wires;
LEDs;
other manually inserted parts.
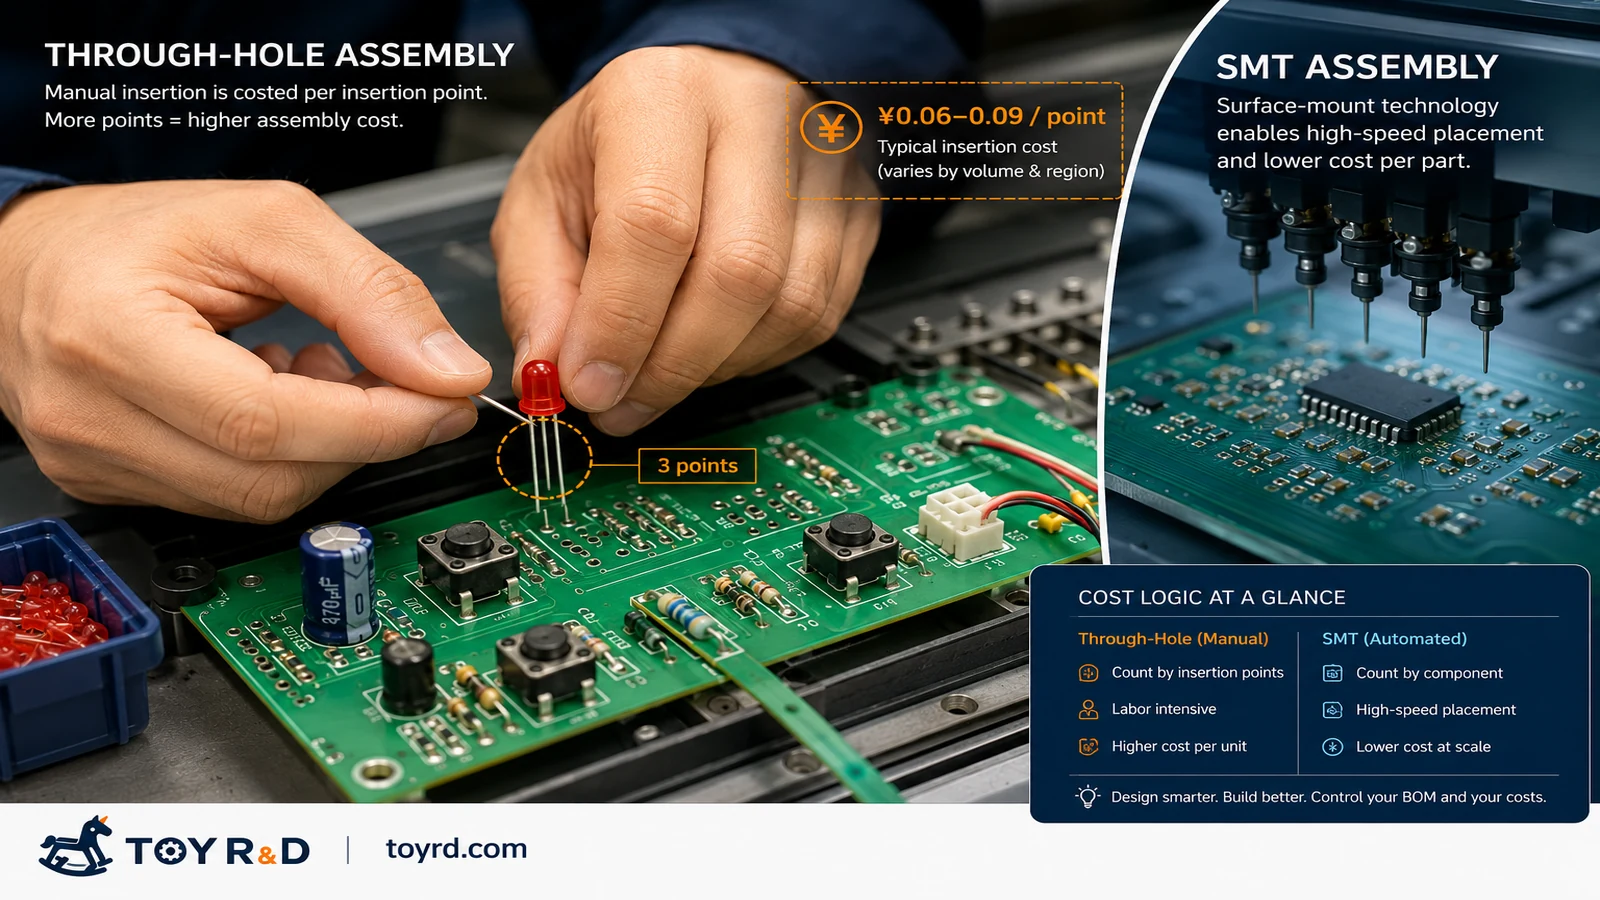
In the local electronics supply chain, through-hole assembly labor is often calculated per insertion or soldering point, not simply per component.
A practical market reference we have encountered is approximately:
RMB 0.06–0.09 per point.
This distinction is important.
For example, if an LED has three leads, it is counted as three points.
At RMB 0.06 per point:
3 × 0.06 = RMB 0.18
At RMB 0.09 per point:
3 × 0.09 = RMB 0.27
So a single three-lead LED may represent RMB 0.18–0.27 of through-hole labor.
That may still sound insignificant.
But now imagine a PCB design adds several extra through-hole points.
Suppose a design adds 5 extra points, with labor priced at RMB 0.08 per point:
5 × 0.08 = RMB 0.40 per product
At 100,000 units, that becomes:
RMB 40,000
This is one of the most important ways to understand toy cost engineering.
An engineer may look at a component and think:
“It is only one small part.”
The factory sees:
“This action has to be repeated 100,000 times.”
That is why toy electronics engineers may redesign a PCB simply to remove several insertion points, eliminate a connector, reduce manual soldering, or combine functions.
7. SMT Has a Different Cost Structure
Surface-mount assembly follows a different economic model.
SMT is more automated and can be highly efficient for stable, high-volume production.
But it should not be simplified into:
SMT is always cheaper than through-hole assembly.
SMT costs can also involve:
stencil preparation;
placement points;
component count;
PCB panelization;
machine setup;
production-line changeover;
order quantity;
component packaging;
reflow and inspection.
For small production runs, fixed setup costs may make the cost per PCB relatively high.
For orders of tens or hundreds of thousands of units, the economics can be completely different.
So there is no universal rule that every component should be converted to SMT.
The correct answer depends on:
production volume;
component type;
PCB layout;
automation level;
total manufacturing cost.
This is why the real value of an experienced electronics solution provider is not just the ability to draw a PCB.
It is knowing:
how to design the PCB so that it is economical to manufacture.
That cost-and-reliability trade-off is the lens ToyRD uses when turning an electronics concept into a production-ready toy.
8. Why Does Chenghai Still Use So Many “Old” Technologies?
At this point, it is tempting to conclude:
Is Chenghai electronics simply technologically behind?
That is only half true.
From a technology-generation perspective, many low-cost toy electronics solutions are indeed based on mature and sometimes very old technologies.
But from an industrial perspective, Chenghai has become extremely good at extracting value from those technologies.
A very inexpensive IC.
A very cheap PCB.
A low-cost speaker.
A few buttons.
A few LEDs.
Together, they may deliver:
power-on sound;
music;
lighting;
button interaction;
automatic shutdown.
And the entire electronics solution may cost remarkably little.
For a toy retailing for only a few dollars, that may be exactly the right engineering solution.
If the design were upgraded purely for the sake of “modern technology” to include a higher-spec MCU, larger Flash, higher-grade PCB, and more sophisticated power management, the user experience might improve, but the electronics cost could rise significantly.
That would not automatically make it a better product.
9. Several Generations of Toy Electronics Now Coexist in Chenghai
Modern Chenghai toy electronics can no longer be described only in terms of cheap voice ICs.
The market is now clearly segmented.
At the most traditional level, you may still see:
paper-based PCBs;
low-cost voice ICs;
LEDs;
through-hole parts;
simple buttons;
basic speakers.
A step above that, products may use:
better PCBs;
more SMT;
improved audio solutions;
MCUs;
sensors;
lithium batteries;
USB-C;
more advanced power management.
And at the higher end, the architecture becomes completely different:
Bluetooth;
mobile apps;
MEMS microphones;
sound detection;
external Flash;
OTA updates;
Wi-Fi;
cloud services;
even AI.
This creates an interesting reality:
A very cheap traditional toy voice IC and a Bluetooth SoC connected to a mobile app may both be widely used in the same Chenghai electronics market.
There is no contradiction.
They serve completely different products.
10. Good Toy Electronics Are Not About Using the Most Advanced Technology
This is one of the most important lessons in toy development.
We should understand advanced technology.
But the purpose of engineering is not to prove how many advanced technologies we can put into a product.
The real question is:
What does this product actually need?
If a paper-based PCB is sufficient for a simple light-and-sound toy, then it can be the correct choice.
If 6 kHz audio is good enough for the intended product, there may be no reason to increase system cost simply to make the specification look better.
But the opposite is also true.
If the product is positioned at the mid- or high-end, and consumers care about sound quality, connectivity, battery life, reliability, and interaction, then continuing to use the lowest-cost architecture may become the wrong decision.
The real difficulty in toy electronics is therefore not learning one particular IC.
It is learning to judge:
when to save cost, and when not to save cost.
That is one of the reasons ToyRD is gradually documenting these fundamentals.
A great deal of toy engineering knowledge is not mysterious.
It is simply scattered across electronics markets, supplier quotations, factory experience, and years of mass-production projects.
Paper-based PCBs, 6 kHz audio, and a few cents of labor per insertion point may sound like small details.
But when enough of these details are connected together, you begin to understand something much bigger:
how a toy can be manufactured at the price it is.
And that may be one of the most valuable things to understand about Chenghai toy electronics and the broader Shantou toy supply chain.
*A real toy-development case showing why the best cost reduction sometimes comes from understanding a quotation—not simply pushing a supplier for a lower price.*
In toy development, small tooling charges appear everywhere.
A supplier may quote for an injection mold, silicone mold, printing jig, paint mask, spray fixture, assembly fixture, or some other production aid. The amount may only be a few hundred or a few thousand RMB, so it is tempting to approve it quickly and keep the project moving.
But small charges add up. More importantly, they often hide assumptions about how the supplier expects the product to be manufactured.
A recent silicone toy project gave us a good example.
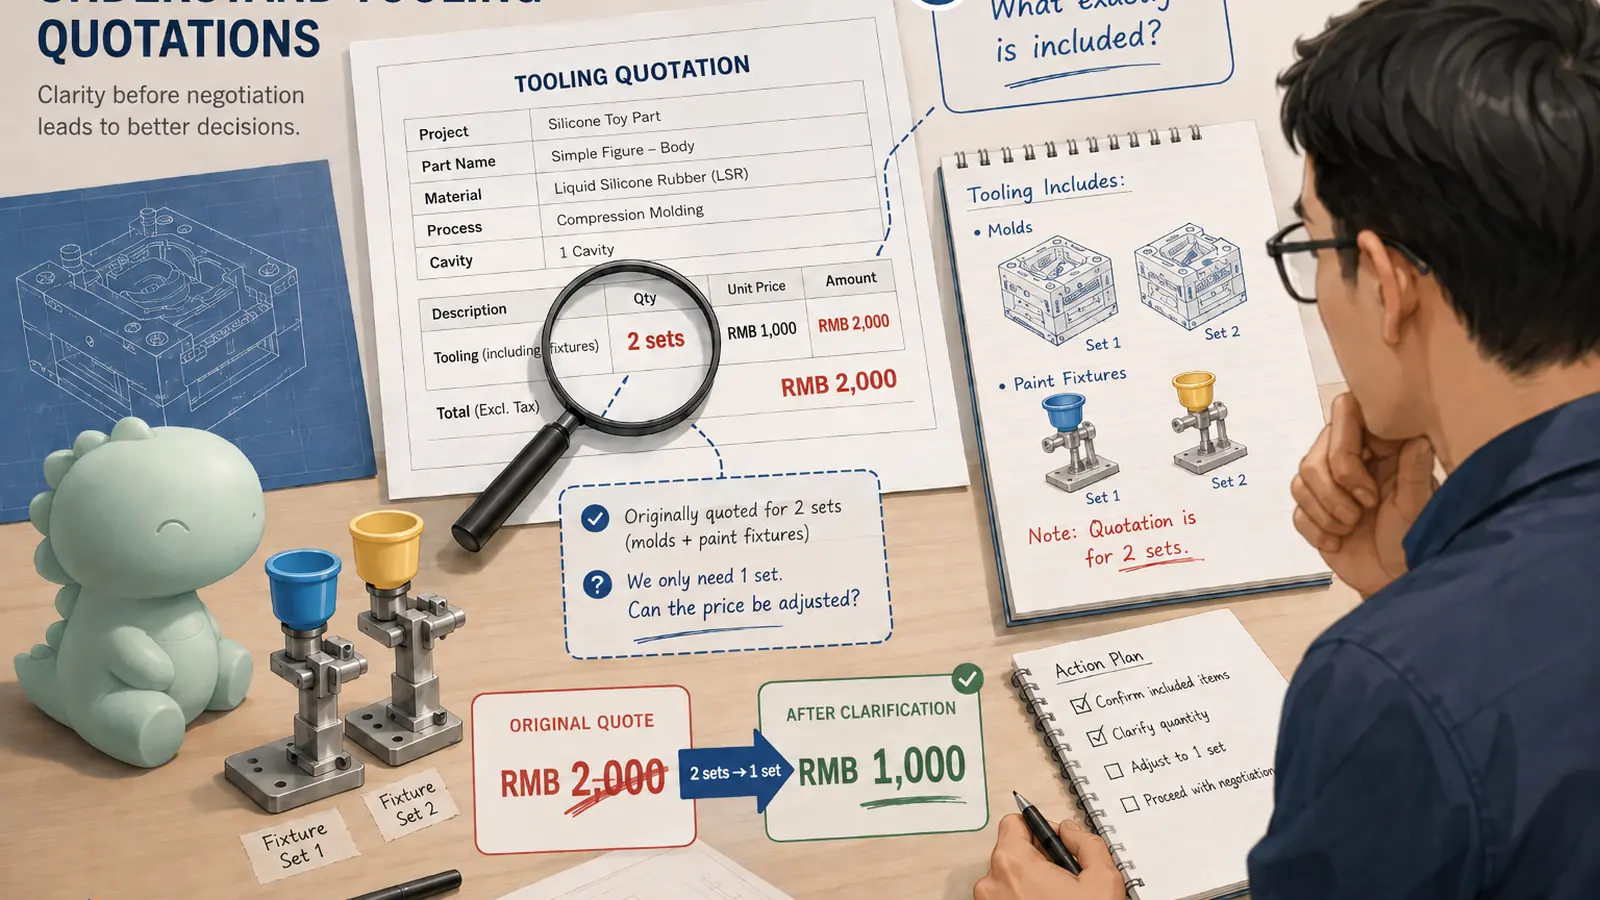
The Original Quote: RMB 2,000
Clarifying the quoted quantity can reduce cost without forcing a lower unit price.
The product required two separate painted areas. To keep the paint in the correct position during production, the supplier's painting subcontractor needed dedicated spray fixtures.
The quotation was:
Spray fixture A: RMB 1,000
Spray fixture B: RMB 1,000
Total: RMB 2,000
At first glance, the price looked high.
We had already asked another source about similar masking fixtures, and the indicative price was only a few hundred RMB each.
The obvious reaction would have been:
"Your price is too high. Can you reduce it?"
That is how many sourcing discussions begin.
But price negotiation was not actually the most useful first step.
Instead, we asked a different question:
What exactly is included in the RMB 1,000?
That question changed the whole conversation.
The Quote Was Based on Two Sets, Not One
After checking with the painting factory, the supplier came back with an important detail:
Each RMB 1,000 quotation included two identical sets of the fixture.
The painting factory had apparently quoted according to its normal production arrangement. Two sets would give them more flexibility during mass production and help maintain throughput if both were needed on the line.
That may be reasonable for a larger or faster production run.
But it was not what our project needed at this stage.
We were dealing with a relatively small production quantity. We asked whether one set of each fixture would be enough and whether using only one set would affect the delivery schedule.
The answer was yes: one set was enough, and it would not delay the small production run.
So the quotation was revised to:
Spray fixture A: 1 set, RMB 500
Spray fixture B: 1 set, RMB 500
New total: RMB 1,000
The tooling cost was reduced by 50%.
But technically, we did not negotiate a lower unit price.
We corrected the assumption behind the quotation.
We didn't negotiate the price. We corrected the assumption behind the quote.
That distinction matters.
Price Problems Are Often Specification Problems
When two suppliers quote very different prices, it is easy to conclude that one is expensive.
Sometimes that is true.
But before making that judgment, check whether they are actually quoting the same thing.
For a small production fixture, useful questions include:
What material is the fixture made from?
How many pieces or sets are included?
Why are multiple sets necessary?
Is the fixture designed for sampling, a pilot run, or full mass production?
What production volume is the quoted configuration intended to support?
Does the price include adjustment or trial fitting?
Does it include replacement if the fixture wears out?
Who owns the fixture after it is paid for?
A quote of RMB 200 and a quote of RMB 1,000 may look wildly different until you discover that one supplier is quoting one simple mask while the other is quoting multiple production-ready fixtures plus setup work.
The first task is not to bargain.
The first task is to understand what you are buying.
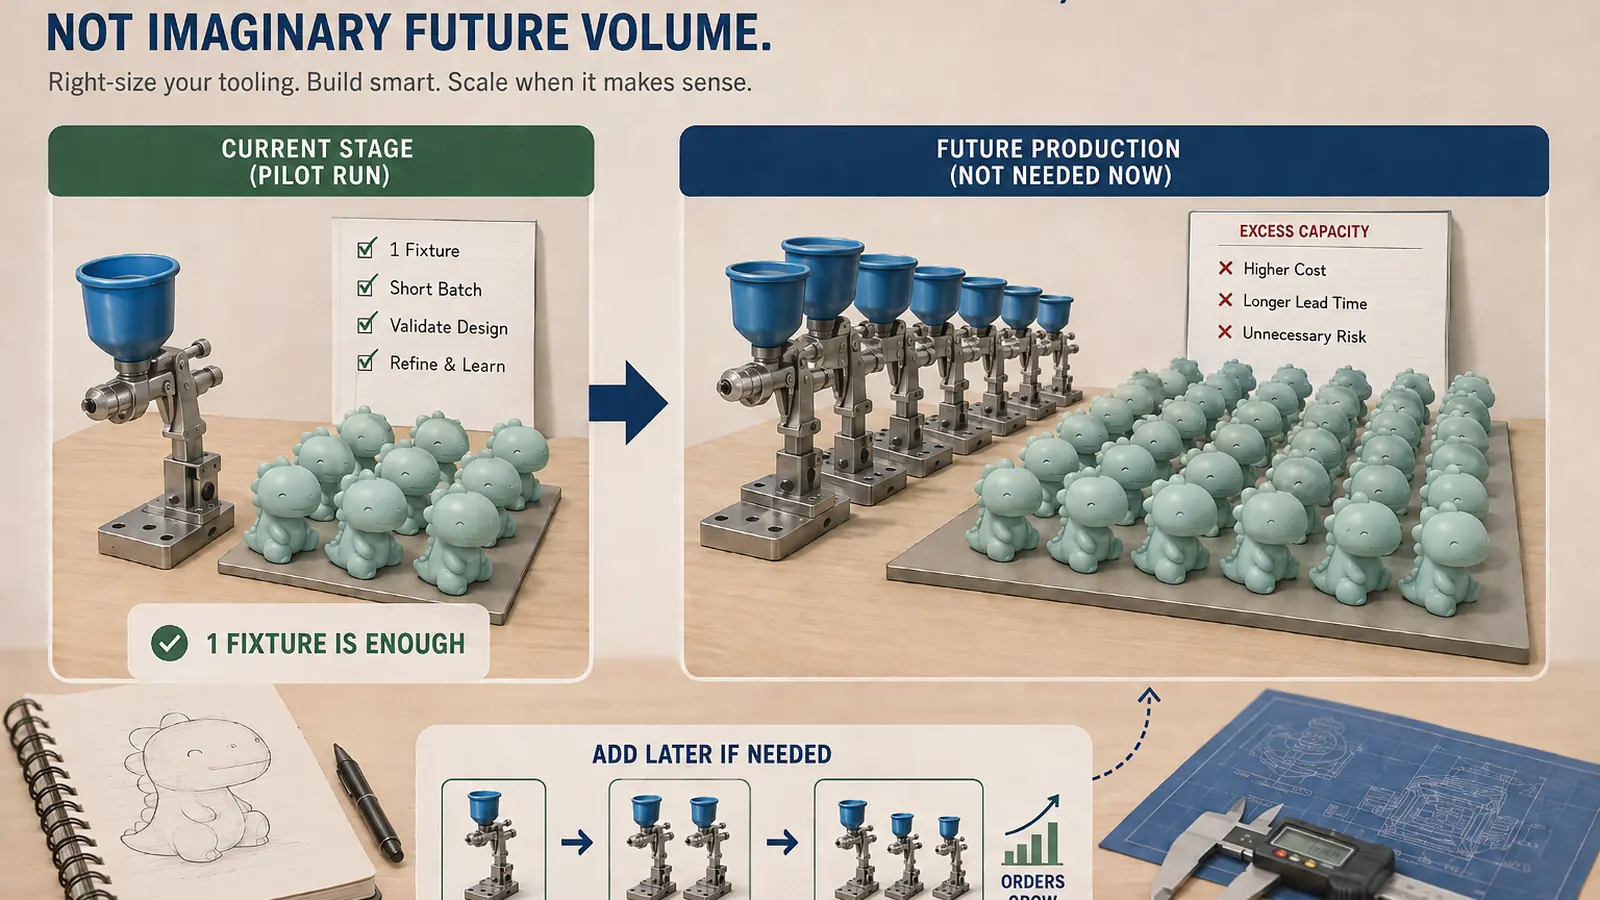
Do Not Pay Today for Production Capacity You May Need Tomorrow
Build for the current production stage, then add capacity when the order volume justifies it.
This case also reflects a broader issue in toy development.
Suppliers often think in terms of production efficiency. That is understandable. Their job is to keep factories running smoothly.
Product developers, however, have a different problem: uncertainty.
A new toy may begin with:
a prototype,
a customer sample,
a 500-piece test order,
a 1,000-piece pilot run,
or a small first production order.
Nobody knows yet whether it will eventually become a 20,000-piece product.
If the supplier automatically prepares tooling for future high-volume production, the customer may end up paying for capacity that is not currently necessary.
This is especially important for ODM and new-product projects.
A useful principle is:
Tooling should match the current stage of the product, not the imaginary future volume.
If the product succeeds and production increases, additional fixtures can be added later.
That is usually better than building every possible backup fixture before the market has validated the product.
In our case, there was no reason to pay for two sets immediately when one set could support the current order without affecting delivery.
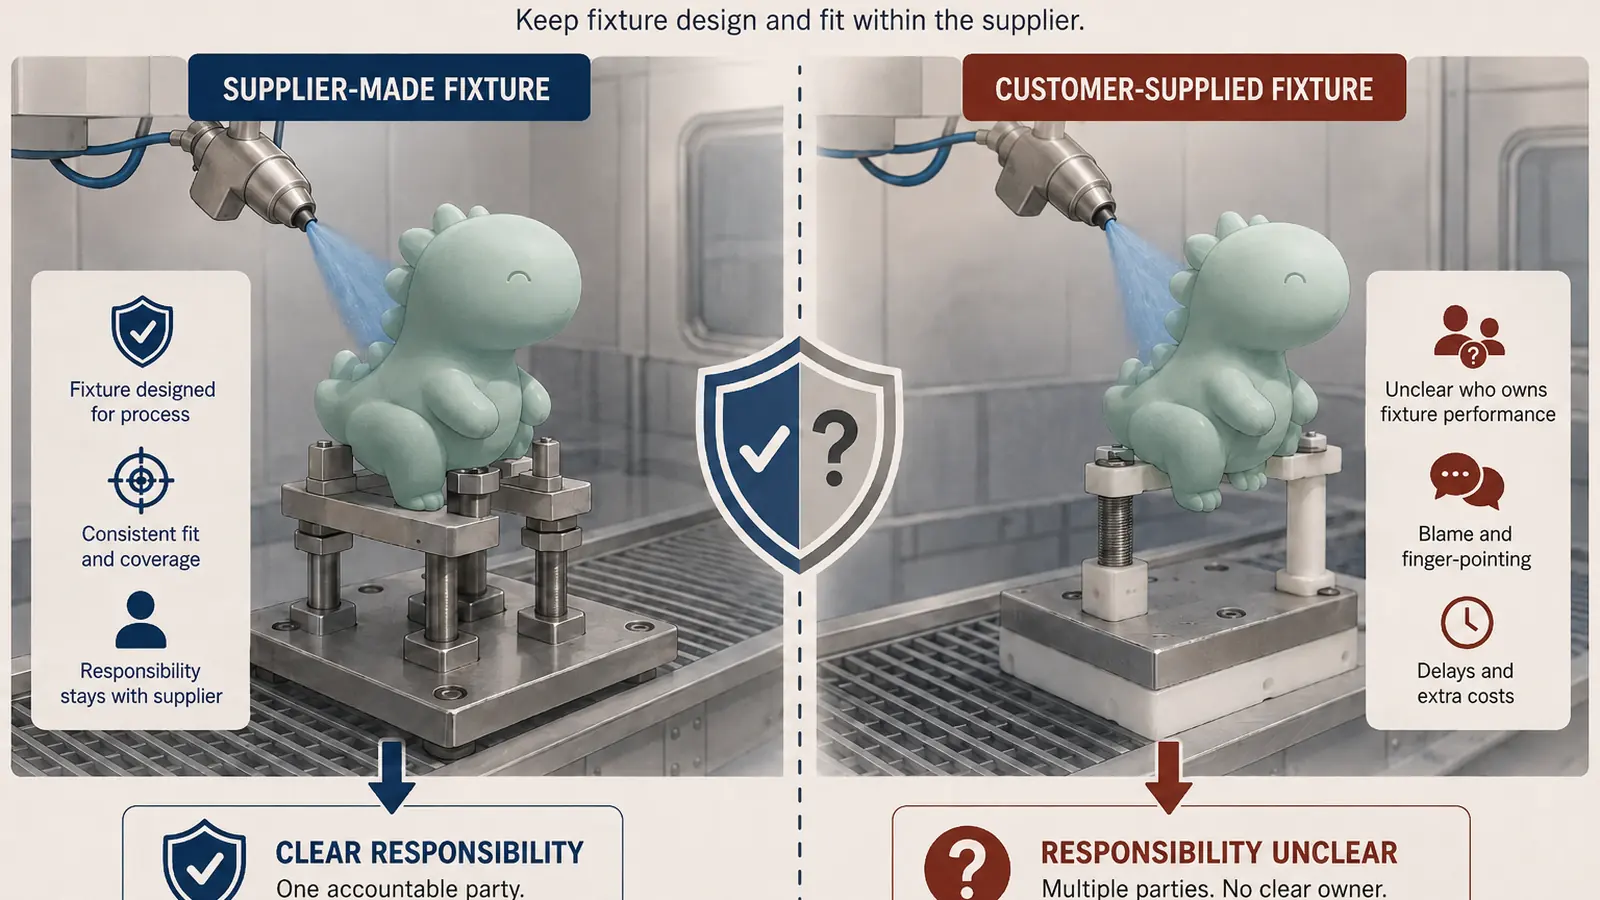
The Cheapest Fixture Is Not Always the Best Decision
Keeping fixture design with the supplier preserves clear responsibility for process performance.
There was another interesting part of this case.
We could probably have found an outside supplier willing to make the fixtures for less than RMB 500 per set.
So why not simply buy the cheapest fixtures ourselves and send them to the painting factory?
Because tooling cost is only one part of the decision.
The other part is process responsibility.
If the painting factory designs and makes its own fixture, then problems such as these stay within its process:
paint position is incorrect,
masking edges are poor,
the part does not locate properly,
the fixture does not fit consistently,
overspray becomes excessive,
or production becomes unstable.
The supplier has to solve the problem as part of delivering an acceptable finished component.
If we design or purchase the fixture ourselves and hand it to the factory, responsibility becomes less clear.
If the painted result is poor, the factory may reasonably say:
"The fixture was supplied by you."
Then a few hundred RMB of tooling savings can turn into a much more expensive argument about who is responsible for the production problem.
This leads to another useful rule:
Sometimes you are not paying for the tool itself. You are paying to keep process responsibility with the supplier.
For small differences in price, that can be worth more than the savings.
"Mold" Is Often Too Broad a Word
This case also highlights a terminology problem that appears frequently in toy sourcing.
In everyday factory communication, people sometimes use the Chinese word *mó* (模) very loosely. It may be translated into English as "mold," even when the item is not really a production mold in the conventional sense.
But these are very different things:
Injection mold
Silicone compression mold
Blow mold
Printing jig
Assembly jig
Paint mask
Spray fixture
Positioning fixture
Their cost structures, lifetimes, materials, ownership, and production purposes are completely different.
When reviewing a quotation, do not rely only on the label in the spreadsheet.
Ask what the physical item actually is and what function it performs.
That one clarification can prevent a surprising amount of confusion.
A Practical Checklist Before Approving Small Tooling Charges
Before approving a tooling or fixture charge, I now think it is worth checking at least these eight questions:
1. What exactly are we buying? 2. How many sets are included in the quotation? 3. Why is that quantity required? 4. What production volume is the tooling intended to support? 5. Can the project start with fewer sets? 6. Who owns the tooling after payment? 7. Who is responsible if the tooling does not produce an acceptable result? 8. Under what conditions would additional tooling be required later?
For more expensive molds, the checklist should obviously go much further: mold life, cavity count, steel grade, modification responsibility, maintenance, storage, ownership, and transfer rights all matter.
But even for a small RMB 500 fixture, asking the right questions can improve both cost control and supplier accountability.
The Lesson Was Not About Bargaining
The most valuable part of this case was not saving RMB 1,000.
It was understanding why the extra RMB 1,000 appeared in the first place.
The supplier was not necessarily trying to overcharge us. Their subcontractor had simply quoted a production setup that included more fixture capacity than our current project needed.
Once that assumption became visible, the solution was straightforward.
No aggressive negotiation was required.
No supplier had to "lose" the negotiation.
We simply aligned the tooling configuration with the real production requirement.
That is a much healthier way to manage product development.
Toy sourcing is often described as a battle over price. In practice, some of the best cost reductions come from something much less dramatic:
Ask better questions.
Before telling a supplier that a quotation is too expensive, first make sure you understand exactly what they have quoted.
You may discover that the real problem is not the price at all.
It is the assumption behind it.
*ToyRD shares practical lessons from real toy-development work: product engineering, sourcing, tooling, manufacturing, compliance, and the small decisions that determine whether a toy can move successfully from idea to mass production.*
In toy product development, some failures are especially difficult to diagnose because every individual decision seems perfectly reasonable.
We once ran into exactly this kind of problem.
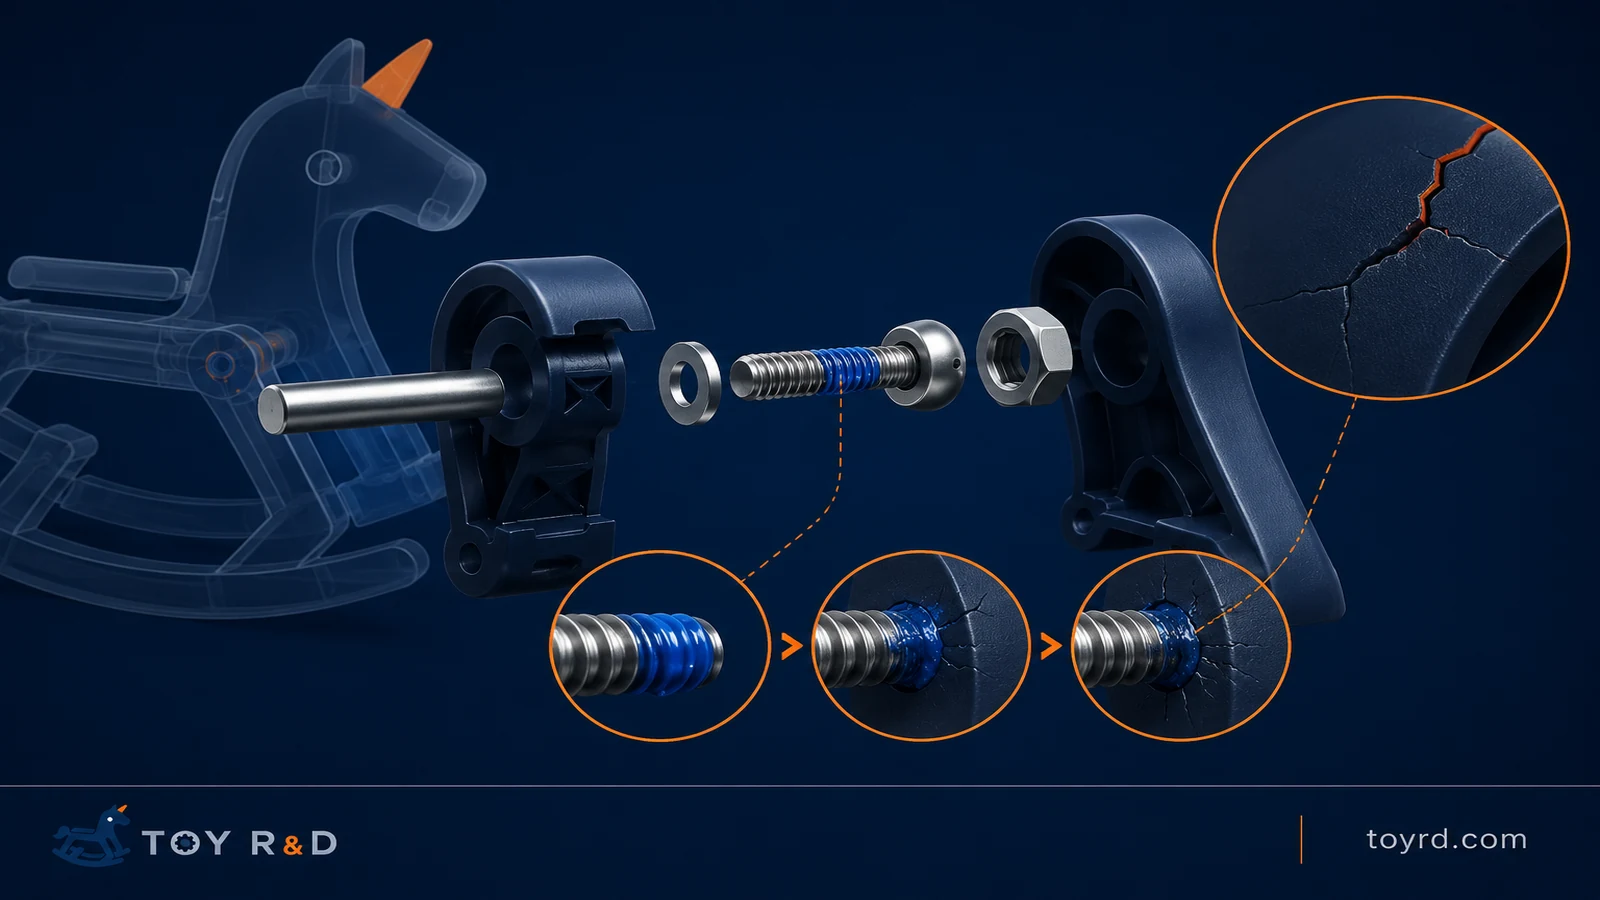
The product contained an internal moving mechanism built around a steel center shaft. In the original design, the shaft was secured using a screw-and-nut connection.
Nothing about that arrangement seemed unusual.
The real problem began when we tried to make the mechanism more reliable.
A Decision That Seemed Completely Normal
A moving mechanism can generate vibration during repeated operation.
And whenever vibration is involved, one obvious engineering question comes up:
Could the screw gradually loosen over time?
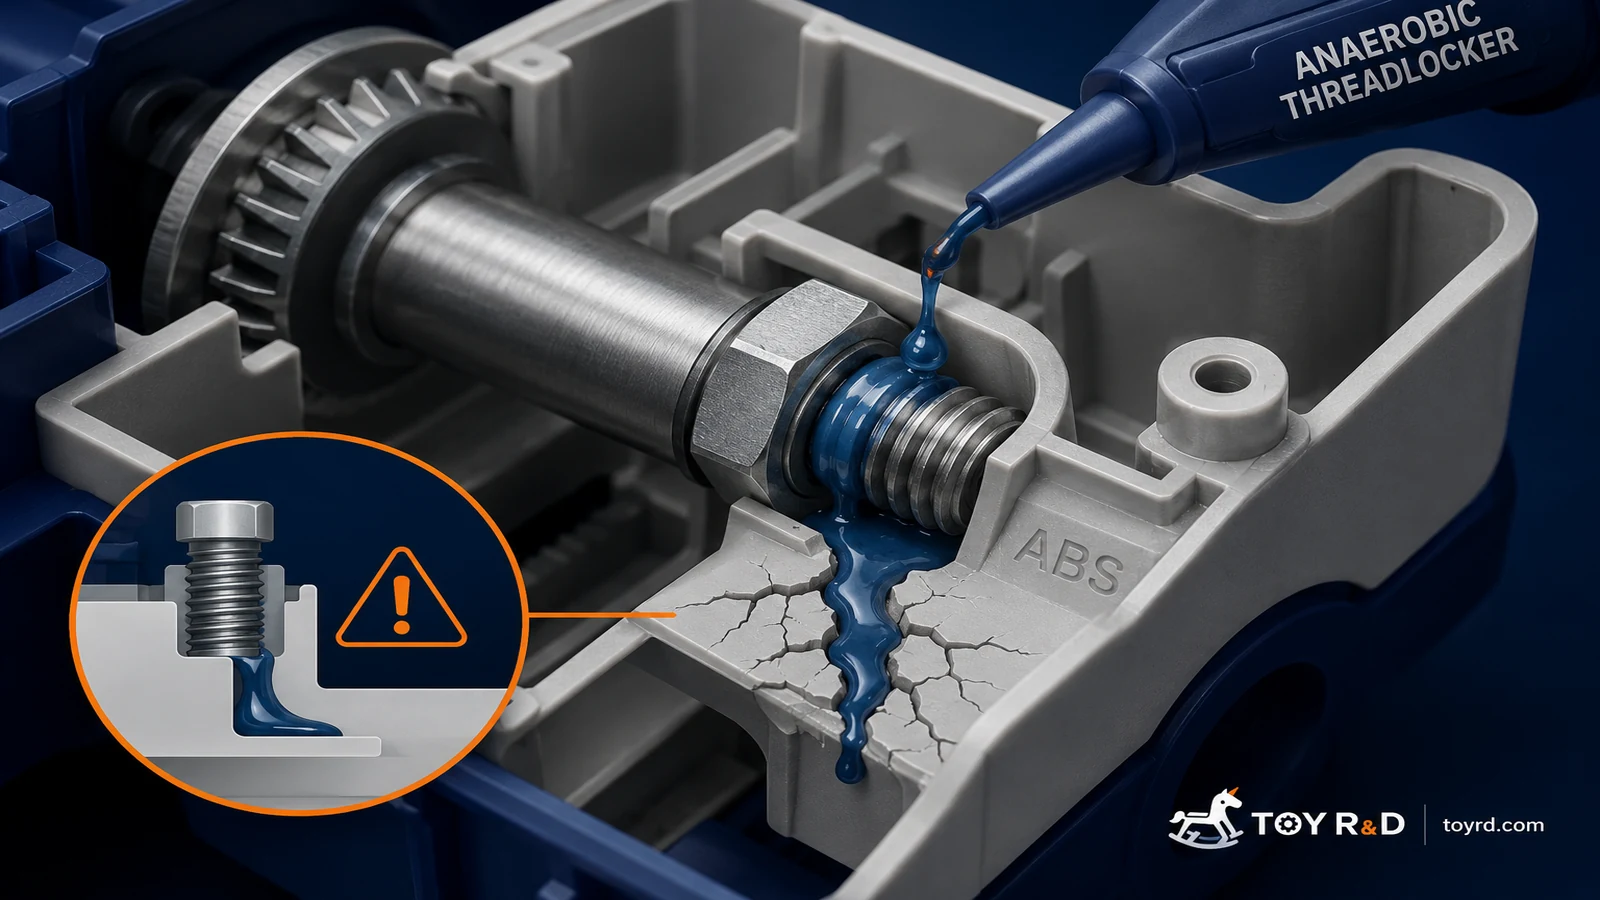
So we used a very common solution: anaerobic threadlocker on the threaded connection.
The reasoning was straightforward:
Steel shaft + metal screw/nut + vibration → use threadlocker to prevent loosening.
Looking only at the threaded joint, this seemed like a perfectly sensible engineering decision.
But the product did not consist only of metal components.
The entire mechanism was installed inside an ABS plastic housing.
That was where the real problem began.
The Failure Wasn't Actually in the Threaded Joint
During mass production, operators could not apply threadlocker with laboratory-level precision every single time.
Sometimes a little too much was applied.
Then a little more.
Excess liquid could run along the metal components and eventually reach nearby ABS parts.
At first, we did not realize how important this was.
Our attention remained focused on the mechanical structure itself:
Was the plastic part too weak?
Was the ABS wall too thin?
Was the moving mechanism creating an unexpected load?
Was assembly introducing excessive internal stress?
Did the structure simply need reinforcement?
We spent considerable time investigating why internal plastic parts were cracking.
Eventually, the investigation led us to something that had initially seemed almost irrelevant:
the threadlocker.
Anaerobic Threadlocker and ABS Can Be a Dangerous Combination
Threadlocker near stressed ABS can create a material-compatibility and stress-cracking risk.
Many threadlocking compounds are designed specifically for metal threaded fasteners.
But there is an important distinction:
Being suitable for metal threads does not mean a chemical is compatible with every plastic surrounding those threads.
Certain threadlocking formulations or their chemical components can contribute to cracking, embrittlement, or environmental stress cracking (ESC) in plastics such as ABS.
What makes this kind of failure particularly difficult to diagnose is that it may not look like this:
“The chemical touched the plastic, and the plastic immediately cracked.”
The real situation can be much more subtle.
An ABS component may already contain stress from injection molding, screw fastening, snap-fit assembly, interference, or mechanical loading during operation.
When an incompatible chemical reaches an already stressed area, the material's ability to tolerate that stress can be reduced.
Eventually, what you see is simply:
The ABS cracked.
And that can easily lead an engineering team to blame the plastic geometry, wall thickness, or mechanical strength while overlooking the chemical sitting next to it.
“Tell the Operator to Use Less” Wasn't Our Final Solution
Once we identified the cause, the most obvious corrective action would have been to control the amount of threadlocker more carefully.
We could have introduced dispensing fixtures, stricter work instructions, operator training, and additional QC checks.
Those measures can certainly help.
But then we asked a different question:
What if this product didn't need threadlocker at all?
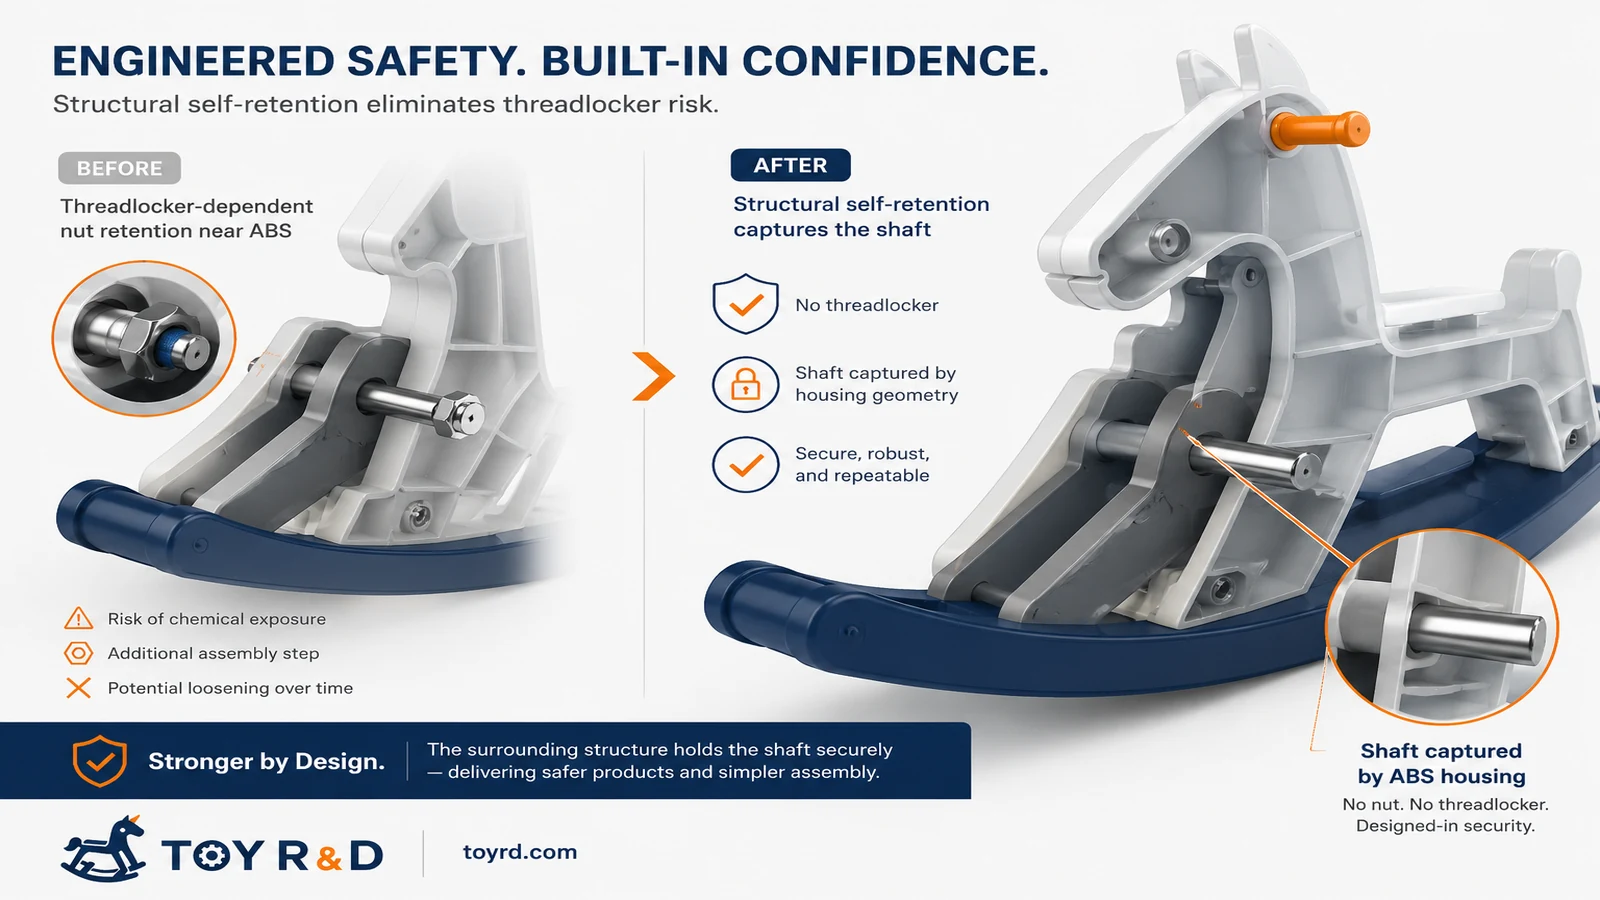
So we redesigned how the center shaft was retained.
The original design logic was:
Center shaft → screw/nut fastening → threadlocker to prevent loosening
The revised design became:
Center shaft → structural positioning → housing captures and retains the shaft
In other words, the shaft no longer depended on a tightened nut to remain in position. Instead, the surrounding housing and internal geometry physically constrained and located the shaft.
That broke the entire failure chain.
No nut that needed protection from loosening meant no need for threadlocker.
No threadlocker meant no possibility of excess adhesive reaching the ABS and creating a material-compatibility risk.
In the end, we did not simply learn to apply threadlocker more carefully.
We removed the need for it from the design.
Sometimes the Best Process Control Is Eliminating the Process
A structural retention feature can eliminate the chemical and process risk created by threadlocker.
The lesson from this case goes beyond:
“Be careful when using threadlocker near ABS.”
There is a broader design-for-manufacturing principle behind it:
If avoiding a manufacturing failure requires operators to maintain precise control every single time, first ask whether the design can eliminate that risk altogether.
If a production instruction says:
“Apply only a tiny amount here.”
“Never let it flow onto this surface.”
“Every operator must control the quantity precisely.”
then the design deserves another look.
Building ten engineering samples and manufacturing ten thousand units are very different problems.
A robust mass-production design should not merely work under ideal conditions. It should reduce its dependence on operator skill, experience, and constant attention wherever practical.
At ToyRD, we apply this design-for-manufacturing mindset early—before a process-control requirement becomes a mass-production risk.
Material Compatibility Is an Easy Layer of Product Design to Miss
Threadlocker and stressed ABS should be evaluated together as a material-compatibility risk.
Toy development often brings many different materials and process chemicals together:
ABS, PC, PP, TPE, silicone, inks, paints, adhesives, lubricants, cleaning agents, threadlockers, and more.
It is easy to think about each one separately:
ABS is a structural material.
Threadlocker is an assembly aid.
Grease belongs to the mechanical mechanism.
Ink belongs to printing.
But inside a real product, all of these materials may eventually exist in the same physical space.
So material selection should not stop at asking:
“Is this material suitable for its intended function?”
We should also ask:
“What happens when it comes into contact with the materials around it?”
This is one of the areas we pay close attention to at ToyRD. Many mass-production failures are not caused by one obviously incorrect component. They happen at the intersections between materials, mechanical structures, assembly processes, and manufacturing reality.
From “How Do We Stop This From Failing?” to “How Do We Make This Failure Mode Disappear?”
Looking back, the most valuable part of this case was not simply discovering that a threadlocker could contribute to ABS cracking.
The more important lesson was how the problem-solving approach changed.
At first, we asked:
How do we make sure this screw never loosens?
That led us to threadlocker.
After discovering the problem, we could have asked:
How do we control the threadlocker more precisely?
Instead, we eventually asked:
Why does this joint need to depend on a tightened threaded fastener in the first place?
Once the question changed, the solution changed with it.
We redesigned the shaft retention so that the housing itself constrained the shaft, removing the risky assembly process at its source.
That is a principle worth remembering in product development:
Don't only optimize a problematic solution.
>
Sometimes the better design is the one that makes that solution unnecessary.
A small amount of threadlocker once led us to investigate cracked ABS parts.
What we gained from the experience was much bigger than a rule about adhesive compatibility.
It changed the way we looked at the design itself.
*ToyRD — Practical toy product development, engineering, manufacturing, and compliance insights from real-world development experience.*
When a toy project begins, most teams naturally focus on the product itself:
What should it look like?
How should the function work?
Can all components fit inside the housing?
How should the mold be designed?
Can the target cost be achieved?
But there are two questions that are often left until much later:
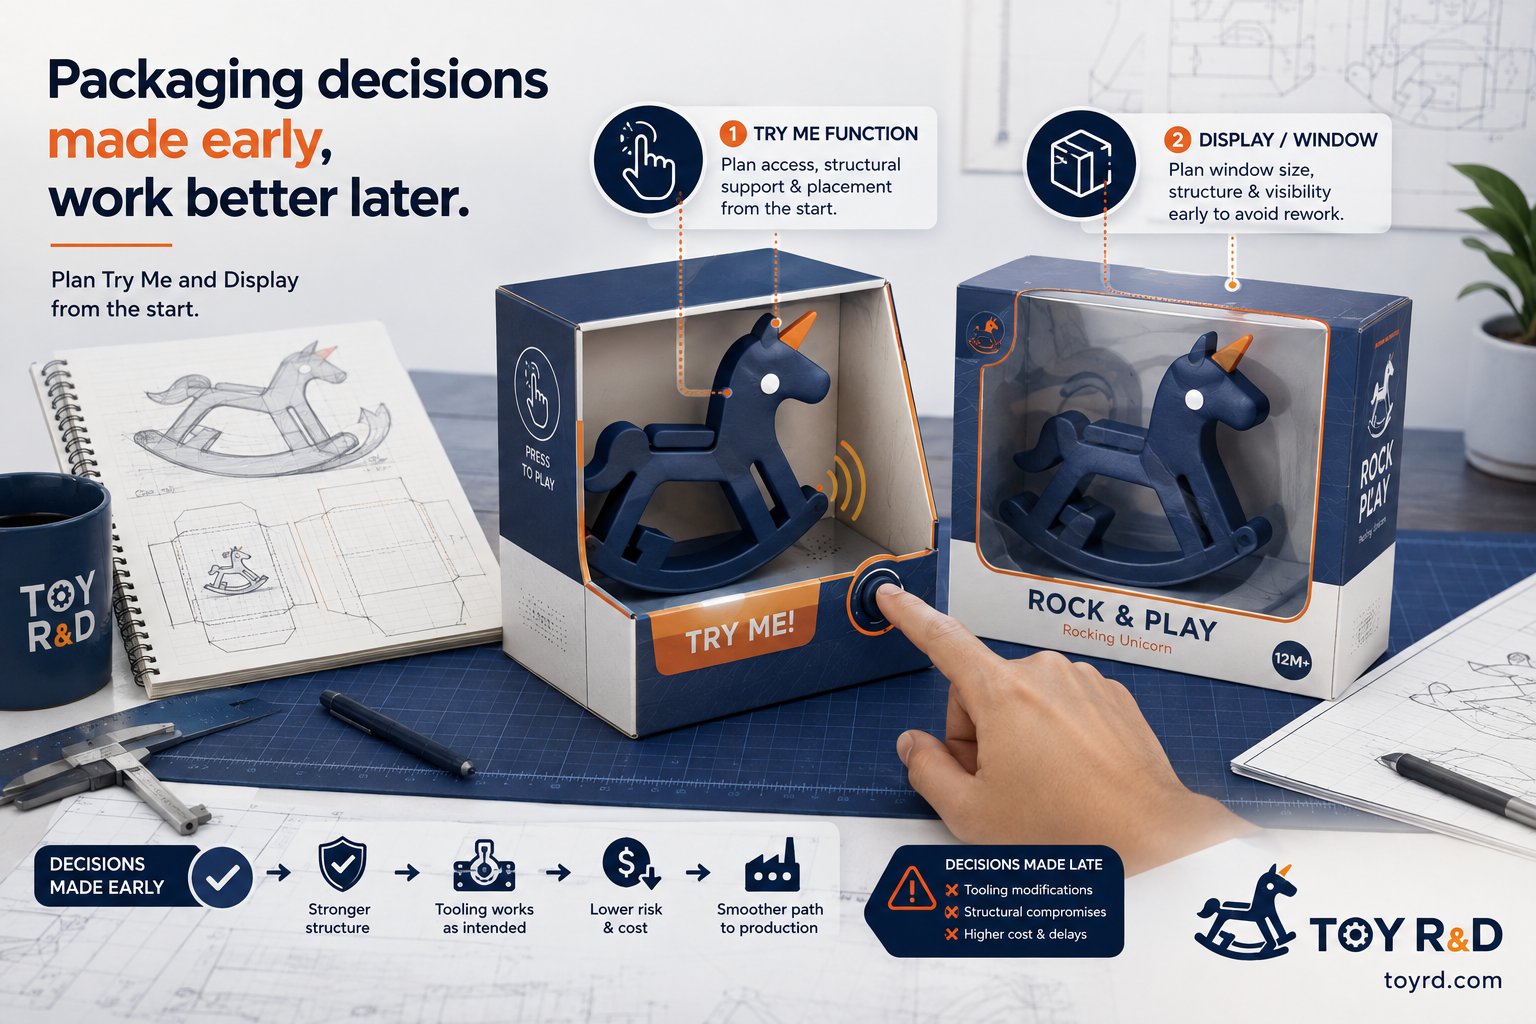
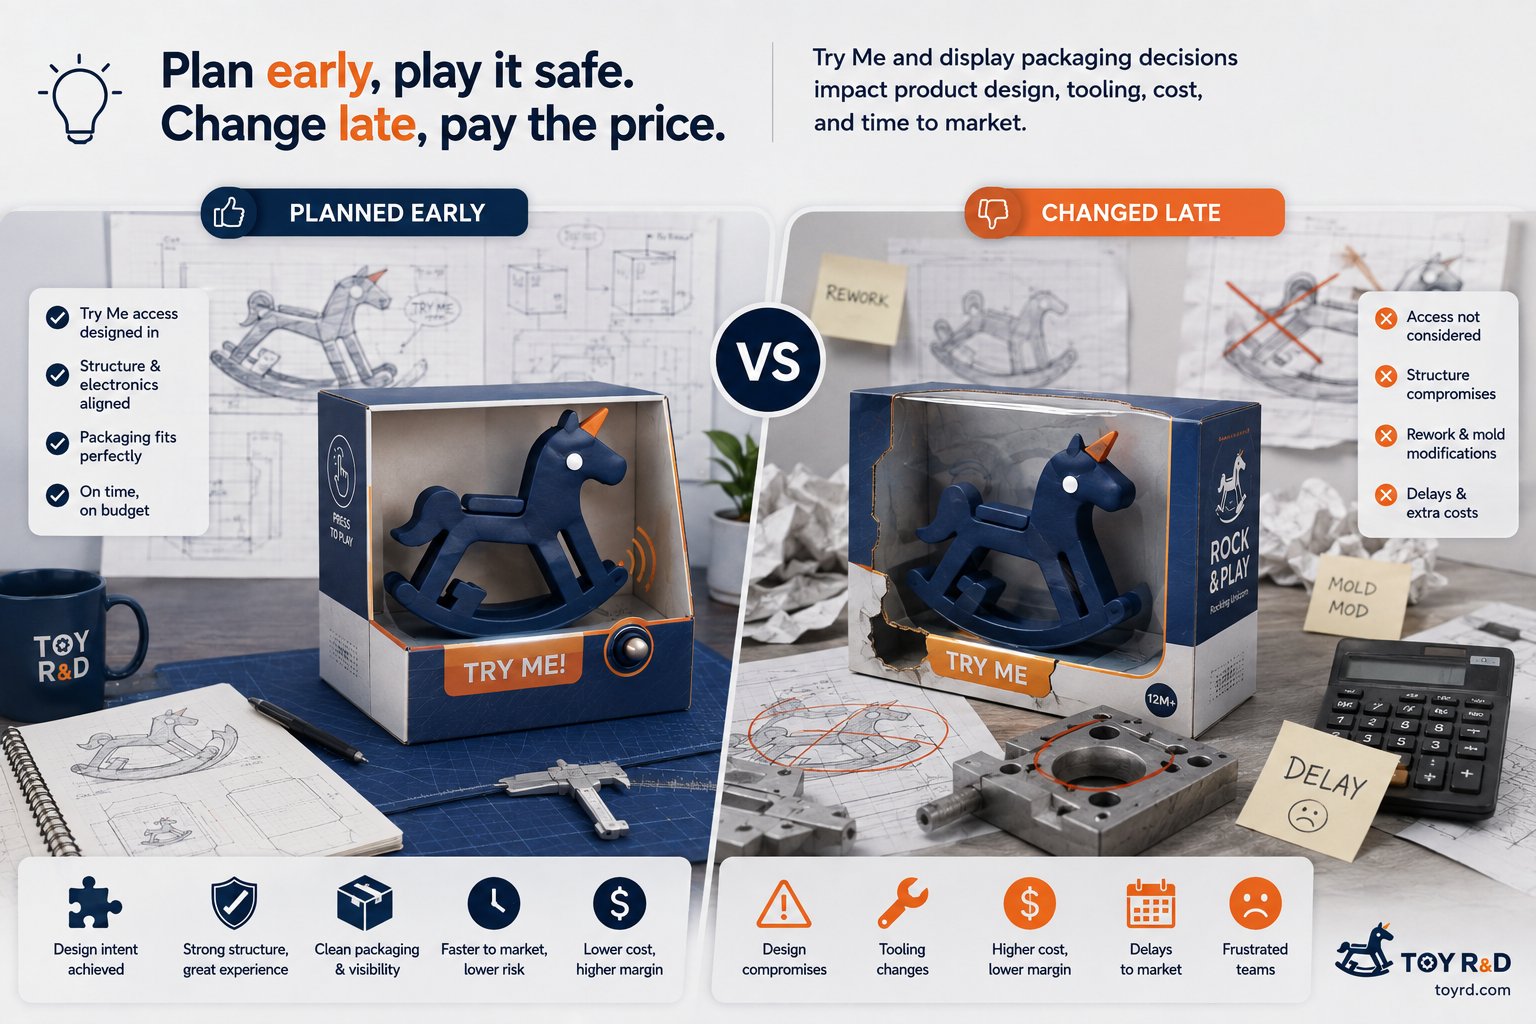
Does the product need a Try Me function while it is still inside the packaging?
Will the product use a window box, display box, open box, or another presentation-focused packaging format?
At first glance, both questions sound like packaging decisions.
In reality, they can directly affect the electronics, firmware, mechanical structure, and even the mold design.
If these requirements are only raised after the product structure has been frozen and the tooling is already completed, what looked like a small packaging request can quickly turn into a serious engineering problem.
1. A Try Me Function Is More Than Just a Hole in the Box
Plan Try Me access and display windows early to avoid rework.
Many electronic toys are designed so consumers can experience a key feature without removing the product from the package.
For example, the shopper may be able to:
press a button to hear a sound,
activate a light,
trigger a motion,
play a short demo,
or experience the product’s main selling point.
This is commonly known as a Try Me function.
At first, the requirement may sound simple:
Just open a hole in the packaging so the customer can press the product button.
But in real product development, it is rarely that simple.
The button location has to work with the packaging
If the main button is located on the back, underneath the product, or in an area that becomes inaccessible once the product is secured inside the package, the packaging team may have no practical way to expose it.
At that point, the project may need to:
move the button,
add a dedicated Try Me button,
modify the PCB,
add wiring,
add a secondary trigger mechanism,
or route a cable from the product to a button mounted on the package.
A requirement that originally sounded like a packaging detail has now started to affect the electronics and mechanical design.
2. Try Me Mode May Also Require Dedicated Firmware or Hardware Logic
There is another issue that is easy to overlook:
The behavior of a toy in retail display mode is often different from its behavior during normal use.
For example, in normal operation, pressing a button may trigger a full song, a long lighting sequence, or a complete movement cycle.
But in a retail store, customers may press that button repeatedly throughout the day.
If the toy always runs its full sequence, the batteries may drain before the product is even sold.
For that reason, some toys are designed with dedicated modes such as:
Try Me Mode,
Demo Mode,
Short Play Mode,
or a switch between display mode and normal use mode.
That means the product may need dedicated firmware logic from the beginning.
In some cases, the hardware architecture also needs to support this mode.
From a ToyRD product-development perspective, Try Me should therefore not be treated as a packaging-only feature.
It is better understood as a system-level requirement that connects the product, electronics, firmware, mechanical structure, and packaging.
3. Window Boxes and Display Packaging Can Change the Product Structure
The second issue is the packaging format itself.
If a toy is packed inside a fully closed carton, there is often more flexibility in how the product is restrained internally.
But if the product uses:
a window box,
a display box,
an open box,
or another semi-open retail presentation,
the situation becomes very different.
The product is visible to the customer and may even be partially accessible.
Its position inside the package therefore needs to remain stable during transportation, handling, and retail display.
This creates a practical engineering question:
How will an irregularly shaped toy actually be fixed inside the packaging?
Toy products are often far from rectangular.
They may have curved bodies, protruding parts, soft components, wheels, handles, or other unusual geometry.
A simple inner tray may not be enough.
Possible fixing methods may include:
cable ties,
molded trays,
cardboard restraints,
plastic clips,
screws,
or dedicated packaging fixation points on the product itself.
And this is where packaging can begin to affect the mold.
4. A Small Packaging Screw Can Change the Mold Design
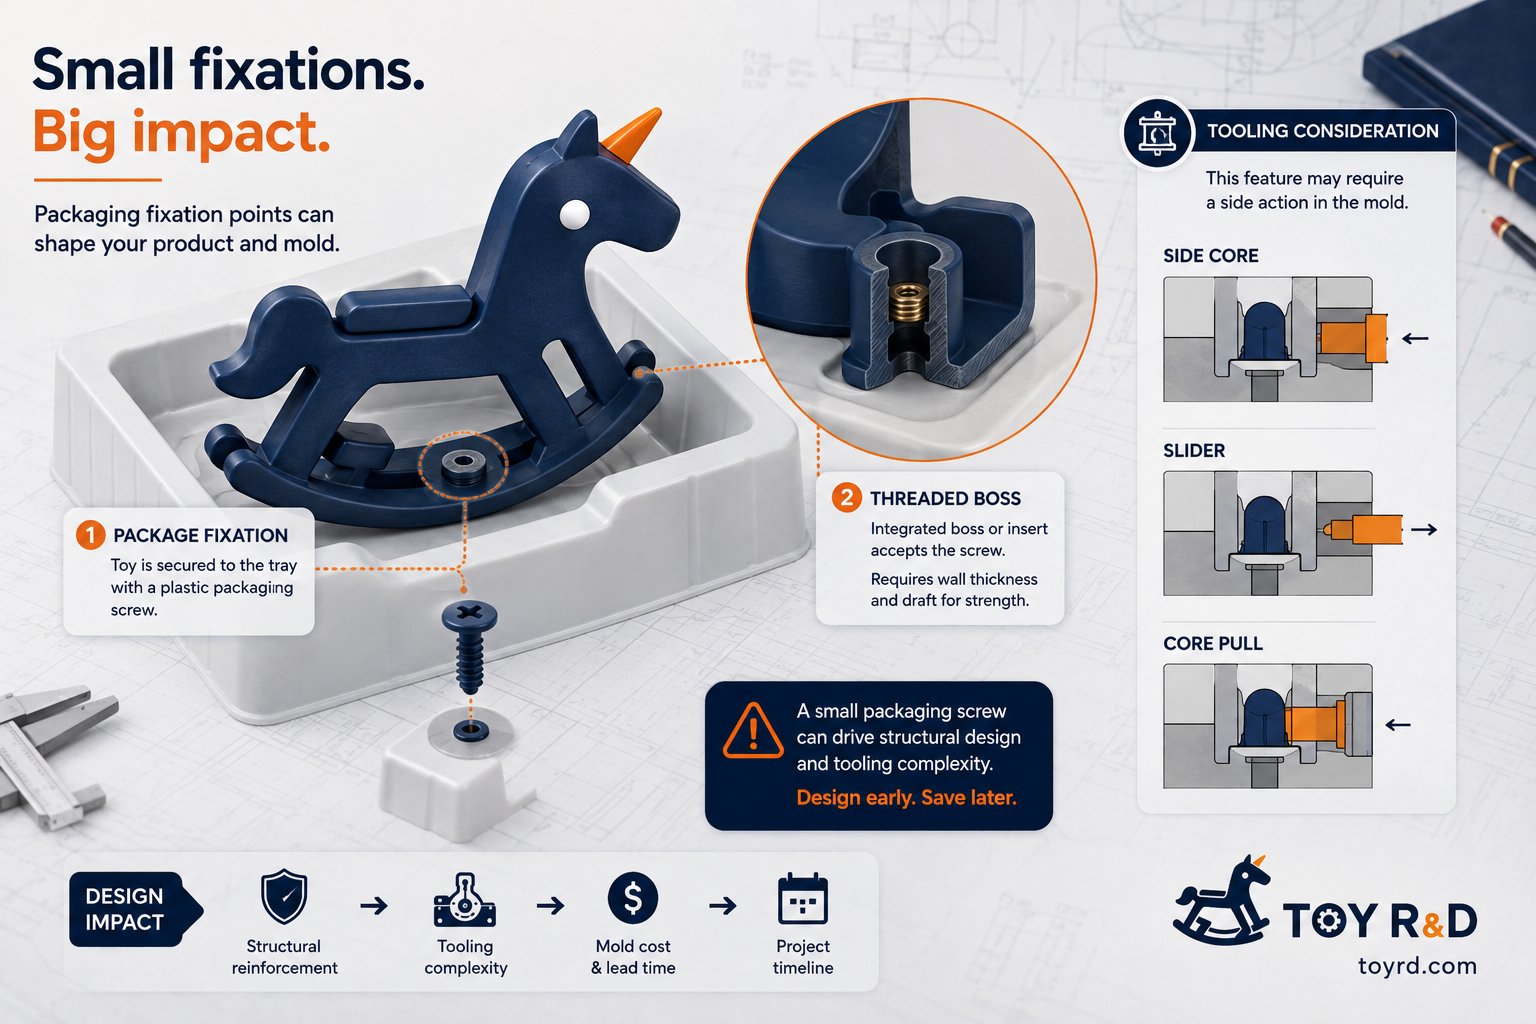
A small packaging screw can influence mold architecture.
One common way to secure a product onto an inner tray is to use a plastic fixing screw from the rear or bottom of the tray.
From the packaging side, it looks like a very small component.
From the mechanical engineering side, however, the situation is different.
If the packaging screw needs to engage with the product, the product itself must include a matching feature.
It could be thought of as:
a threaded interface, screw boss, or nut-like fixing structure designed specifically for packaging.
Now consider what happens if that fixing feature is not aligned with the normal mold opening direction.
The tool may require:
side actions,
sliders,
lifters,
core pulls,
or another special demolding mechanism.
Suddenly, a tiny packaging screw has started to influence the mold architecture.
That is exactly why this requirement must be discussed before the tooling design is finalized.
5. The Real Problem Is Not Just the Cost of Mold Modification
A common response is:
If we need it later, can’t we just modify the mold?
Sometimes yes.
But sometimes the answer is no.
Once a mold has been designed and built, the core steel, mold base, cooling channels, ejector layout, sliders, and surrounding mechanisms have already occupied most of the available space.
If the original tool was never designed for a side core or additional fixing structure, a late change may create problems such as:
insufficient steel around the required area,
no room for a slider mechanism,
interference with cooling channels,
interference with ejector pins,
collision with internal product structures,
insufficient mold strength,
excessive modification cost.
The worst-case scenario is not simply that the mold modification becomes expensive.
The real worst case is:
the existing mold no longer has a practical way to create the required feature at all.
At that point, the team may be forced to choose between several bad options:
redesign the packaging,
redesign the product,
accept a weaker retail presentation,
develop a more complicated fixing method,
or, in extreme cases, rebuild tooling.
All of this may have been avoided if the packaging fixation point had been considered before tooling started.
6. Packaging Is Not the Last Step of Product Development
Early planning keeps structure, tooling, and cost under control.
When teams think in this sequence, packaging naturally feels like something that can be solved at the end.
For retail toys, that is often a mistake.
A better way to think about it is:
Packaging is part of the product system.
Packaging decisions may determine:
whether the product needs a Try Me function,
which controls must remain accessible,
how the product is presented,
how the product is restrained,
whether packaging screws are required,
where fixation points must be located,
whether the mold requires side actions,
whether the product can survive shipping while maintaining its presentation,
and whether the final retail display achieves the intended visual effect.
Some packaging decisions therefore need to be made before the mold is designed, not after.
7. Two Questions We Prefer to Ask Early
At ToyRD, these are the kinds of questions that are worth discussing before the mechanical design is finalized.
Question 1: Does the product need a Try Me function?
If the answer is yes, continue asking:
Where will the customer interact with the product through the packaging?
Can the existing product button be reached?
Is a dedicated Try Me button required?
Does the PCB need an additional connector or input?
Does a wire need to extend from the product to the package?
Is a dedicated Demo Mode required?
Will any of these requirements affect the external design or internal structure?
The earlier these questions are answered, the easier the implementation becomes.
Question 2: How will the product be displayed and fixed inside the package?
If the product will use a window box or display-oriented package, consider:
What position should the product maintain?
Can it move during transportation?
Is an inner tray enough?
Can cable ties solve the problem?
Is a plastic packaging screw needed?
If so, where will the screw engage with the product?
Does the fixing feature affect the mold opening direction?
Is a slider, lifter, or core pull required?
If any of the answers affect the tool structure, the requirement belongs in the early engineering review.
8. Small Requirements Can Become Large Problems
Toy development is full of details like this.
The original requirement may be tiny:
one button,
one hole,
one cable,
one screw,
one threaded feature.
But once that small requirement crosses the boundaries between packaging, product design, electronics, mechanical engineering, and tooling, its impact can grow very quickly.
Experienced product development is not only about solving difficult problems later.
It is also about identifying them while they are still cheap to solve.
Adding a small structural feature before tooling may take only a few minutes of CAD work.
Adding the same feature after tooling is complete may require a mold modification.
And sometimes, the existing mold may not be able to support the change at all.
So if a toy may require a Try Me function, a window box, or a display-style package, do not wait until the packaging artwork starts.
These decisions belong much earlier in the product-development process.
Because in toy development:
Packaging may be produced near the end, but packaging requirements should never be designed at the end.
Why approval gates, written decisions, and clear processes matter in product development
In a small product development team, informal communication can work surprisingly well.
The boss walks into the R&D office and says, “Go ahead with the tooling.” A salesperson tells an engineer that the customer wants a color change. Someone sends a supplier a message, and the project moves forward.
When there are only a few people and a few projects, this can feel fast and efficient.
But as the number of products, suppliers, customers, engineers, quotations, samples, molds, certifications, packaging files, and revisions increases, this way of working starts to break down.
The problem is not that people stop working hard.
The problem is that the company is still trying to run on memory, verbal instructions, and personal judgment when the organization has already become too complicated for that.
At ToyRD, I want to document the parts of product development that rarely appear in textbooks: customer requests that change halfway through a project, suppliers that say “yes” before fully checking, managers who disagree, prototypes that move forward too early, and tooling decisions that suddenly turn uncertainty into real cost.
From that perspective, a professional R&D process is not about adding bureaucracy. It is about making important decisions visible, traceable, and executable.
A good process turns “someone said so” into a decision the whole team can follow.
Note: The example below is adapted from real patterns I have seen in product-development environments. Identifying details have been changed and simplified.
A Familiar Problem in a Family-Run Company
Clear approval gates turn conflicting directions into a decision the whole team can follow.
Consider a consumer-products company managed by a father and his son.
The father founded the business. He has decades of experience and is comfortable making decisions quickly based on instinct. He knows the suppliers, understands the market, and often has a strong feeling about whether a product is worth pursuing.
His son is more involved in sales, customers, pricing, and commercial planning.
One afternoon, the father looks at a new product prototype and tells the R&D team:
“This looks good. Start the tooling. We need to move quickly.”
The engineers begin preparing files for the mold supplier.
The next morning, the son hears about it and says:
“Do not start tooling yet. The customer has not confirmed the target price.”
The team stops.
A day later, the father asks why nothing has happened.
“I already approved it. Why are we still waiting?”
Now the R&D manager is stuck in the middle.
Who should the team listen to?
The father?
The son?
The latest instruction?
The person with the strongest opinion?
At first glance, this looks like a conflict between two managers.
But the deeper problem is different.
The company has never clearly defined one simple question:
What exactly must happen before a project is officially approved for tooling?
Without that definition, every project depends on interpretation.
And interpretation becomes dangerous when money, tooling, lead time, testing, and customer commitments are involved.
This is one reason I believe process becomes most valuable not when people agree, but when reasonable people disagree.
A good process does not decide who is right. It decides where the disagreement must be resolved before execution continues.
The Real Purpose of a Process: Define Who Decides What
Many companies already know *how* to develop a product.
The difficult part is defining:
Who proposes a change?
Who reviews the technical feasibility?
Who confirms the cost?
Who checks the commercial assumptions?
Who approves the investment?
Who is allowed to tell the supplier to proceed?
Without these boundaries, everyone can be involved while nobody is truly responsible.
If one of these steps is missing, the project may still move forward—but the risk moves forward with it.
Sales may assume R&D has approved the change.
R&D may assume management has approved the extra cost.
The supplier may assume the customer has already confirmed the design.
And by the time someone realizes that the decision was never formally made, samples may have been produced, tooling may have started, or delivery time may already have been affected.
That is why the most important parts of a process are often not the arrows in a flowchart.
They are the decision gates.
At ToyRD, this is the distinction I care about most: a process should be designed around decisions that change risk, cost, or reversibility—not around forms for their own sake.
Written Decisions Are More Valuable Than “Everyone Knows”
One of the most dangerous phrases inside a company is:
“Everyone should know this already.”
A reliable team should not depend on what everyone *should* remember.
Important decisions should leave a trace.
For example, this is not a useful project record:
“Change the dog ear color.”
Six months later, nobody knows:
Which version was changed?
What color was approved?
Who requested it?
Did the customer approve it?
Did the cost increase?
Did the supplier already make the sample?
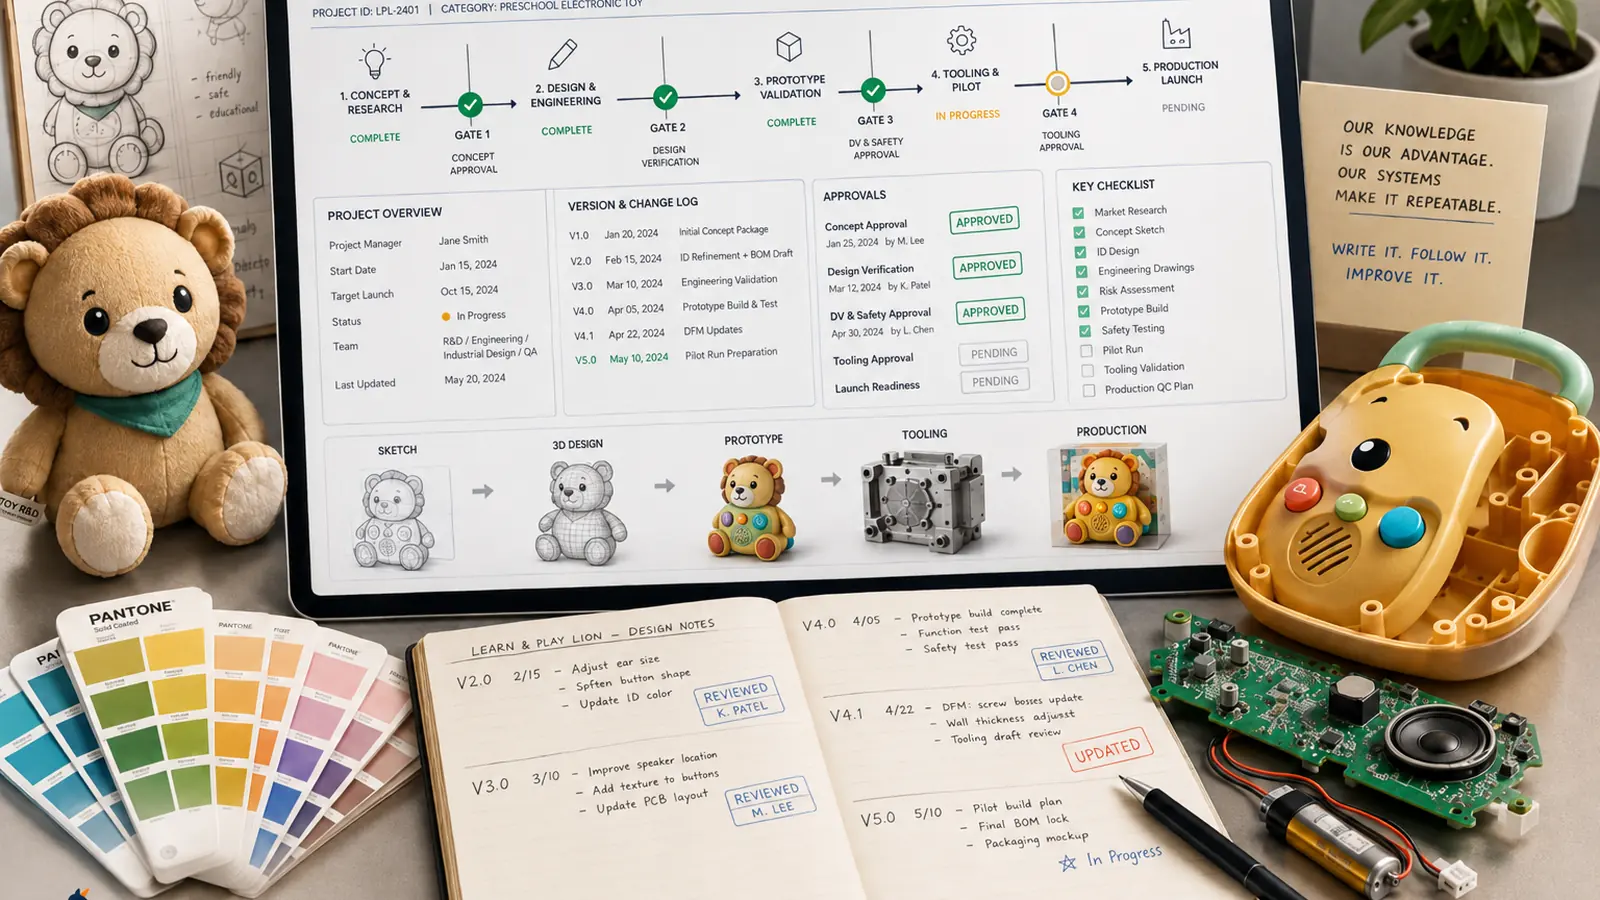
A useful record would look more like this:
V3: Dog-ear color changed from Pantone A to Pantone B. Spray-painting process added. Unit cost increased by RMB 0.35. Customer confirmation received on August 26. Approved to proceed with the next sample.
Now the decision has a version, a reason, a cost impact, an approval status, and a next step.
That is what “traceable” actually means.
It does not mean creating paperwork for the sake of paperwork.
It means that months later, another engineer—or even a new employee—can understand what happened without relying on someone’s memory.
In physical product development, this matters even more because decisions often become physical objects: a sample, a mold insert, a PCB, a printed package, a certification sample, or thousands of finished units.
Once a vague instruction becomes a physical object, correcting it gets expensive.
A Process Should Reduce Communication, Not Create More of It
A visible development process makes the current stage and the next decision clear.
People often associate approval systems with bureaucracy.
That can certainly happen when a process is badly designed.
But a good process should actually reduce unnecessary communication.
Without a clear system, teams repeatedly ask questions such as:
Has the boss approved this?
Has the customer confirmed the sample?
Is this the final version?
Can we send the tooling deposit?
Who approved this cost?
Are we allowed to release the drawing to the supplier?
These questions exist because the project is sitting in an ambiguous state.
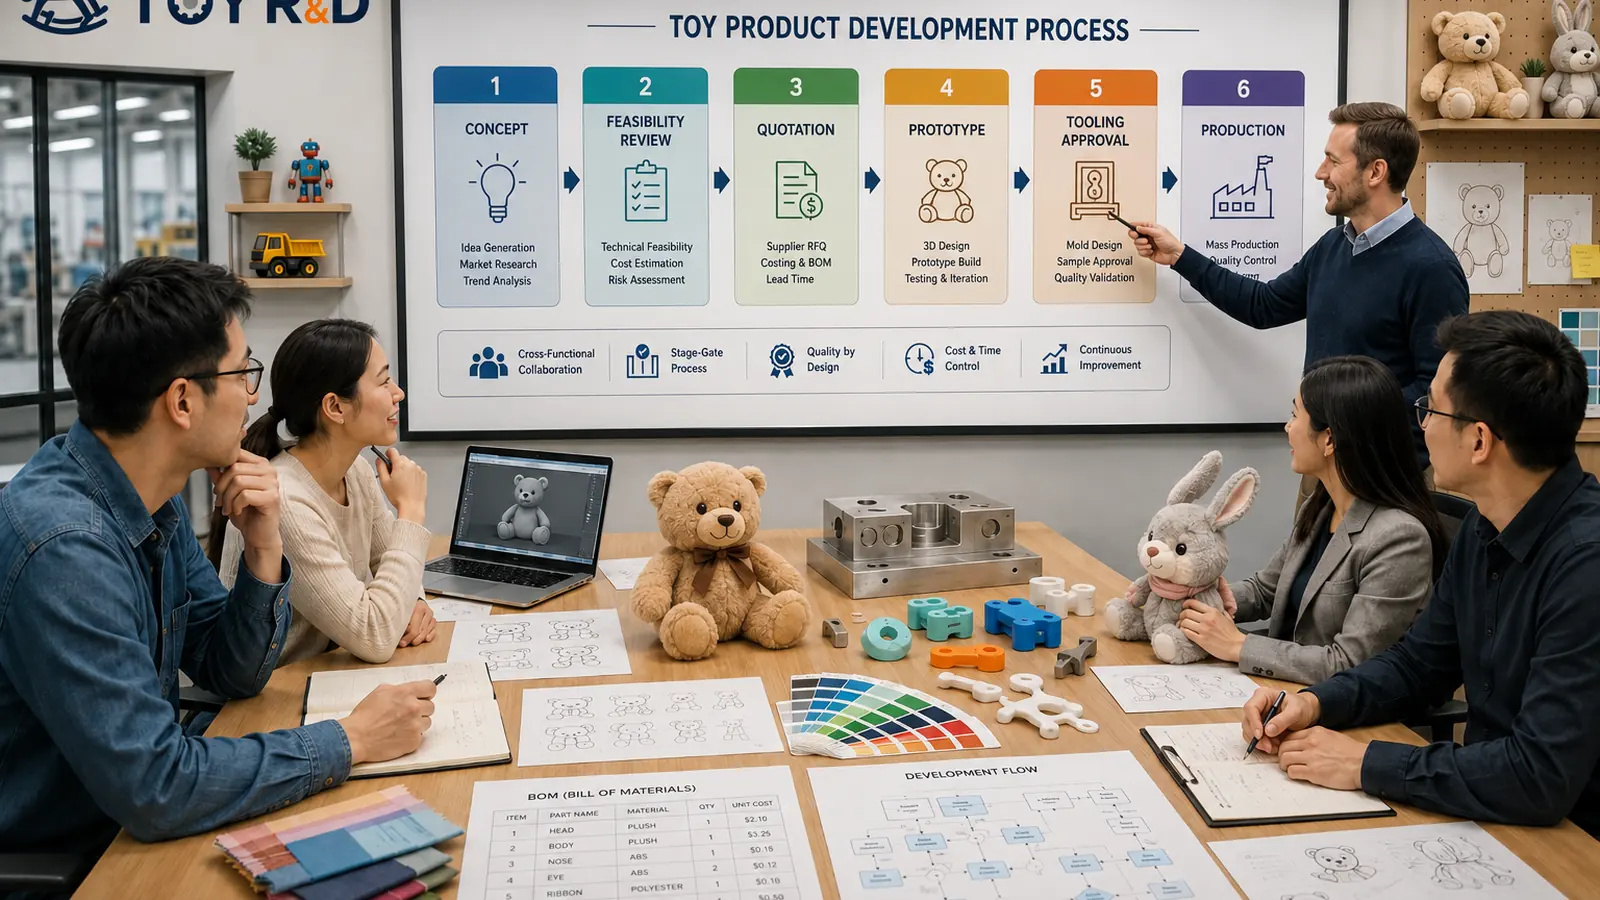
A clearer development system might use stages such as:
When the status is clear, the team does not need to keep asking what they are allowed to do next.
The process answers the question.
This is an important principle for small teams in particular. A process should not be a second job layered on top of product development. It should remove repeated clarification, reduce rework, and make the current state obvious.
The Process Did Not Eliminate Disagreement
Back to the father-and-son company.
The company eventually introduced a more structured development process.
Tooling could no longer begin simply because someone said, “Go ahead.”
Before a project entered Tooling Approved, several points had to be confirmed:
The basic structure was frozen.
The tooling quotation had been reviewed.
The expected product cost was understood.
The customer’s target price or commercial direction was clear.
The expected order quantity had been discussed.
The person with final investment authority had formally approved the tooling.
This did not mean the father and son suddenly agreed on everything.
The father could still say:
“We should move now. If we wait too long, we will miss the market.”
The son could still reply:
“The customer has not committed yet. I do not want to spend on tooling before the business case is clear.”
Both opinions could still be valid.
The important change was that their disagreement now had a place to be resolved.
Before the process, disagreement leaked directly into execution.
After the process, the discussion had to end at a defined approval point before the team moved forward.
The process did not eliminate disagreement. It stopped disagreement from leaking into execution.
That distinction matters.
In my view, this is one of the strongest reasons to formalize a workflow. The workflow is not there because managers should never change their minds. It is there so that a change of mind becomes a visible new decision instead of silently overwriting the old one.
Good R&D Processes Need Gates, Not Endless Forms
A product development process should contain a small number of meaningful gates.
The exact structure depends on the company, but a typical toy or consumer-product development workflow might include the following.
Gate 1: Is This Project Worth Developing?
Before engineering resources are committed, the team should understand the basic business case.
Questions may include:
Who is the customer?
Is this ODM, OEM, or internal development?
What is the expected order quantity?
Is this a test order or a long-term program?
What is the target price?
What development investment might be required?
Not every idea deserves the same amount of engineering time.
Gate 2: Is It Technically Feasible?
The engineering team reviews the concept.
For toys and baby products, this may involve:
Mechanical structure
Electronics
Firmware or app requirements
Battery and power design
Material selection
Safety risks
Testing requirements
Regulatory considerations
This is where an attractive concept begins to meet engineering reality.
Gate 3: Does the Cost Make Sense?
The company should understand not only the unit cost, but also the development investment.
That may include:
BOM cost
Tooling cost
Decoration processes
Packaging
Testing and certification
Sample cost
MOQ
One-time engineering expenses
A product with an acceptable unit price can still be a poor project if the tooling investment is too high for the expected order volume.
Gate 4: Are We Really Ready to Start Tooling?
This is one of the most important gates in physical product development.
Once steel is cut, flexibility decreases quickly.
Before tooling begins, the company should know:
Which design revision is being tooled?
What is still open?
Who accepted the tooling quotation?
Who accepted the commercial risk?
What happens if the customer changes direction?
I keep returning to tooling in ToyRD articles because it is such a clear example of an irreversible decision. Before tooling, uncertainty is mostly discussion, CAD, samples, and engineering time. After tooling begins, uncertainty becomes money.
Gate 5: Is the Final Sample Approved?
The sample used for production should be clearly identified.
Ideally, there should be a defined golden sample or final approved sample, together with the relevant drawings, BOM revision, artwork, firmware version, and packaging files.
“Use the latest sample” is not a system.
A production team should know exactly what “latest” means.
Gate 6: Are We Ready for Production?
Before mass production, the team should confirm that critical open issues have been closed.
Depending on the product, this might include:
Product testing
Compliance documentation
Packaging approval
Instruction manual
Labeling
Software or firmware version
Quality requirements
Production sample approval
The goal is not to create a perfect document system.
The goal is to prevent known uncertainty from quietly becoming production risk.
Different Decisions Deserve Different Levels of Approval
One mistake companies make is treating every change as equally important.
They are not.
Changing the position of a small printing graphic is not the same as modifying a PCB.
Changing a packaging sentence is not the same as opening a new mold.
Changing a decorative color is not the same as changing a safety-related structure.
A useful principle is:
Different decisions deserve different levels of approval.
Low-risk changes should move quickly.
High-cost, high-risk, or difficult-to-reverse decisions should require stronger confirmation.
This is how a process avoids becoming bureaucracy.
The process should be proportional to the risk.
The cost of the process should never exceed the risk it is trying to control.
If a ten-minute problem requires three forms and five signatures, the process itself has become waste.
Process Is Also a Boundary of Responsibility
A good workflow does more than define project stages.
It defines responsibility.
For example:
Sales owns the commercial requirement and customer communication.
R&D owns technical feasibility and engineering judgment.
Purchasing owns supplier communication, quotation, and sourcing support.
Quality or compliance owns testing and regulatory requirements.
Management owns major investment decisions.
The exact boundaries vary from company to company.
What matters is that the team knows where one person’s responsibility ends and another begins.
Without this, companies often reach the same uncomfortable situation:
Everyone was involved, but nobody was responsible.
A process is not mainly useful when something goes wrong and management wants to find someone to blame.
Its real value appears earlier.
It tells people what they are responsible for *before* the problem happens.
What I Would Actually Implement in a Small R&D Team
A shared record keeps revisions, approvals, and open risks visible beyond any one person’s memory.
I do not think a small product-development team needs an expensive enterprise system before it can become more disciplined.
If I were starting from a messy, mostly verbal workflow, I would begin with five very simple things.
1. A Visible Project Status
Every active project should have one clearly defined current stage.
Not “almost ready.” Not “probably waiting for the customer.”
Something explicit, such as:
Prototype Testing — Waiting for Customer Approval
2. A Short Decision Log
For every meaningful change, record:
Date
Revision
Decision
Reason
Cost or schedule impact
Approver
Next action
This can be extremely simple. The important thing is that the decision survives the conversation.
3. A Few Hard Approval Gates
Do not create twenty approval points.
Start with the decisions that can create the biggest losses if they are misunderstood:
Development investment
Tooling release
Major structural change
Final sample approval
Production release
4. One Source of Truth for Revisions
The drawing revision, BOM revision, sample status, artwork revision, and firmware version should not live in five unrelated chat histories.
The team needs one place where the current approved state is visible.
5. Escalation Rules
When two managers disagree, the R&D team should not have to guess whose instruction wins.
The system should define who has final authority for different types of decisions.
This is less glamorous than a new PLM system, but in many small teams it creates far more value.
It is also the kind of practical system I want ToyRD to keep exploring: not process for process’s sake, but small mechanisms that prevent expensive ambiguity.
The Best Process Makes the Company Less Dependent on Individuals
There is a simple test for whether a development organization is mature.
Ask what happens when a key person is absent for two weeks.
If the project stops because nobody knows:
What was approved,
Which sample is current,
Why a change was made,
What the supplier promised,
Who has authority to make the next decision,
then the company does not really have a system.
It has experienced people holding the system together in their heads.
That can work for years.
But it is fragile.
A better organization allows someone else to open the project record and understand:
1. Where the project is now. 2. What has already been decided. 3. Why those decisions were made. 4. What risks are still open. 5. Who must approve the next step.
At that point, the company begins to operate more like a machine—not because people are treated like machines, but because the system remembers the rules while people focus on judgment.
That is an important difference.
When Experience Becomes Process, It Becomes Organizational Capability
An experienced R&D manager may carry hundreds of lessons from previous projects.
They know which supplier promises are dangerous.
They know when a sample is not ready for tooling.
They know which customer changes are likely to affect certification.
They know when a quotation looks incomplete.
They know what information must be confirmed before money is committed.
If all of this knowledge remains inside one person’s head, it is personal experience.
But when those lessons are converted into:
Approval gates
Checklists
Revision logs
BOM controls
Quotation templates
Tooling approval records
Sample approval forms
Decision logs
then experience becomes a repeatable system.
And a repeatable system becomes organizational capability.
When experience becomes a process, individual knowledge becomes organizational capability.
That is the real reason an R&D team needs process.
Not because every decision should be slow.
Not because every action needs a form.
And not because management wants more control.
The goal is much simpler:
Important decisions should not disappear into conversations.
They should become visible decisions that the whole team can follow.
Why I Am Writing About This on ToyRD
ToyRD is not intended to be a collection of abstract management theory.
What interests me is the practical layer between an idea and a product that can actually be manufactured: quotations, samples, tooling, BOMs, supplier follow-up, testing, approvals, revisions, and the hundreds of small decisions that determine whether a project stays under control.
Many of these problems look trivial when described one by one.
A missing approval line. An outdated BOM. A supplier working from the wrong drawing. A manager changing direction in a chat message. A customer request that never made it into the project record.
But this is exactly where physical product development becomes difficult.
Over time, I want ToyRD to do more than write about these problems. I also want to turn some of these lessons into practical tools: tooling approval checklists, quotation review tools, BOM controls, sample approval records, costing tools, and lightweight project-development templates that small teams can actually use.
That is the ToyRD approach I want to build around:
Real product-development problems, converted into practical systems and tools.
Because the goal is not to make a company look more organized.
The goal is to make fewer expensive mistakes.
ToyRD — Practical thinking, tools, and field notes for toy and physical product development.toyrd.com
In toy development, the most expensive compliance problem is not always a failed test.
Sometimes the bigger problem starts earlier: a new regulation is interpreted in a certain way, the product is redesigned around that interpretation, and the redesign then triggers a different set of safety requirements.
What looks like a conflict between two regulations may actually be a chain reaction caused by an earlier design decision.
We recently came across a good example involving a rechargeable electronic toy. The case is useful because it shows why compliance should not be treated as something that happens only after a sample arrives at the laboratory.
At ToyRD, this is exactly the kind of problem we like to examine from the development side: not only *what does the standard say?*, but also *what product definition did we create before the standard was applied?*
The Original Product Was Never Designed for Consumer Battery Replacement
Battery serviceability changes the enclosure design and must be considered alongside toy-safety requirements.
The product was a rechargeable electronic toy with sound and light functions.
Internally, it contained the usual components: a PCB, a rechargeable lithium-polymer battery, a speaker, LEDs, and a charging circuit.
The original enclosure was simple. The upper and lower plastic housings were joined by ultrasonic welding.
From a product-use perspective, there was no reason for the consumer to open the housing. The user could charge and operate the toy normally, while the battery remained inside the product.
In other words, the original design logic was:
Rechargeable product, sealed enclosure, no user battery replacement.
Then the EU Batteries Regulation entered the discussion.
"The Battery Must Be Replaceable" Became "The Consumer Must Replace It"
Regulation (EU) 2023/1542 introduced new requirements for the removability and replaceability of portable batteries.
Article 11 establishes a general rule that portable batteries incorporated into products should be readily removable and replaceable by the end-user during the lifetime of the product. It also explains that commercially available tools may be used; "removable" does not necessarily mean tool-free.
The requirement under Article 11 applies from 18 February 2027.
When the customer first heard about this requirement, the interpretation was understandable:
The battery can no longer be permanently sealed inside the product.
But the next assumption was more consequential:
Therefore, the consumer must be able to open the toy and replace the battery personally.
That assumption immediately became a mechanical-design decision.
The original ultrasonic-welded enclosure was changed to a screw-closed enclosure.
On the surface, this looked like a straightforward compliance improvement:
Ultrasonic welding = cannot open.Screws = can open.
But something more important than the fastening method had changed.
The product's serviceability definition had changed.
It was no longer merely a rechargeable product with an internal battery. It was moving toward being defined as a product whose internal battery was intentionally accessible for replacement by the user.
That distinction matters.
One Sentence in the Instructions Changed the Compliance Path Again
Later, the customer prepared the user instructions and included wording stating that the consumer could open the product and replace the internal battery.
That sentence reinforced the new product definition.
From a compliance perspective, the laboratory was no longer looking only at a rechargeable toy with an internal battery. The documentation now explicitly described a product that the user was expected to open in order to access and replace that battery.
That naturally raised another set of questions.
If the user is expected to open this part of the toy:
How is access controlled?
Can a child gain access to the battery?
What happens to the screws after the cover is opened?
Are the fasteners part of the battery-safety system?
Does the battery compartment construction meet the applicable toy electrical-safety requirements?
This is where EN IEC 62115 entered the picture.
The laboratory was not contradicting the EU Batteries Regulation. It was evaluating the product that had now been presented to it: a toy with an intentionally openable battery-access structure.
Then the 20 N for 10 Seconds Requirement Appeared
When a battery-access design is intended for users, its fastening and safety functions must be validated as a complete system.
EN IEC 62115:2020+A11:2020 includes requirements for fasteners used to secure doors or covers that provide access to a battery compartment.
Clause 13.4.6 addresses captive battery-compartment fasteners. Where the clause applies, the screw or similar fastener is expected to remain with the door, cover, or equipment after opening.
The associated test applies a force of 20 N for 10 seconds to the fastener.
An important engineering detail is that this is 20 N of force, not a torque value.
From the laboratory's perspective, this requirement makes sense. If a screw is part of the system that prevents inappropriate access to a battery, losing that screw after opening the compartment could undermine the safety function during later use.
But from the project team's perspective, the situation suddenly looked contradictory:
The EU wants the battery to be replaceable.
while at the same time:
The toy-safety standard places additional restrictions on the construction used to access the battery.
The natural reaction is to ask:
Which rule are we supposed to follow?
The better question is:
Did the first rule actually require us to define the product this way?
Go Back Upstream: What Does the EU Batteries Regulation Actually Require?
Article 11 of Regulation (EU) 2023/1542 does establish a strong general principle of battery removability and replaceability.
For many products, the intention is clear: a battery should not unnecessarily turn an otherwise usable product into waste simply because the battery has reached the end of its useful life.
But the regulation also recognizes that end-user replacement is not always compatible with product safety.
Article 11 includes derogation mechanisms under which certain products may be designed so that the battery is removable and replaceable only by independent professionals.
That distinction is critical.
"The battery must be replaceable" does not always mean "the ordinary consumer must personally open the product and replace it."
For a child-related product, that difference can completely change the engineering solution.
A product may need to be serviceable without being designed as a consumer-openable battery compartment.
July 2026 Made the Toy Case Much More Relevant
On 14 July 2026, the European Commission adopted Commission Delegated Regulation C(2026) 5031 final, supplementing the Batteries Regulation with additional derogations from the end-user removability and replaceability requirement.
One of the specifically listed categories is:
electric toys that incorporate rechargeable batteries
The proposed derogation applies until 31 July 2030 where, due to the nature or size of the toy, the derogation is necessary to ensure the safety of the toy.
Under that route, the rechargeable battery may be removable and replaceable only by independent professionals, rather than by the end-user.
This is an important development for rechargeable toy design.
It reflects a basic safety reality: the policy goal of making batteries replaceable should not force a toy manufacturer to introduce a new child-access hazard simply to make the battery easier for a consumer to reach.
There is, however, an important status note.
At the time of writing, 30 August 2026, C(2026) 5031 has been adopted by the European Commission but is still within the European Parliament and Council scrutiny process. EUR-Lex lists 14 October 2026 as the foreseen end of the objection period. The act enters into force only after the required procedure and publication in the Official Journal are completed.
So it should not yet be described as a fully effective exemption without that qualification.
The 2030 Toy Safety Rules Show the Same Direction
The regulatory direction becomes even clearer when we look at Regulation (EU) 2025/2509, the new EU Toy Safety Regulation, which will replace the current Toy Safety Directive from 1 August 2030.
Its electrical-safety provisions state that batteries constituting small parts must not be accessible without a tool. It also provides that, where the size or nature of the toy requires it, a rechargeable battery may instead be made inaccessible and removable or replaceable only by independent professionals.
This helps explain why the 2026 delegated act provides a temporary toy-related derogation through 31 July 2030.
The policy direction is not:
Make every rechargeable toy easy for a consumer to open.
It is closer to:
Make battery replacement possible, while preserving the safety level required for the toy.
Those are very different design objectives.
Now the Original Project Becomes Much Easier to Understand
If we map the project as a development chain, the problem is clearer:
EU Batteries Regulation introduces battery removability and replaceability requirements
↓
interpreted as
The consumer must personally replace the internal battery
↓
therefore
Ultrasonic welding is replaced by screws
↓
the instructions state
The consumer can open the product and replace the battery
↓
the product is now presented as
User-openable with accessible battery replacement
↓
the laboratory evaluates the resulting structure under the relevant battery-access requirements of EN IEC 62115
The Batteries Regulation did not directly create the EN IEC 62115 fastener problem.
The intermediate product-definition decision did.
That is why describing the situation simply as "two regulations are conflicting" misses the most useful lesson.
Do Not Start by Asking How to Make the Screw Pass
Once a laboratory raises the 20 N / 10 s requirement, the immediate engineering reaction is often:
How do we redesign the screw?
Maybe use a captive screw. Maybe change the thread. Maybe modify the housing. Maybe change the cover.
Those may eventually be necessary.
But at ToyRD, we would first move one step upstream and ask:
Does this product actually need to be defined as consumer battery-replaceable?
That question should be answered before committing to another structural redesign.
If the applicable regulatory route allows this particular rechargeable toy to use independent-professional battery replacement, then the product design, risk assessment, instructions, and laboratory test definition should all follow that same logic.
The instructions should not simultaneously tell an ordinary consumer to open the toy and replace the battery themselves.
On the other hand, if the commercial decision is genuinely to provide consumer battery replacement, then the product should be engineered from the beginning as a proper user-serviceable battery system, with all the corresponding toy-safety requirements considered.
Simply changing ultrasonic welding into several ordinary screws is not the same as designing a compliant consumer-accessible battery compartment.
Deleting One Sentence from the Manual Is Not the Whole Solution
Battery replacement must remain possible without turning a child-safe toy into a consumer-openable battery compartment.
In this case, removing the statement that the consumer can replace the battery may be part of the correction.
But changing the manual alone is not enough.
The project needs four things to agree with each other:
Regulatory path → Product design → User instructions → Laboratory test definition
If the intended route is professional battery replacement, the product and instructions should consistently reflect that.
If the intended route is end-user replacement, the enclosure and battery-access system should be designed accordingly.
A compliance document should describe the product that actually exists.
It should not be used to create a different product definition after the engineering work has already been completed.
This Is Why ToyRD Focuses on Design-Stage Compliance
Compliance is often treated as the last step of product development:
That approach works until a test failure reveals that the problem started much earlier.
By the time the laboratory identifies the issue:
the enclosure may already be tooled;
the PCB may already be frozen;
production samples may exist;
manuals may be written;
packaging may be in artwork;
schedules may already be committed.
At that stage, a misunderstanding that originally cost nothing to correct can become an expensive engineering change.
At ToyRD, we prefer a different question:
Before changing the product, are we sure we are solving the requirement that actually applies?
This is part of what we mean by a development-stage Second Opinion.
Sometimes the most valuable compliance input is not another test.
It is stopping a design change long enough to verify why that change is being made.
Four Questions Before Changing a Toy Because "The EU Requires It"
Whenever a new regulatory requirement reaches the engineering team, these four questions are worth asking before modifying the product.
1. What regulation or standard are we actually talking about?
"The EU requires it" is not a specification.
Find the regulation, article, standard, clause, or official guidance behind the request.
2. What does the original requirement actually say?
A regulatory objective and an engineering solution are not the same thing.
"The battery must be replaceable" is a regulatory requirement.
"Therefore the consumer must remove four screws and replace it personally" is an engineering interpretation.
There may be other compliant routes.
3. Does this exact requirement apply to this exact product?
Battery type, toy category, age grading, safety risks, product construction, intended use, and placing-on-the-market date can all affect the answer.
Compliance should always return to the actual product.
4. Will this design change trigger another requirement?
This is where engineering and compliance have to meet.
Changing one fastening method may change:
battery accessibility;
child access;
small-parts risks;
fastener requirements;
servicing method;
instructions;
risk assessment;
laboratory test conditions.
A product is evaluated as a system, not one regulation at a time.
Regulatory Misinterpretation Has a Real Development Cost
There is a type of product-development cost that rarely appears in a BOM:
Regulatory Misinterpretation Cost.
A tooling modification costs money.
Another prototype round costs money.
Another laboratory submission costs money.
Updating the manual and packaging costs money.
A delayed launch costs money.
But sometimes all of those costs begin with a sentence like:
"We heard the EU will require this."
The purpose of good compliance work is therefore not only to tell a team which clause to test.
It is also to help the development team determine what that clause means before it becomes plastic, tooling, documentation, and production inventory.
For ToyRD, that is an important part of R&D intelligence:
Understand the regulation. Define the product correctly. Then design the solution.
Sometimes a useful Second Opinion does not add another feature or another test.
Sometimes it simply asks, before the mold is changed:
Are we solving the right problem?
Disclaimer: This article discusses product-development and regulatory reasoning and is not legal advice. Applicability depends on the specific product, battery, intended use, age grading, market-entry date, final legislation in force, and assessment by competent compliance professionals or laboratories.
References
1. Regulation (EU) 2023/1542 on batteries and waste batteries — Article 11, removability and replaceability of portable batteries. https://eur-lex.europa.eu/legal-content/EN/TXT/?uri=CELEX:32023R1542
2. European Commission, "Commission adds exemptions to rules on removability of portable batteries," 14 July 2026. https://environment.ec.europa.eu/news/commission-adds-exemptions-portable-battery-removal-rules-2026-07-14_en
4. Regulation (EU) 2025/2509 on the safety of toys — Annex II, Part IV, Electrical Properties. https://eur-lex.europa.eu/legal-content/EN/TXT/?uri=CELEX:32025R2509
5. EN IEC 62115:2020+A11:2020 — Electric toys — Safety, Clause 13.4.6, Battery compartment fasteners. Consult an authorized copy of the standard for the full normative text.
When a toy project begins, most people naturally focus on the idea.
Is the design attractive enough? Is the function innovative? Will customers like it? Will it make people stop and take a closer look at a trade show?
But after spending enough time in product development, I have gradually come to believe that many projects do not fail because of the idea. They fail because of execution.
A good concept may miss a customer’s internal review simply because the sample was two weeks late. A project that was already close to approval may slowly lose momentum because the supplier keeps delaying the sample. A product that still has room for cost optimization may end up in endless price negotiations simply because the quotation only shows one total number, with no visibility into where the cost actually comes from.
None of these sound like “technical problems.”
But in reality, they often have a bigger impact on whether a project succeeds than the technical problems themselves.
Deadlines Matter, but a Deadline Alone Does Not Prevent Delays
Smaller, verifiable checkpoints make delays visible early enough to act.
When we work with suppliers, we normally give them a clear deadline.
For example, a prototype, tooling sample, PCB sample, or packaging sample may need to be completed by a certain date. To be safe, we usually start following up one or two days before the deadline.
This is a very common approach.
But the reality is simple:
Even if you start chasing in advance, the sample can still be late.
I used to think the main reason was that the supplier lacked execution, or that our project was not high enough on their priority list.
Those situations certainly happen.
But I later realized that the bigger problem is this:
By the time you discover that the project is going to be delayed, it is often already too late.
A deadline is only the final point in time.
Imagine that a supplier originally planned to prepare materials on Monday, process parts on Tuesday, assemble on Wednesday, and test on Thursday.
If something already went wrong on Tuesday, but you do not ask about progress until Thursday, then no matter how urgently you chase them, the lost time is already gone.
So instead of only “chasing the deadline,” a more effective method is to break one large deadline into several smaller checkpoints that can actually be verified.
For example:
Have the raw materials arrived?
Has machining started?
Has the PCB been soldered?
Has the plush sewing been completed?
Has the mold gone onto the machine?
Can you send a photo of the current sample status?
What exactly is blocking progress today?
The purpose of these questions is not to put more pressure on the supplier.
The value is that they help you discover earlier when the project has already started drifting away from the original plan.
If you know on Tuesday that a key part still has not arrived, the R&D team still has time to decide:
Should we wait?
Should we switch suppliers?
Should we build a functional sample first?
Should we send the completed parts to the customer for early confirmation?
The real value is not how much faster you can push the supplier at the end.
It is knowing a few days earlier that the target date may no longer be realistic.
Those few days are often where project management can actually recover time.
One Core Part of R&D Management Is Making Risk Visible Earlier
A lot of R&D work appears to be about managing the product.
Drawing, revising structures, confirming electronics, testing functions, approving samples, following tooling, following packaging.
But if you step back, you realize that a large part of what an R&D manager actually deals with every day is information.
Who is working on what?
Which part of the project is already at risk?
When a supplier says “no problem,” is there really no problem — or have they simply not started yet?
When must the customer see the sample?
Which issue, if left unresolved today, will affect the whole project three days later?
So project management is not only about assigning a completion date.
More importantly, it is about creating a mechanism that allows bad news to appear as early as possible.
That may sound counterintuitive.
Everyone likes to hear “yes,” “no problem,” and “we can make it.”
But in product development, the earlier you know that something may not make it in time, the safer the project becomes.
Because there is still time to adjust.
The most dangerous situation is not that a problem exists.
It is that the problem has already existed for days while everyone still believes the project is on track.
Quotation Works the Same Way: One Total Price Is Often Not Enough
A transparent quotation makes cost a design decision, not just a negotiation.
Another interesting thing I have seen is how some highly experienced buyers handle quotations.
When they receive a price, they rarely look only at the final number.
They keep breaking it down.
How much is the plastic?
How much is the electronics?
How much is the speaker?
How much is the plush material?
How much is the packaging?
How much is the labor?
How much could be saved by removing one printing process?
How much could be saved by changing one component to a different material?
At first, this style of purchasing can feel like the buyer is simply trying to negotiate every line item down.
But over time, I have come to appreciate the logic behind it.
Because professional cost control is not really asking:
“Can you make it cheaper?”
It is asking:
“Where is the cost coming from?”
These two questions may sound similar, but they lead to completely different conversations.
The first usually has only one outcome: the supplier gives up a little more margin.
The second can actually change the product.
For example, a product may be too expensive not because the supplier’s margin is too high, but because:
one component uses an unnecessarily high material specification;
there are too many printing processes;
a metal part is structurally too complicated;
the packaging volume is too large;
the PCB includes components that are not really necessary;
one cosmetic effect requires an additional production process;
the order quantity is too small to spread fixed costs efficiently.
Once these costs are broken down, R&D, purchasing, and the customer can make much better decisions together.
Maybe the customer wants to keep the appearance but remove one function.
Maybe the electronics specification cannot be reduced, but the packaging can be optimized.
Maybe one expensive component is actually a key selling point, and another cost item should be changed instead.
The purpose of breaking down a quotation is not only to push the price lower. It is to turn cost into something that can be understood, discussed, traded off, and designed.
Good R&D Is Not Just About Getting the Product Made
I used to think of R&D mainly as “solving technical problems.”
Now I think that definition is too narrow.
A mature R&D engineer — or a mature R&D team — does not only need to make the product work.
They also need to keep asking several very practical questions:
Is the timeline still under control?
Are we spending money on the parts that truly create value?
Are risks being discovered early enough?
Are the supplier, purchasing team, engineers, and customer all working with the same information?
Very often, what determines whether a toy project succeeds is not one brilliant idea.
It is a collection of small, unglamorous execution details.
Was the deadline broken into process checkpoints?
When the supplier said “almost finished,” did anyone verify the actual progress?
When the quotation came in, did anyone understand the real cost structure?
When a risk appeared, was it discovered on the final day — or one week earlier?
These things rarely appear in a product brochure.
And people rarely talk about them.
But they are a very real part of toy development.
That is also what I hope to keep documenting on ToyRD:
Not only how a toy should be designed, but how a toy is actually developed and made inside a real supply chain.
If you have worked in the toy industry for any length of time, you have probably heard the name Chenghai.
But for many overseas consumers—and even for some buyers who are new to the industry—Chenghai is still just a small and relatively unknown place on the map.
Located in Shantou, Guangdong Province, China, Chenghai covers an area of less than 400 square kilometers. Yet its toy manufacturing ecosystem reaches far beyond its footprint.
Here, toys are not simply the business of a few individual factories. They are part of an entire city-level industrial ecosystem.
According to a 2025 report on the development of Chenghai’s toy and creative industries, the region is home to around 68,000 toy-related manufacturing and business entities. Products made here are exported to more than 170 countries and regions, and Chenghai’s plastic toy production capacity is estimated to account for roughly one-third of the global total.
But what makes Chenghai truly special is not just the numbers.
Within a remarkably small geographic area, you can turn a toy idea into a real commercial product.
Chenghai’s Real Advantage Is Not Just Low Cost
When people talk about manufacturing in China, cost is often the first thing that comes to mind.
But if I had to explain Chenghai’s biggest competitive advantage today, price would not be the first thing I mentioned.
I would say: speed.
A mature toy project may involve product design, 3D engineering, prototype development, tooling, injection molding, electronics, PCB development, IC solutions, speakers, motors, LEDs, silicone parts, plush components, printing, spray painting, pad printing, packaging, testing, certification, assembly, and logistics.
In many places, this means managing a dozen or even dozens of suppliers spread across different cities. In Chenghai, many of those suppliers may be within a 30-minute drive.
The area has developed a highly concentrated supply chain covering product development, design, IP, raw materials, tooling, injection molding, assembly, trading, exhibitions, warehousing, and logistics.
The result is a level of efficiency that cannot be explained simply by lower labor costs.
If a structural problem is discovered in the morning, you can visit the mold maker that afternoon. If the electronics do not perform as expected, you can take the sample directly to the electronics solution provider. If the lighting effect is poor, you can change the LED, redesign the light guide, modify the firmware, and test again.
Silicone too hard? Change the Shore hardness. Sound quality not good enough? Change the speaker, amplifier, sampling rate, or acoustic chamber. Packaging dimensions not right? Adjust the die line and make another sample.
For toy development, this density of suppliers is incredibly valuable.
The Hardest Part of Toy Development Is Often the Final 20%
Creating a prototype that can move, light up, or make sounds is usually not the hardest part. The difficult part is turning that prototype into a product that can be manufactured reliably in quantities of 10,000 or 100,000 units—while keeping each unit as close as possible to the original design intent.
A toy that looks very simple can reveal dozens of problems once mass production begins: gears that are too noisy, short battery life, uneven LED brightness, buttons that do not feel right, plastic parts that shrink or deform, batch-to-batch color variation, shifted printing, inconsistent plush filling, speakers that sound different inside the housing, clips that fail drop tests, or structures that must be redesigned to pass a safety test.
Rapid iteration between design, electronics, tooling, and production is central to toy development.
That is why toy development depends so heavily on experience and supply-chain collaboration.
One of Chenghai’s greatest strengths is that people here deal with these problems every single day—not a few new toys every year, but a continuous stream of new projects, modifications, trial runs, and mass-production launches across thousands of companies, engineers, mold makers, electronics suppliers, and subcontractors.
That experience accumulates over time.
From an Idea to a Product You Can Actually Quote
Imagine a European customer comes to you with an idea:
“I want to make a baby soothing toy that lights up, plays music, and reacts to sound.”
That one sentence is still a long way from a real product. Many questions must be answered first: What material should be used? What is the intended age grade? Should it use AA batteries or a rechargeable lithium battery? What kind of audio IC and speaker are suitable? How should the LED light be diffused? Where should the sound sensor be positioned? Will motor noise interfere with sound detection? Should the body be plastic or silicone? How many molds are required? How will the product be assembled, packaged, quoted, and assessed for its target-market requirements?
No single supplier can answer all of these questions alone. What is really needed is a network of specialized suppliers. That is exactly where Chenghai is strong.
Small Orders and Fast Experimentation Matter Too
The modern toy market is changing. In the past, large brands could invest heavily in tooling and rely on huge order volumes to spread out those costs.
Today, more brands want to start with a small production run, test a product at a trade show, evaluate market response, see how customers react on Amazon or TikTok, and then scale up only if the product performs well.
That means a toy supply chain must do more than support mass production. It must also support fast experimentation.
The large number of small and mid-sized suppliers in Chenghai can actually be an advantage in this environment. You can begin with a prototype, make an engineering sample, modify the structure, open the mold, adjust it after the first trial, and then move into a small pilot run.
The process is rarely a straight line. It is iterative. And for new product development, the ability to iterate quickly can be more valuable than saving a few cents on unit cost.
Fast feedback from buyers, product teams, and suppliers helps turn early concepts into market-ready products.
Chenghai Is Evolving from “Making Toys” to “Creating Toys”
Ten or fifteen years ago, when people thought about Chenghai, the image might have been OEM manufacturing, plastic toys, remote-control cars, battery-operated toys, and low-cost production.
Today, Chenghai is noticeably different. Building blocks, designer toys, licensed IP, smart toys, AI voice interaction, baby products, educational products, and cross-border e-commerce are all becoming increasingly important parts of the local industry.
In 2024, the output value of Chenghai’s large-scale toy and creative enterprises reached RMB 14.091 billion, up 5.2% year over year. By 2025, the total output value of the broader toy and creative industry had exceeded RMB 50 billion. Chenghai has also been included in Guangdong’s first group of pilot industrial clusters for the “cross-border e-commerce + industrial belt” model. In 2024, Chenghai’s toy exports reached RMB 10.24 billion, representing year-on-year growth of 12.3%.
The region still has extremely strong manufacturing capabilities. But what is becoming increasingly important is R&D capability, product definition, IP development, and fast commercialization.
Chenghai Is Not Perfect
Of course, I do not want to describe Chenghai as some kind of perfect toy paradise. It has its problems too.
Supplier capability varies dramatically. Some factories are excellent at manufacturing but weak in project management. Some suppliers quote very quickly, but their cost breakdowns are not transparent. Some companies have decades of experience but almost no English-language materials. Two suppliers making the same product may deliver completely different quality. Even for the same engineering problem, different engineers may propose completely opposite solutions.
Coming to Chenghai does not automatically give you a great supply chain. The real challenge is knowing who to work with, what questions to ask, and how to judge whether a proposed solution actually makes sense.
Why TOY R&D Starts in Chenghai
One of the reasons I created TOY R&D is that I have always felt there is a huge amount of valuable toy-development knowledge in Chenghai that has never really been documented.
Much of that knowledge exists only in the experience of engineers, buyers, mold makers, electronics solution providers, and factory owners. Why should a plastic part be split this way? Why is this area prone to sink marks? Why can two audio solutions with the same 12 kHz sampling rate sound completely different? Why can the same LED perform dramatically differently after changing the reflector or light guide? Why can a quotation look cheaper at first, yet result in a higher total production cost?
People in Chenghai deal with questions like these every day. Yet online, it is still surprisingly difficult to find answers written from the perspective of real toy development.
So TOY R&D is trying to do something simple: document the knowledge hidden inside the toy supply chain.
Materials. Structures. Tooling. Electronics. Audio. LEDs. Costing. Compliance. Supply chains. And the countless real-world problems that appear during product development.
We do not just want to say: “China can make toys.”
We want to explain: How a toy is actually made.
If you are developing a toy, there is a good chance that one day your product may pass through Chenghai. And when you finally visit, you may realize that the most interesting thing here is not any single giant toy factory. It is the city itself.