When developing a product, it is easy to fall into a familiar assumption:
If we want a better result, we should use a better material.
If we want a stronger structure, we upgrade the material.
If we want the electronics to be thinner, we choose a more advanced circuit solution.
If we want the product to feel more premium, we add more parts, more processes, and more cost.
But after working on enough real-world products, I have become increasingly convinced that this is not always the right way to think.
Sometimes, a very ordinary — even seemingly “low-end” — material can create an unexpectedly refined result when it is used in exactly the right place.
The important question is not how sophisticated the material is.
The important question is:
What problem do you actually need it to solve?
A Lighting Problem Inside a Flexible Structure
The solution should meet the real bending, lighting, weight, and cost requirements—nothing more.
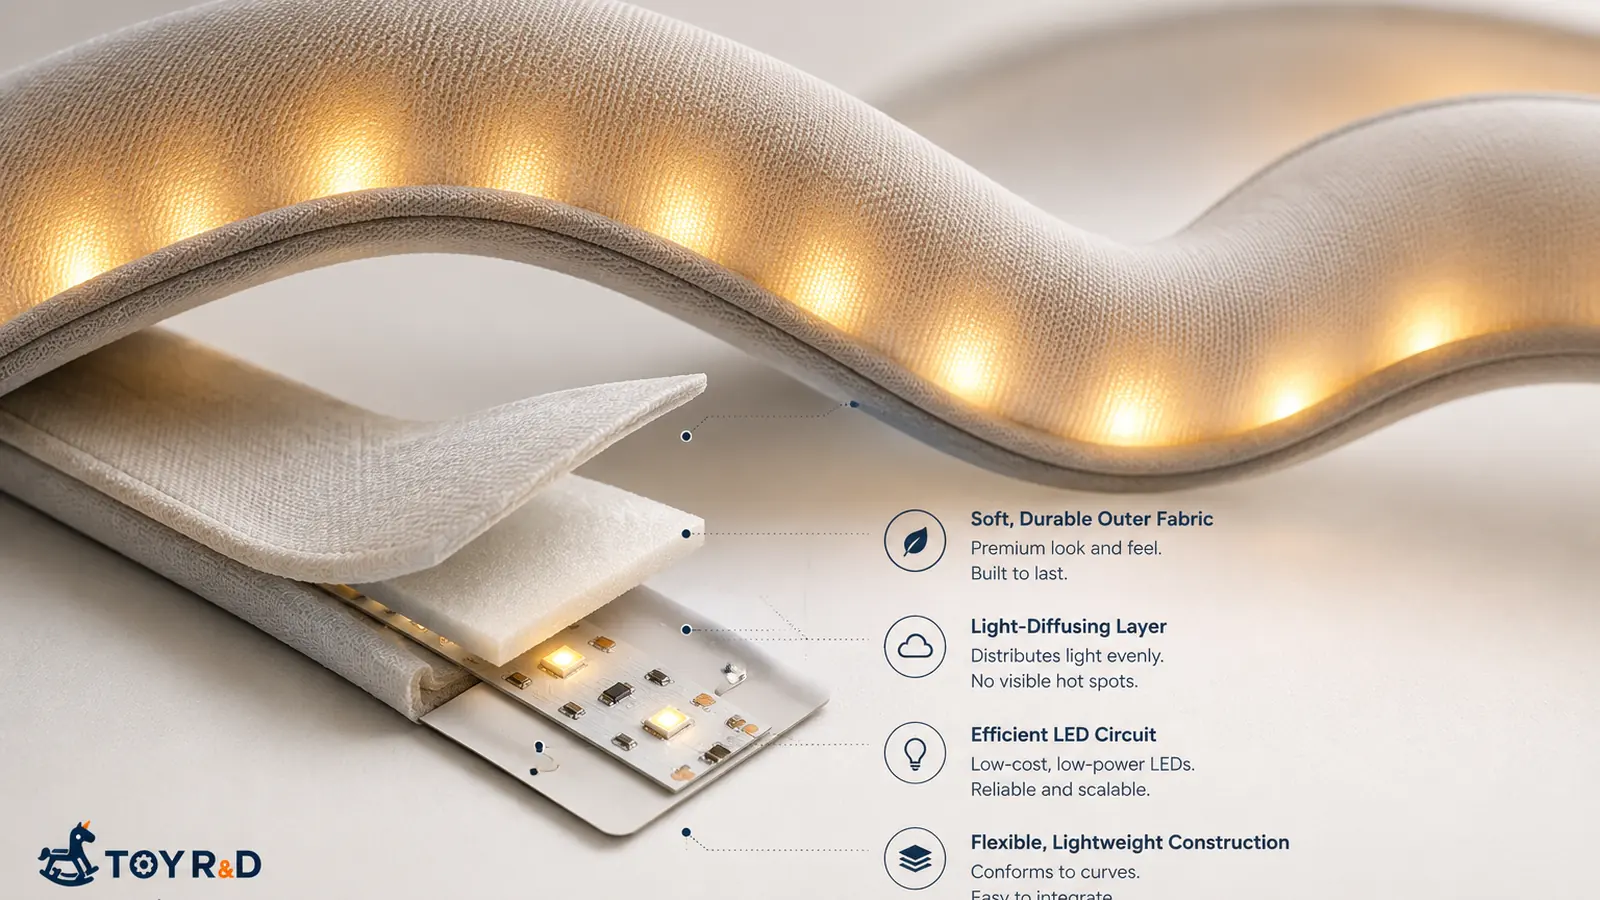
In one project, we needed to add a lighting effect inside a soft, flexible textile structure.
From an electronics perspective, this did not seem particularly complicated.
If a structure needs to bend while carrying multiple LEDs, one of the most obvious solutions is:
Use a flexible printed circuit, or FPC.
That is exactly what FPC is designed for.
It is thin, flexible, suitable for mounting LEDs, and technically easy for an electronics engineer to justify.
On paper, it looks like the standard answer.
But product development is different from pure electronics engineering.
A technically correct solution is not always the best product solution.
So we went back and looked at the actual requirements again.
Did the structure really need a full flexible circuit?
Did it need to survive repeated, extreme folding?
Did it require high-density routing?
High-speed signals?
Very tight dimensional tolerances?
Not really.
The real requirements were much simpler:
It needed to carry LEDs.
It needed to conduct electricity.
It needed to tolerate a certain degree of bending with the textile structure.
It needed to stay lightweight.
It had to remain hidden inside the product.
And it had to be inexpensive.
Once the requirements were broken down this way, the problem changed.
We were no longer asking:
“What is the best flexible circuit solution?”
We were asking:
“What is the lowest-cost structure that can reliably meet these actual requirements?”
Those two questions sound similar.
But they can lead to very different answers.
A Solution That Did Not Look “Premium”
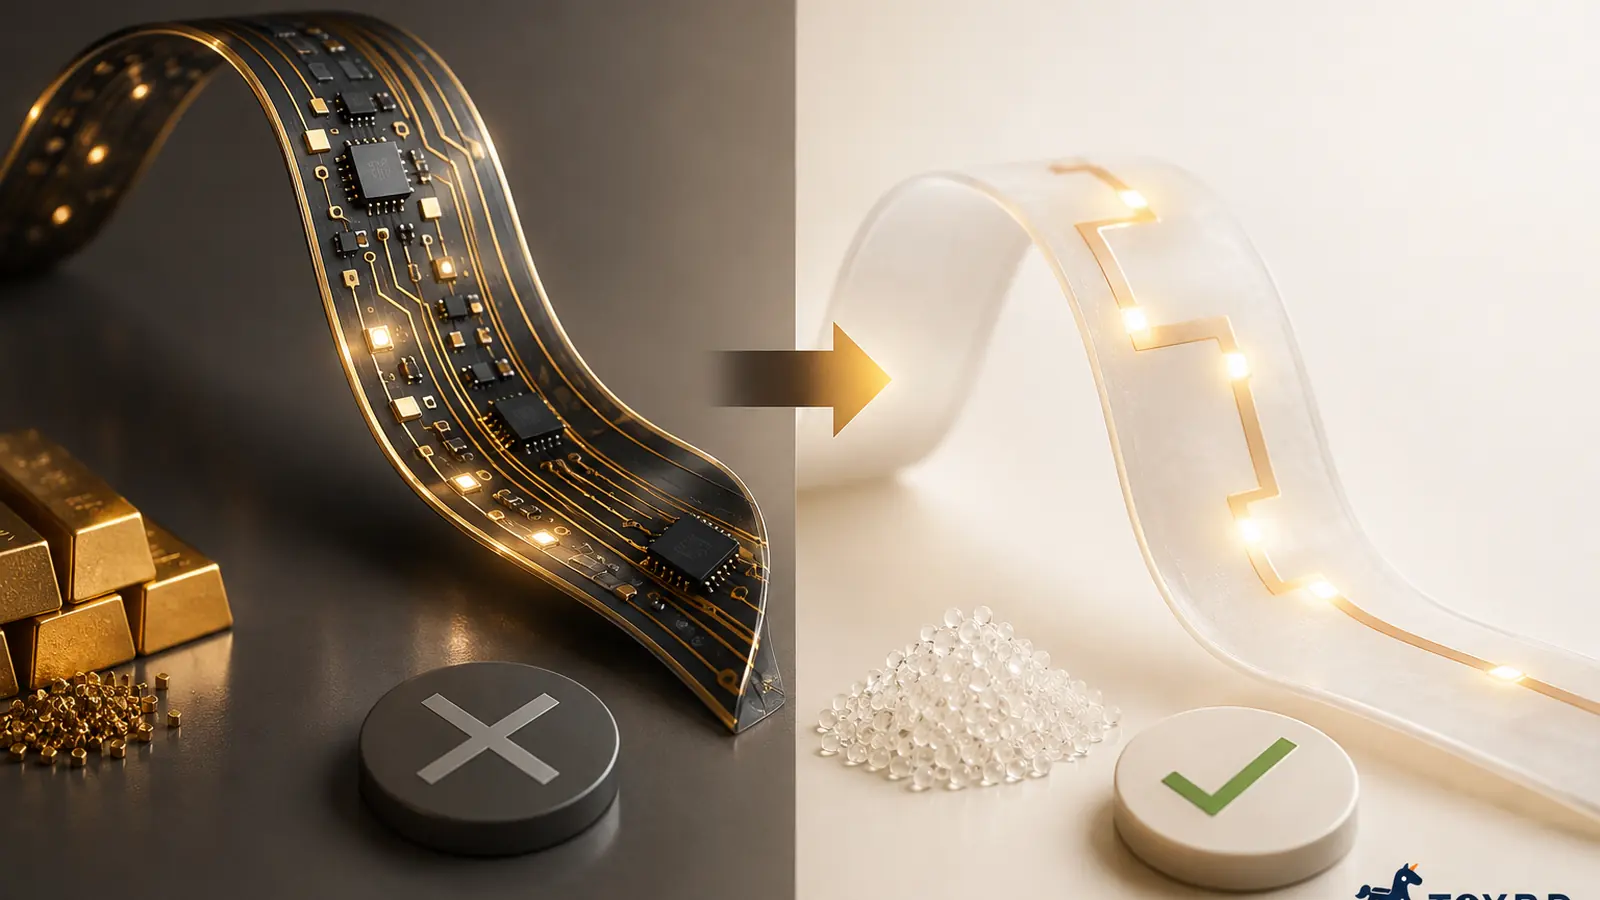
The final solution was not a conventional high-spec flexible circuit.
Instead, we used a very low-cost circuit structure built on a substrate that naturally offered a useful degree of flexibility.
By itself, the material was not impressive.
It was not something a marketing team would put on the front of the package.
The end user would probably never know it existed.
But inside the right product structure, it did exactly what we needed.
The LEDs could be distributed along the flexible section.
The overall assembly could still bend sufficiently.
The electronics could remain hidden inside the textile construction.
And the user could still clearly perceive the intended lighting effect.
What the customer experienced looked more sophisticated than what the internal cost structure might suggest.
That is one of the most interesting things about product development.
The user experiences the result, not the BOM.
“Cheap” Does Not Mean “Bad”
A lower-cost structure is valuable when it reliably delivers the performance the product genuinely needs.
There is an important distinction here.
Cost optimization is not simply about finding a cheaper component.
If you replace a two-dollar part with a one-dollar part but create more failures, more assembly difficulty, more rework, more compliance risk, or more after-sales problems, that is not real cost optimization.
Good cost engineering means:
Finding a lower-cost solution that still satisfies the performance the product genuinely requires.
In some cases, a simpler and cheaper structure may even be more suitable for mass production than a supposedly “better” solution.
That is why I do not find it particularly useful to divide materials into:
premium materials and low-end materials.
A better distinction is:
the right material and the wrong material.
Do Not Choose the Material First and Justify It Later
Engineers naturally tend to begin with the technologies they already know.
An electronics engineer sees a flexible structure and thinks of FPC.
A mechanical engineer sees a connection problem and thinks of screws, snap-fits, or reinforcement ribs.
A supplier sees an appearance issue and may immediately suggest painting, UV printing, IMD, or another added component.
None of these solutions are necessarily wrong.
The problem is that we sometimes move too quickly into how to build something before clearly defining what the product actually needs.
A useful habit in product development is to ask, before choosing the solution:
What conditions does this feature truly need to satisfy?
Then break those conditions down.
For example:
How much does it actually need to bend?
How many bending cycles does it need to survive?
Can the user touch this component?
What is the realistic product life requirement?
Is the feature carrying a functional load, or is it mainly creating a visual effect?
Is this level of performance genuinely required by the product, or was it added by the engineering team simply because it was possible?
A surprising amount of unnecessary cost enters a product before these questions have been properly answered.
Premium Products Do Not Always Come From Expensive Parts
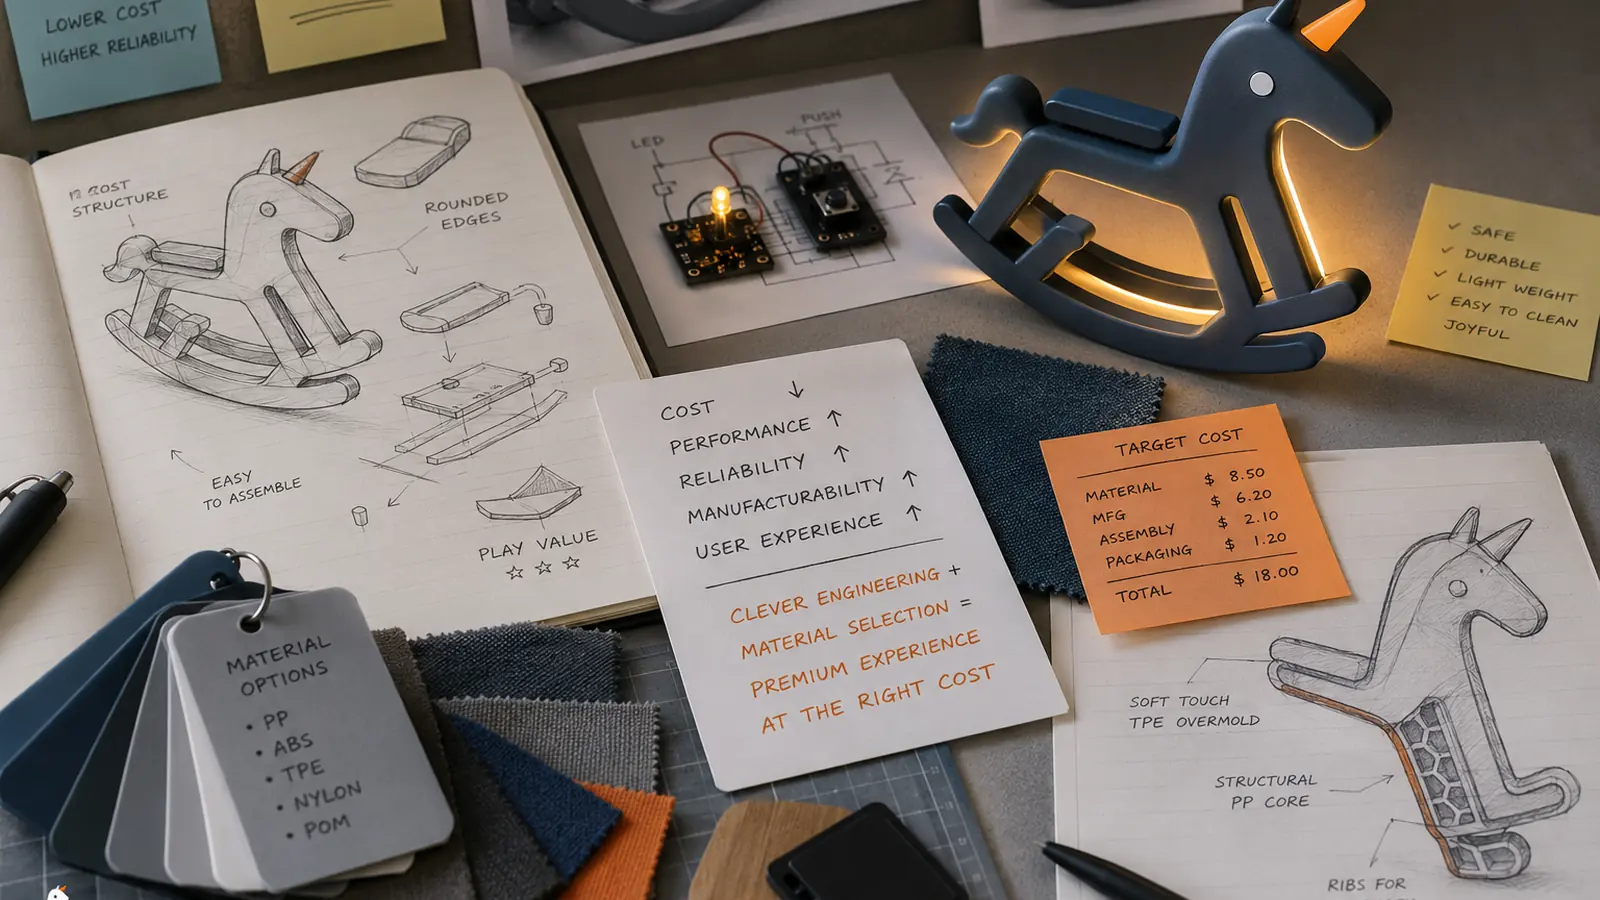
The best material decision is the one that creates the intended experience without spending where the customer gains no value.
I increasingly enjoy studying products that are clever on the outside and surprisingly simple on the inside.
They create strong perceived value without relying on excessive material cost.
In many ways, that is harder than simply using expensive components.
Because good product engineering is not:
“I know an advanced technology, so I should put it into the product.”
It is:
“I know many possible technologies, but I will only use the one this product actually needs.”
That is why opening a well-designed mass-produced product can sometimes create a strange reaction:
“That is all there is to it?”
But this kind of simplicity is rarely accidental.
It is often what remains after many rounds of trade-offs, simplification, testing, and decision-making.
A ToyRD Product Development Principle
At ToyRD, these are exactly the kinds of engineering decisions I want to keep documenting.
Not simply:
Which material is the best?
Which chip is the most advanced?
Which manufacturing process is the most sophisticated?
But rather:
What is the most reasonable choice when cost, performance, reliability, manufacturability, and user experience all have to be balanced at the same time?
Great products are not always great because they use expensive things.
Often, they are great because someone understood precisely:
where the money should be spent — and where it should not.
Sometimes, a very ordinary material, used in exactly the right place, can create a surprisingly extraordinary result.
That may be one of the most interesting parts of product development.
When a toy project begins, most teams naturally focus on the product itself:
What should it look like?
How should the function work?
Can all components fit inside the housing?
How should the mold be designed?
Can the target cost be achieved?
But there are two questions that are often left until much later:
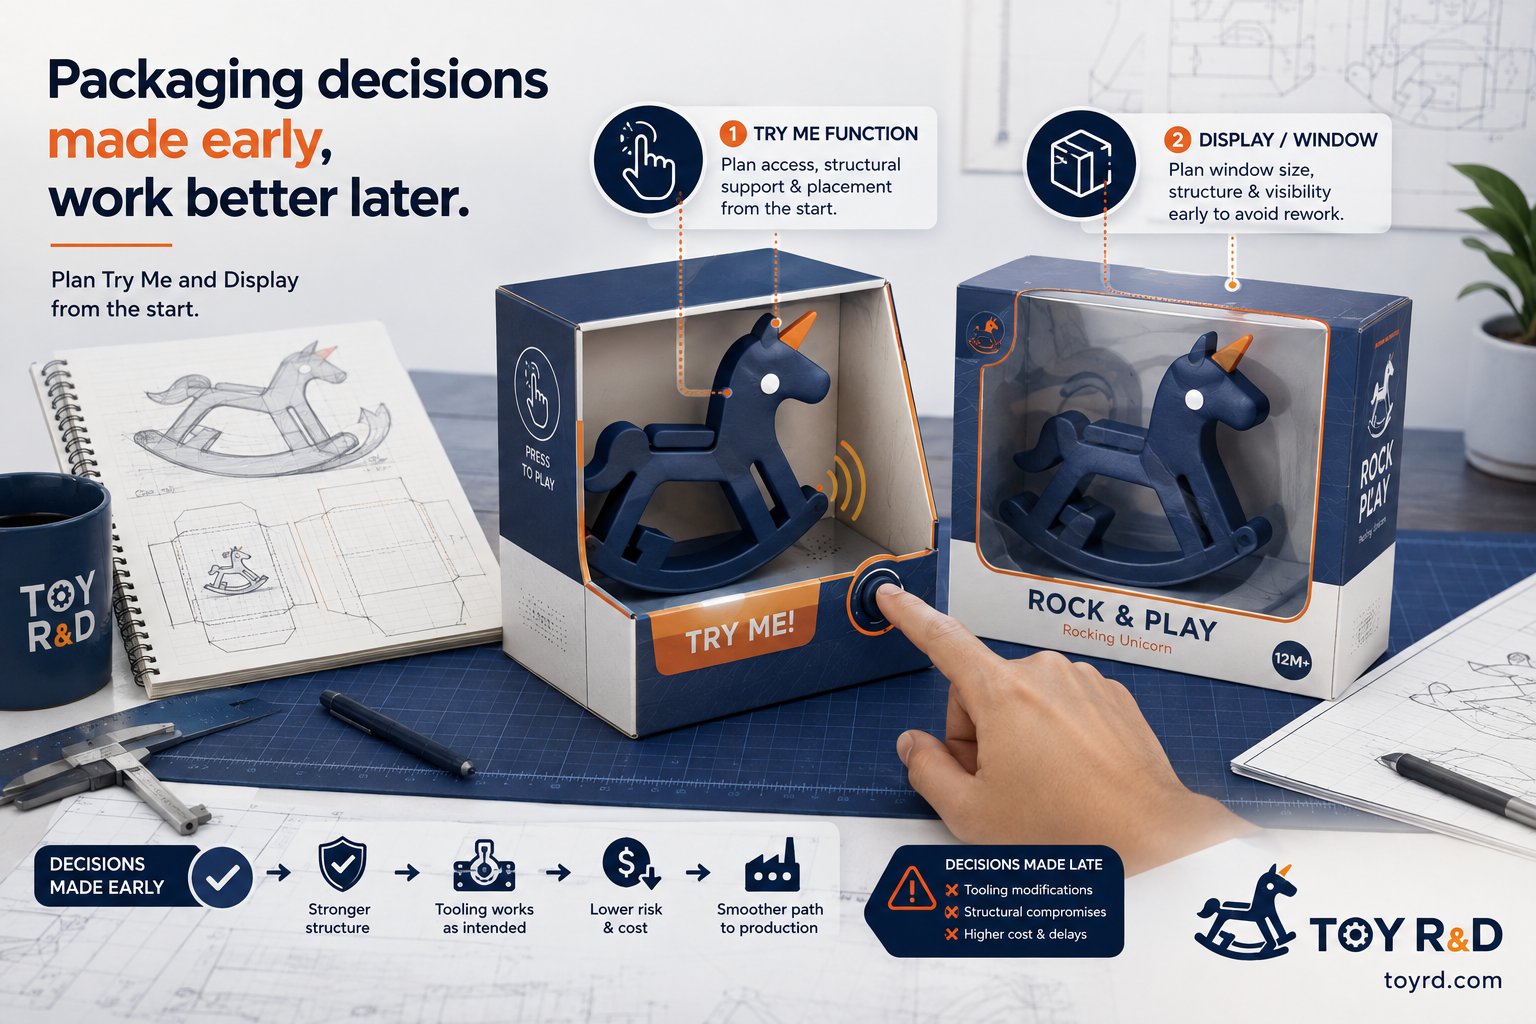
Does the product need a Try Me function while it is still inside the packaging?
Will the product use a window box, display box, open box, or another presentation-focused packaging format?
At first glance, both questions sound like packaging decisions.
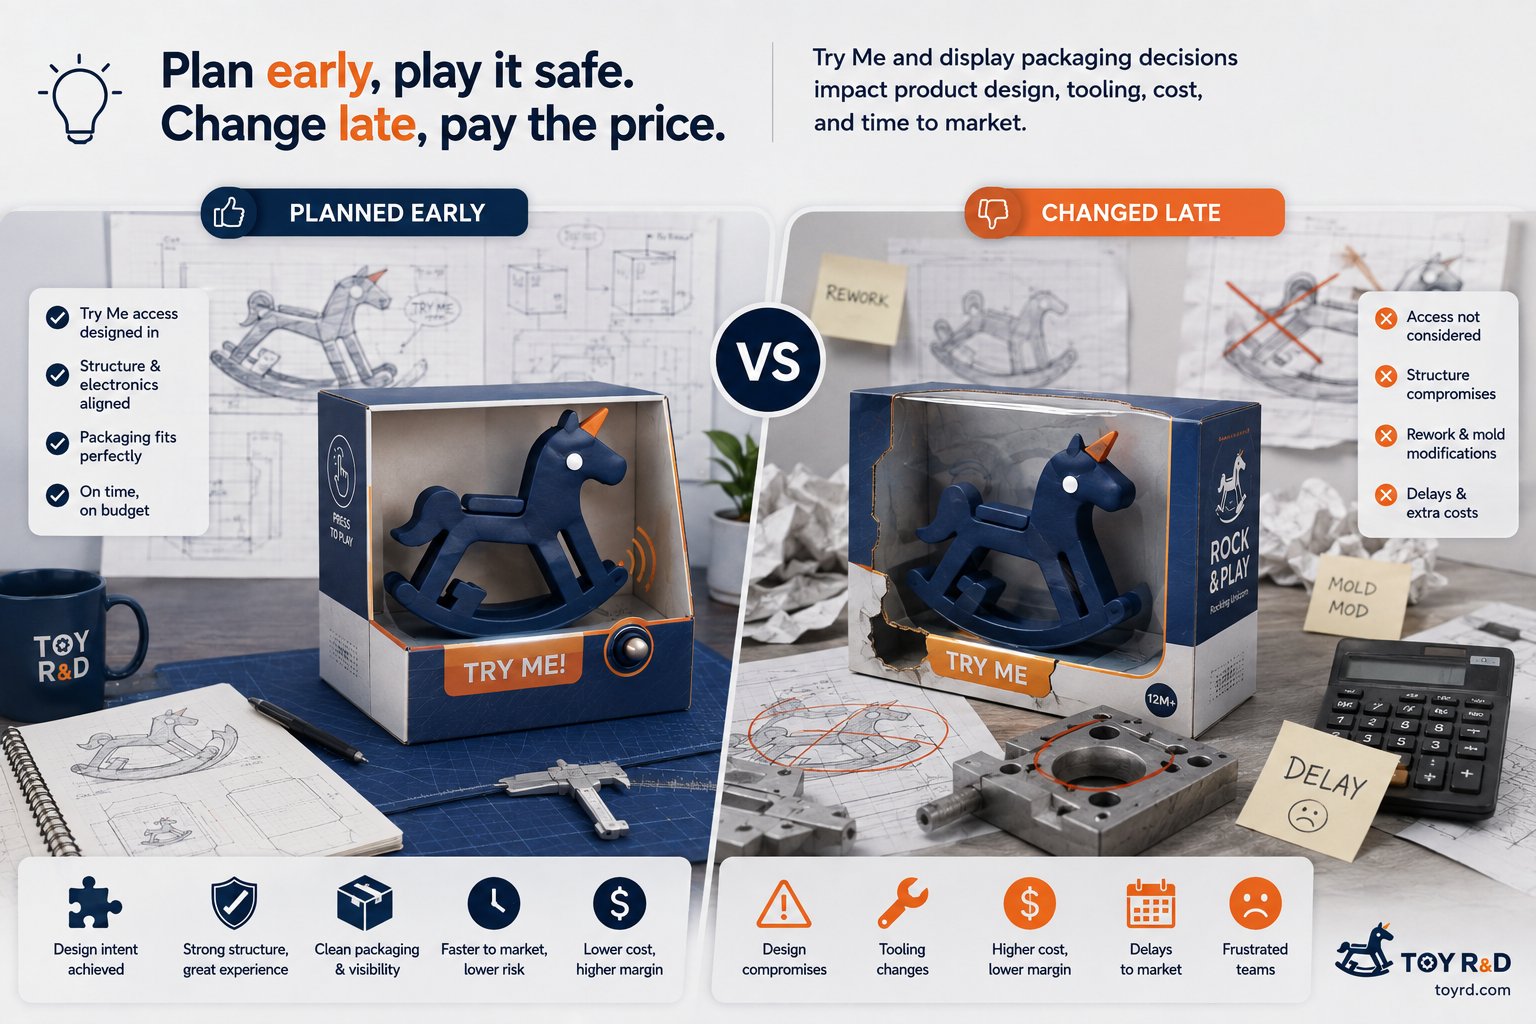
In reality, they can directly affect the electronics, firmware, mechanical structure, and even the mold design.
If these requirements are only raised after the product structure has been frozen and the tooling is already completed, what looked like a small packaging request can quickly turn into a serious engineering problem.
1. A Try Me Function Is More Than Just a Hole in the Box
Plan Try Me access and display windows early to avoid rework.
Many electronic toys are designed so consumers can experience a key feature without removing the product from the package.
For example, the shopper may be able to:
press a button to hear a sound,
activate a light,
trigger a motion,
play a short demo,
or experience the product’s main selling point.
This is commonly known as a Try Me function.
At first, the requirement may sound simple:
Just open a hole in the packaging so the customer can press the product button.
But in real product development, it is rarely that simple.
The button location has to work with the packaging
If the main button is located on the back, underneath the product, or in an area that becomes inaccessible once the product is secured inside the package, the packaging team may have no practical way to expose it.
At that point, the project may need to:
move the button,
add a dedicated Try Me button,
modify the PCB,
add wiring,
add a secondary trigger mechanism,
or route a cable from the product to a button mounted on the package.
A requirement that originally sounded like a packaging detail has now started to affect the electronics and mechanical design.
2. Try Me Mode May Also Require Dedicated Firmware or Hardware Logic
There is another issue that is easy to overlook:
The behavior of a toy in retail display mode is often different from its behavior during normal use.
For example, in normal operation, pressing a button may trigger a full song, a long lighting sequence, or a complete movement cycle.
But in a retail store, customers may press that button repeatedly throughout the day.
If the toy always runs its full sequence, the batteries may drain before the product is even sold.
For that reason, some toys are designed with dedicated modes such as:
Try Me Mode,
Demo Mode,
Short Play Mode,
or a switch between display mode and normal use mode.
That means the product may need dedicated firmware logic from the beginning.
In some cases, the hardware architecture also needs to support this mode.
From a ToyRD product-development perspective, Try Me should therefore not be treated as a packaging-only feature.
It is better understood as a system-level requirement that connects the product, electronics, firmware, mechanical structure, and packaging.
3. Window Boxes and Display Packaging Can Change the Product Structure
The second issue is the packaging format itself.
If a toy is packed inside a fully closed carton, there is often more flexibility in how the product is restrained internally.
But if the product uses:
a window box,
a display box,
an open box,
or another semi-open retail presentation,
the situation becomes very different.
The product is visible to the customer and may even be partially accessible.
Its position inside the package therefore needs to remain stable during transportation, handling, and retail display.
This creates a practical engineering question:
How will an irregularly shaped toy actually be fixed inside the packaging?
Toy products are often far from rectangular.
They may have curved bodies, protruding parts, soft components, wheels, handles, or other unusual geometry.
A simple inner tray may not be enough.
Possible fixing methods may include:
cable ties,
molded trays,
cardboard restraints,
plastic clips,
screws,
or dedicated packaging fixation points on the product itself.
And this is where packaging can begin to affect the mold.
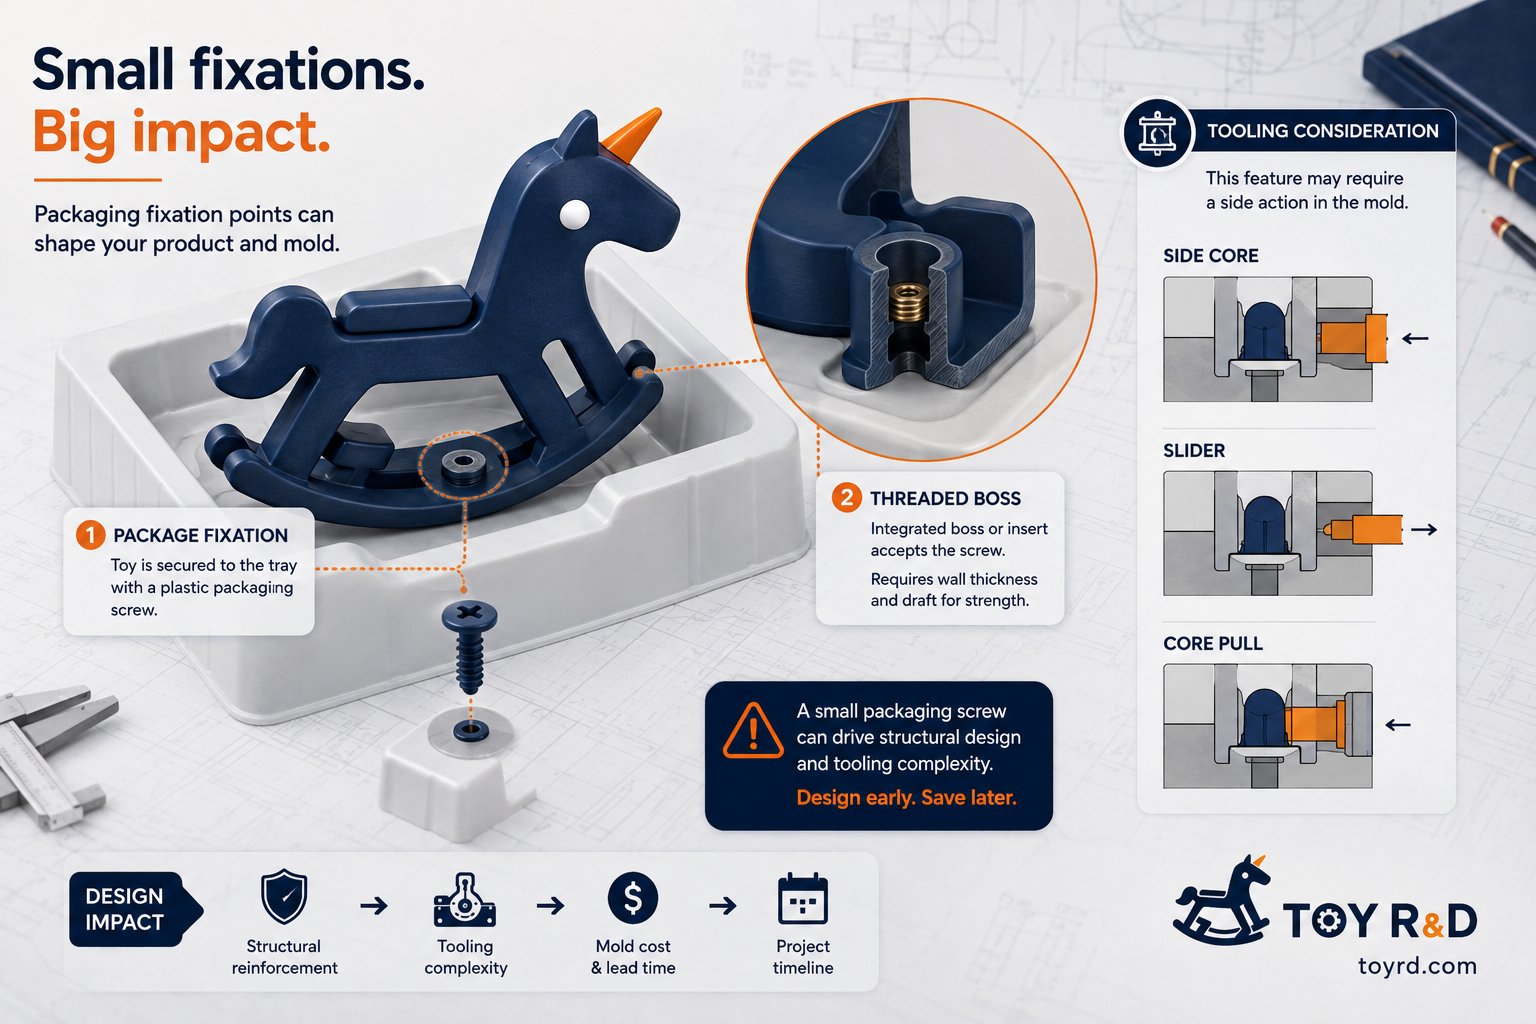
4. A Small Packaging Screw Can Change the Mold Design
A small packaging screw can influence mold architecture.
One common way to secure a product onto an inner tray is to use a plastic fixing screw from the rear or bottom of the tray.
From the packaging side, it looks like a very small component.
From the mechanical engineering side, however, the situation is different.
If the packaging screw needs to engage with the product, the product itself must include a matching feature.
It could be thought of as:
a threaded interface, screw boss, or nut-like fixing structure designed specifically for packaging.
Now consider what happens if that fixing feature is not aligned with the normal mold opening direction.
The tool may require:
side actions,
sliders,
lifters,
core pulls,
or another special demolding mechanism.
Suddenly, a tiny packaging screw has started to influence the mold architecture.
That is exactly why this requirement must be discussed before the tooling design is finalized.
5. The Real Problem Is Not Just the Cost of Mold Modification
A common response is:
If we need it later, can’t we just modify the mold?
Sometimes yes.
But sometimes the answer is no.
Once a mold has been designed and built, the core steel, mold base, cooling channels, ejector layout, sliders, and surrounding mechanisms have already occupied most of the available space.
If the original tool was never designed for a side core or additional fixing structure, a late change may create problems such as:
insufficient steel around the required area,
no room for a slider mechanism,
interference with cooling channels,
interference with ejector pins,
collision with internal product structures,
insufficient mold strength,
excessive modification cost.
The worst-case scenario is not simply that the mold modification becomes expensive.
The real worst case is:
the existing mold no longer has a practical way to create the required feature at all.
At that point, the team may be forced to choose between several bad options:
redesign the packaging,
redesign the product,
accept a weaker retail presentation,
develop a more complicated fixing method,
or, in extreme cases, rebuild tooling.
All of this may have been avoided if the packaging fixation point had been considered before tooling started.
6. Packaging Is Not the Last Step of Product Development
Early planning keeps structure, tooling, and cost under control.
When teams think in this sequence, packaging naturally feels like something that can be solved at the end.
For retail toys, that is often a mistake.
A better way to think about it is:
Packaging is part of the product system.
Packaging decisions may determine:
whether the product needs a Try Me function,
which controls must remain accessible,
how the product is presented,
how the product is restrained,
whether packaging screws are required,
where fixation points must be located,
whether the mold requires side actions,
whether the product can survive shipping while maintaining its presentation,
and whether the final retail display achieves the intended visual effect.
Some packaging decisions therefore need to be made before the mold is designed, not after.
7. Two Questions We Prefer to Ask Early
At ToyRD, these are the kinds of questions that are worth discussing before the mechanical design is finalized.
Question 1: Does the product need a Try Me function?
If the answer is yes, continue asking:
Where will the customer interact with the product through the packaging?
Can the existing product button be reached?
Is a dedicated Try Me button required?
Does the PCB need an additional connector or input?
Does a wire need to extend from the product to the package?
Is a dedicated Demo Mode required?
Will any of these requirements affect the external design or internal structure?
The earlier these questions are answered, the easier the implementation becomes.
Question 2: How will the product be displayed and fixed inside the package?
If the product will use a window box or display-oriented package, consider:
What position should the product maintain?
Can it move during transportation?
Is an inner tray enough?
Can cable ties solve the problem?
Is a plastic packaging screw needed?
If so, where will the screw engage with the product?
Does the fixing feature affect the mold opening direction?
Is a slider, lifter, or core pull required?
If any of the answers affect the tool structure, the requirement belongs in the early engineering review.
8. Small Requirements Can Become Large Problems
Toy development is full of details like this.
The original requirement may be tiny:
one button,
one hole,
one cable,
one screw,
one threaded feature.
But once that small requirement crosses the boundaries between packaging, product design, electronics, mechanical engineering, and tooling, its impact can grow very quickly.
Experienced product development is not only about solving difficult problems later.
It is also about identifying them while they are still cheap to solve.
Adding a small structural feature before tooling may take only a few minutes of CAD work.
Adding the same feature after tooling is complete may require a mold modification.
And sometimes, the existing mold may not be able to support the change at all.
So if a toy may require a Try Me function, a window box, or a display-style package, do not wait until the packaging artwork starts.
These decisions belong much earlier in the product-development process.
Because in toy development:
Packaging may be produced near the end, but packaging requirements should never be designed at the end.
Why approval gates, written decisions, and clear processes matter in product development
In a small product development team, informal communication can work surprisingly well.
The boss walks into the R&D office and says, “Go ahead with the tooling.” A salesperson tells an engineer that the customer wants a color change. Someone sends a supplier a message, and the project moves forward.
When there are only a few people and a few projects, this can feel fast and efficient.
But as the number of products, suppliers, customers, engineers, quotations, samples, molds, certifications, packaging files, and revisions increases, this way of working starts to break down.
The problem is not that people stop working hard.
The problem is that the company is still trying to run on memory, verbal instructions, and personal judgment when the organization has already become too complicated for that.
At ToyRD, I want to document the parts of product development that rarely appear in textbooks: customer requests that change halfway through a project, suppliers that say “yes” before fully checking, managers who disagree, prototypes that move forward too early, and tooling decisions that suddenly turn uncertainty into real cost.
From that perspective, a professional R&D process is not about adding bureaucracy. It is about making important decisions visible, traceable, and executable.
A good process turns “someone said so” into a decision the whole team can follow.
Note: The example below is adapted from real patterns I have seen in product-development environments. Identifying details have been changed and simplified.
A Familiar Problem in a Family-Run Company
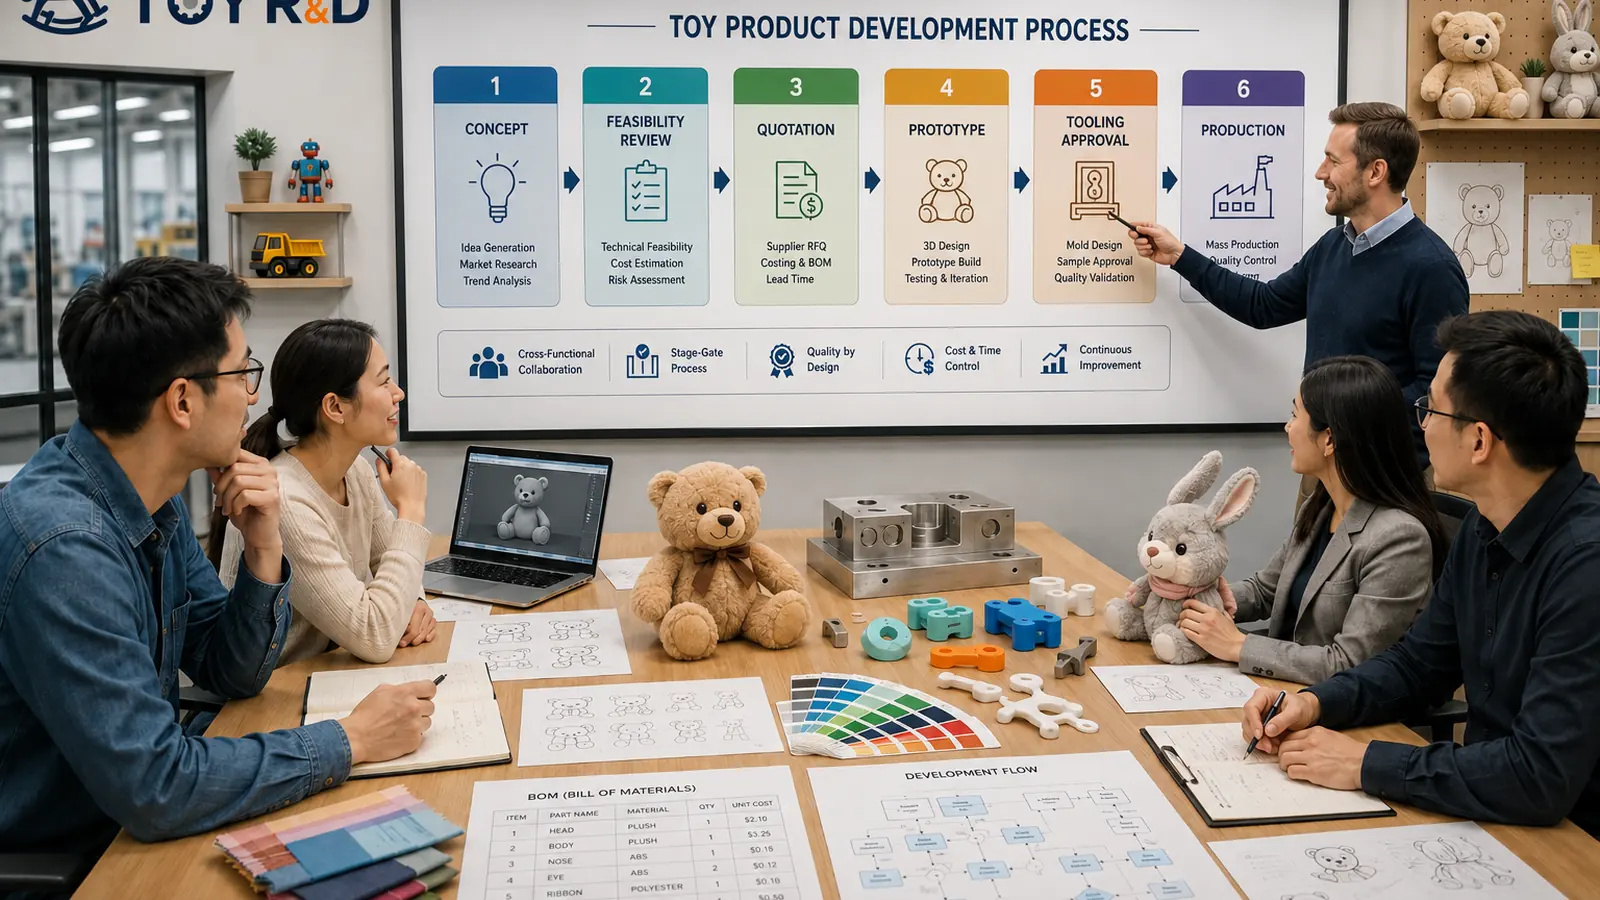
Clear approval gates turn conflicting directions into a decision the whole team can follow.
Consider a consumer-products company managed by a father and his son.
The father founded the business. He has decades of experience and is comfortable making decisions quickly based on instinct. He knows the suppliers, understands the market, and often has a strong feeling about whether a product is worth pursuing.
His son is more involved in sales, customers, pricing, and commercial planning.
One afternoon, the father looks at a new product prototype and tells the R&D team:
“This looks good. Start the tooling. We need to move quickly.”
The engineers begin preparing files for the mold supplier.
The next morning, the son hears about it and says:
“Do not start tooling yet. The customer has not confirmed the target price.”
The team stops.
A day later, the father asks why nothing has happened.
“I already approved it. Why are we still waiting?”
Now the R&D manager is stuck in the middle.
Who should the team listen to?
The father?
The son?
The latest instruction?
The person with the strongest opinion?
At first glance, this looks like a conflict between two managers.
But the deeper problem is different.
The company has never clearly defined one simple question:
What exactly must happen before a project is officially approved for tooling?
Without that definition, every project depends on interpretation.
And interpretation becomes dangerous when money, tooling, lead time, testing, and customer commitments are involved.
This is one reason I believe process becomes most valuable not when people agree, but when reasonable people disagree.
A good process does not decide who is right. It decides where the disagreement must be resolved before execution continues.
The Real Purpose of a Process: Define Who Decides What
Many companies already know *how* to develop a product.
The difficult part is defining:
Who proposes a change?
Who reviews the technical feasibility?
Who confirms the cost?
Who checks the commercial assumptions?
Who approves the investment?
Who is allowed to tell the supplier to proceed?
Without these boundaries, everyone can be involved while nobody is truly responsible.
If one of these steps is missing, the project may still move forward—but the risk moves forward with it.
Sales may assume R&D has approved the change.
R&D may assume management has approved the extra cost.
The supplier may assume the customer has already confirmed the design.
And by the time someone realizes that the decision was never formally made, samples may have been produced, tooling may have started, or delivery time may already have been affected.
That is why the most important parts of a process are often not the arrows in a flowchart.
They are the decision gates.
At ToyRD, this is the distinction I care about most: a process should be designed around decisions that change risk, cost, or reversibility—not around forms for their own sake.
Written Decisions Are More Valuable Than “Everyone Knows”
One of the most dangerous phrases inside a company is:
“Everyone should know this already.”
A reliable team should not depend on what everyone *should* remember.
Important decisions should leave a trace.
For example, this is not a useful project record:
“Change the dog ear color.”
Six months later, nobody knows:
Which version was changed?
What color was approved?
Who requested it?
Did the customer approve it?
Did the cost increase?
Did the supplier already make the sample?
A useful record would look more like this:
V3: Dog-ear color changed from Pantone A to Pantone B. Spray-painting process added. Unit cost increased by RMB 0.35. Customer confirmation received on August 26. Approved to proceed with the next sample.
Now the decision has a version, a reason, a cost impact, an approval status, and a next step.
That is what “traceable” actually means.
It does not mean creating paperwork for the sake of paperwork.
It means that months later, another engineer—or even a new employee—can understand what happened without relying on someone’s memory.
In physical product development, this matters even more because decisions often become physical objects: a sample, a mold insert, a PCB, a printed package, a certification sample, or thousands of finished units.
Once a vague instruction becomes a physical object, correcting it gets expensive.
A Process Should Reduce Communication, Not Create More of It
A visible development process makes the current stage and the next decision clear.
People often associate approval systems with bureaucracy.
That can certainly happen when a process is badly designed.
But a good process should actually reduce unnecessary communication.
Without a clear system, teams repeatedly ask questions such as:
Has the boss approved this?
Has the customer confirmed the sample?
Is this the final version?
Can we send the tooling deposit?
Who approved this cost?
Are we allowed to release the drawing to the supplier?
These questions exist because the project is sitting in an ambiguous state.
A clearer development system might use stages such as:
When the status is clear, the team does not need to keep asking what they are allowed to do next.
The process answers the question.
This is an important principle for small teams in particular. A process should not be a second job layered on top of product development. It should remove repeated clarification, reduce rework, and make the current state obvious.
The Process Did Not Eliminate Disagreement
Back to the father-and-son company.
The company eventually introduced a more structured development process.
Tooling could no longer begin simply because someone said, “Go ahead.”
Before a project entered Tooling Approved, several points had to be confirmed:
The basic structure was frozen.
The tooling quotation had been reviewed.
The expected product cost was understood.
The customer’s target price or commercial direction was clear.
The expected order quantity had been discussed.
The person with final investment authority had formally approved the tooling.
This did not mean the father and son suddenly agreed on everything.
The father could still say:
“We should move now. If we wait too long, we will miss the market.”
The son could still reply:
“The customer has not committed yet. I do not want to spend on tooling before the business case is clear.”
Both opinions could still be valid.
The important change was that their disagreement now had a place to be resolved.
Before the process, disagreement leaked directly into execution.
After the process, the discussion had to end at a defined approval point before the team moved forward.
The process did not eliminate disagreement. It stopped disagreement from leaking into execution.
That distinction matters.
In my view, this is one of the strongest reasons to formalize a workflow. The workflow is not there because managers should never change their minds. It is there so that a change of mind becomes a visible new decision instead of silently overwriting the old one.
Good R&D Processes Need Gates, Not Endless Forms
A product development process should contain a small number of meaningful gates.
The exact structure depends on the company, but a typical toy or consumer-product development workflow might include the following.
Gate 1: Is This Project Worth Developing?
Before engineering resources are committed, the team should understand the basic business case.
Questions may include:
Who is the customer?
Is this ODM, OEM, or internal development?
What is the expected order quantity?
Is this a test order or a long-term program?
What is the target price?
What development investment might be required?
Not every idea deserves the same amount of engineering time.
Gate 2: Is It Technically Feasible?
The engineering team reviews the concept.
For toys and baby products, this may involve:
Mechanical structure
Electronics
Firmware or app requirements
Battery and power design
Material selection
Safety risks
Testing requirements
Regulatory considerations
This is where an attractive concept begins to meet engineering reality.
Gate 3: Does the Cost Make Sense?
The company should understand not only the unit cost, but also the development investment.
That may include:
BOM cost
Tooling cost
Decoration processes
Packaging
Testing and certification
Sample cost
MOQ
One-time engineering expenses
A product with an acceptable unit price can still be a poor project if the tooling investment is too high for the expected order volume.
Gate 4: Are We Really Ready to Start Tooling?
This is one of the most important gates in physical product development.
Once steel is cut, flexibility decreases quickly.
Before tooling begins, the company should know:
Which design revision is being tooled?
What is still open?
Who accepted the tooling quotation?
Who accepted the commercial risk?
What happens if the customer changes direction?
I keep returning to tooling in ToyRD articles because it is such a clear example of an irreversible decision. Before tooling, uncertainty is mostly discussion, CAD, samples, and engineering time. After tooling begins, uncertainty becomes money.
Gate 5: Is the Final Sample Approved?
The sample used for production should be clearly identified.
Ideally, there should be a defined golden sample or final approved sample, together with the relevant drawings, BOM revision, artwork, firmware version, and packaging files.
“Use the latest sample” is not a system.
A production team should know exactly what “latest” means.
Gate 6: Are We Ready for Production?
Before mass production, the team should confirm that critical open issues have been closed.
Depending on the product, this might include:
Product testing
Compliance documentation
Packaging approval
Instruction manual
Labeling
Software or firmware version
Quality requirements
Production sample approval
The goal is not to create a perfect document system.
The goal is to prevent known uncertainty from quietly becoming production risk.
Different Decisions Deserve Different Levels of Approval
One mistake companies make is treating every change as equally important.
They are not.
Changing the position of a small printing graphic is not the same as modifying a PCB.
Changing a packaging sentence is not the same as opening a new mold.
Changing a decorative color is not the same as changing a safety-related structure.
A useful principle is:
Different decisions deserve different levels of approval.
Low-risk changes should move quickly.
High-cost, high-risk, or difficult-to-reverse decisions should require stronger confirmation.
This is how a process avoids becoming bureaucracy.
The process should be proportional to the risk.
The cost of the process should never exceed the risk it is trying to control.
If a ten-minute problem requires three forms and five signatures, the process itself has become waste.
Process Is Also a Boundary of Responsibility
A good workflow does more than define project stages.
It defines responsibility.
For example:
Sales owns the commercial requirement and customer communication.
R&D owns technical feasibility and engineering judgment.
Purchasing owns supplier communication, quotation, and sourcing support.
Quality or compliance owns testing and regulatory requirements.
Management owns major investment decisions.
The exact boundaries vary from company to company.
What matters is that the team knows where one person’s responsibility ends and another begins.
Without this, companies often reach the same uncomfortable situation:
Everyone was involved, but nobody was responsible.
A process is not mainly useful when something goes wrong and management wants to find someone to blame.
Its real value appears earlier.
It tells people what they are responsible for *before* the problem happens.
What I Would Actually Implement in a Small R&D Team
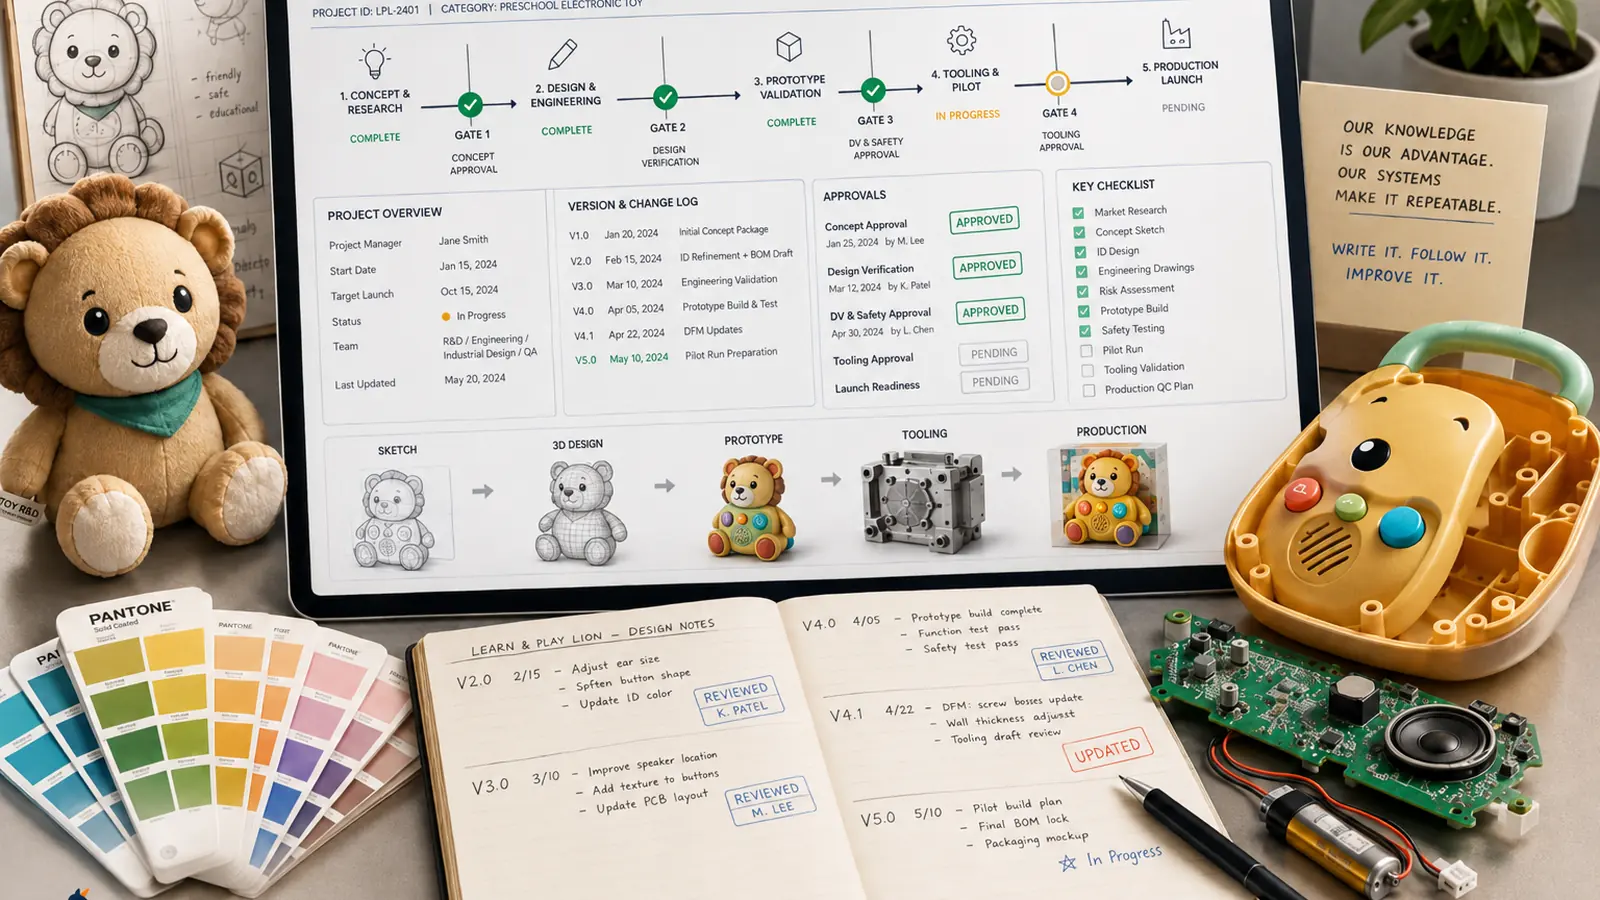
A shared record keeps revisions, approvals, and open risks visible beyond any one person’s memory.
I do not think a small product-development team needs an expensive enterprise system before it can become more disciplined.
If I were starting from a messy, mostly verbal workflow, I would begin with five very simple things.
1. A Visible Project Status
Every active project should have one clearly defined current stage.
Not “almost ready.” Not “probably waiting for the customer.”
Something explicit, such as:
Prototype Testing — Waiting for Customer Approval
2. A Short Decision Log
For every meaningful change, record:
Date
Revision
Decision
Reason
Cost or schedule impact
Approver
Next action
This can be extremely simple. The important thing is that the decision survives the conversation.
3. A Few Hard Approval Gates
Do not create twenty approval points.
Start with the decisions that can create the biggest losses if they are misunderstood:
Development investment
Tooling release
Major structural change
Final sample approval
Production release
4. One Source of Truth for Revisions
The drawing revision, BOM revision, sample status, artwork revision, and firmware version should not live in five unrelated chat histories.
The team needs one place where the current approved state is visible.
5. Escalation Rules
When two managers disagree, the R&D team should not have to guess whose instruction wins.
The system should define who has final authority for different types of decisions.
This is less glamorous than a new PLM system, but in many small teams it creates far more value.
It is also the kind of practical system I want ToyRD to keep exploring: not process for process’s sake, but small mechanisms that prevent expensive ambiguity.
The Best Process Makes the Company Less Dependent on Individuals
There is a simple test for whether a development organization is mature.
Ask what happens when a key person is absent for two weeks.
If the project stops because nobody knows:
What was approved,
Which sample is current,
Why a change was made,
What the supplier promised,
Who has authority to make the next decision,
then the company does not really have a system.
It has experienced people holding the system together in their heads.
That can work for years.
But it is fragile.
A better organization allows someone else to open the project record and understand:
1. Where the project is now. 2. What has already been decided. 3. Why those decisions were made. 4. What risks are still open. 5. Who must approve the next step.
At that point, the company begins to operate more like a machine—not because people are treated like machines, but because the system remembers the rules while people focus on judgment.
That is an important difference.
When Experience Becomes Process, It Becomes Organizational Capability
An experienced R&D manager may carry hundreds of lessons from previous projects.
They know which supplier promises are dangerous.
They know when a sample is not ready for tooling.
They know which customer changes are likely to affect certification.
They know when a quotation looks incomplete.
They know what information must be confirmed before money is committed.
If all of this knowledge remains inside one person’s head, it is personal experience.
But when those lessons are converted into:
Approval gates
Checklists
Revision logs
BOM controls
Quotation templates
Tooling approval records
Sample approval forms
Decision logs
then experience becomes a repeatable system.
And a repeatable system becomes organizational capability.
When experience becomes a process, individual knowledge becomes organizational capability.
That is the real reason an R&D team needs process.
Not because every decision should be slow.
Not because every action needs a form.
And not because management wants more control.
The goal is much simpler:
Important decisions should not disappear into conversations.
They should become visible decisions that the whole team can follow.
Why I Am Writing About This on ToyRD
ToyRD is not intended to be a collection of abstract management theory.
What interests me is the practical layer between an idea and a product that can actually be manufactured: quotations, samples, tooling, BOMs, supplier follow-up, testing, approvals, revisions, and the hundreds of small decisions that determine whether a project stays under control.
Many of these problems look trivial when described one by one.
A missing approval line. An outdated BOM. A supplier working from the wrong drawing. A manager changing direction in a chat message. A customer request that never made it into the project record.
But this is exactly where physical product development becomes difficult.
Over time, I want ToyRD to do more than write about these problems. I also want to turn some of these lessons into practical tools: tooling approval checklists, quotation review tools, BOM controls, sample approval records, costing tools, and lightweight project-development templates that small teams can actually use.
That is the ToyRD approach I want to build around:
Real product-development problems, converted into practical systems and tools.
Because the goal is not to make a company look more organized.
The goal is to make fewer expensive mistakes.
ToyRD — Practical thinking, tools, and field notes for toy and physical product development.toyrd.com